
Python 3.7 remains popular among developers for its reliability and robust feature set, even as newer versions have become available. This guide aims to provide a comprehensive walkthrough on how to install Python 3.7 on Ubuntu 22.04 Jammy Jellyfish LTS or its older stable release of Ubuntu 20.04 Focal Fossa LTS.
Key Features of Python 3.7
- Improved Performance: This version has several optimizations, including a faster hash function and efficient memory usage.
- Enhanced Syntax: Python 3.7 introduced new syntax features like underscores in numeric literals and reserved keywords such as async and await.
- Security Upgrades: The release focuses on better security measures, including removing OpenSSL dependency.
- Positional-Only Parameters: This feature allows for more expressive and readable code by defining function parameters as positional-only.
- Debugging Improvements: Custom thread-specific attributes have been specified for enhanced debugging capabilities.
- Type Hints: Python 3.7 offers improved type hinting to help developers write more maintainable and robust code.
While Python 3.7 is still widely used, it’s worth noting that newer versions offer additional features and improvements. Therefore, for new projects, the latest stable release is generally recommended. However, if you have specific needs that make Python 3.7 the right choice, this guide will detail the steps to install it on Ubuntu 22.04 Jammy Jellyfish LTS or Ubuntu 20.04 Focal Fossa LTS.
Update Ubuntu Before Python 3.7 Installation
To ensure a smooth installation of Python 3.7 and prevent any conflicts, it is highly recommended that you update your system before proceeding with the installation. Here are the steps to follow:
Open your terminal and enter the following command to update your package lists:
sudo apt updateTo upgrade any outdated packages, use the following command:
sudo apt upgradeThis will install any available updates for your system packages.
Method 1: Install Python 3.7 on Ubuntu 22.04 or 20.04 via LaunchPAD PPA
For Ubuntu users, the simplest way to install Python 3.7 is by using the “deadsnakes” team Launchpad PPA. This will provide access to the latest updates for Python and any additional required packages.
Import Python 3.7 Repository
First, you need to import the Python PPA:
sudo add-apt-repository ppa:deadsnakes/ppa -yBefore proceeding, run an APT update to ensure that the newly imported PPA is reflected.
sudo apt updateRun installation command for Python 3.7
With the 3.7 PPA imported, you can install Python by running the following command:
sudo apt install python3.7Verify the installation and build version using the following command.
python3.7 --versionIf desired, you can also install the following additional extras.
Install Additional Extras
You may also want to install additional extras for Python 3.7, such as the debug module, developer (dev) module, VENV (virtual environment) module, Distutils module, lib2to3 utility module, and DBM.GNU module, and Tkinter module. To install these extras, run the following command:
sudo apt install python3.7-dbg python3.7-dev python3.7-venv python3.7-distutils python3.7-lib2to3 python3.7-gdbm python3.7-tkAlternatively, to install all extras, run the full installation command:
sudo apt install python3.7-full
Method 2: Install Python 3.7 on Ubuntu 22.04 or 20.04 via Source
Download Python 3.7 on Ubuntu
To begin, you need to download the latest Python 3.7 from the official website. Use the following command to download the Python 3.7 archive:
wget https://www.python.org/ftp/python/3.7.16/Python-3.7.16.tar.xzAfter downloading the Python archive, extract it using the following command:
tar -xf Python-3.7.{version}.tar.xzNext, install the dependencies required to install Python 3.7:
sudo apt install build-essential zlib1g-dev libncurses5-dev libgdbm-dev libnss3-dev libssl-dev libsqlite3-dev libreadline-dev libffi-dev curl libbz2-dev pkg-config make -yGo to the directory where you extracted the Python archive:
cd Python3.7.{version}/Now, run the following command to configure the environment:
./configure --enable-optimizations --enable-sharedThe script will perform several checks to ensure that all necessary dependencies are present on your system. Running ./configure –enable-optimizations will optimize the Python binary by running multiple tests, which can make the build process slower but will result in a faster and more efficient Python installation.
After configuring the environment, it’s time to compile it using the following command:
makeTo significantly increase the compiling speed, you can use the “-j <number of CPUs>” option, which specifies the number of CPUs you want. For example, if your server has 6 CPUs, you can use all six or at least 4 to 5 to increase the speed. The command would be “make -j 6”.
make -j 6After finishing the building process, install the Python binaries by running the following command:
sudo make altinstallThe “make altinstall” command is recommended to avoid overwriting the default Python 3 binary system.
Finally, configure the dynamic linker run-time bindings by running the ldconfig command after installation:
sudo ldconfigTo confirm that Python 3.7 and the corresponding build version have been successfully installed, run the following command:
sudo python3.7 --versionInstall PIP via Python 3.7 on Ubuntu 22.04 or 20.04
To install Pip for Python 3.7, you can use the following command:
sudo apt install python3-pipIf you need to reinstall Pip manually, use the following command to download get-pip.py using the wget command:
wget https://bootstrap.pypa.io/get-pip.pyAfter downloading the file, install Pip using the following command:
python3.7 get-pip.pyIt’s recommended to check for upgrades after installation to ensure you have the latest version of Pip. Use the following command:
python3.7 -m pip install --upgrade pipYou can verify the version of Pip that is installed by running the following command:
pip3.7 --versionSwitch Default Python Versions on Ubuntu
If you require multiple versions of Python on your system and need to set a particular one as the default version, you can use the following steps to change the Python version.
First, add the symbolic links for each Python version separately, specifying the group name “python” and the version number next to the symlink. Here is an example of the commands you can use:
sudo update-alternatives --install /usr/bin/python python /usr/bin/python2.7 1
sudo update-alternatives --install /usr/bin/python python /usr/bin/python3.7 2
sudo update-alternatives --install /usr/bin/python python /usr/bin/python3.8 3
sudo update-alternatives --install /usr/bin/python python /usr/bin/python3.9 4
sudo update-alternatives --install /usr/bin/python python /usr/bin/python3.10 5
sudo update-alternatives --install /usr/bin/python python /usr/bin/python3.11 6
sudo update-alternatives --install /usr/bin/python python /usr/bin/python3.12 7
You don’t need to list all the Python versions you have installed. Copying the entire command will create symbolic links for the versions available on your system.
To view the available Python versions, use the following command:
sudo update-alternatives --config python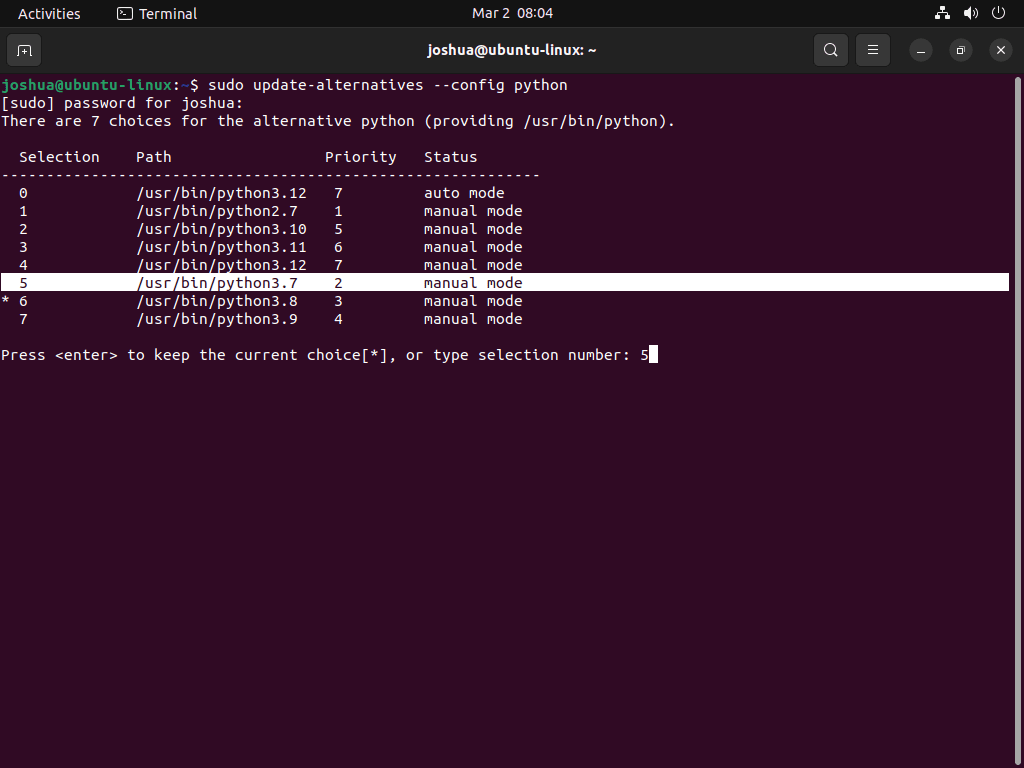
If you have multiple Python versions installed, select the one you want to set as the default version by entering its corresponding selection number. This number will vary depending on the number of versions you have installed. For example, if you want to set Python 3.7 as the default version, enter the selection number 5 from the image.
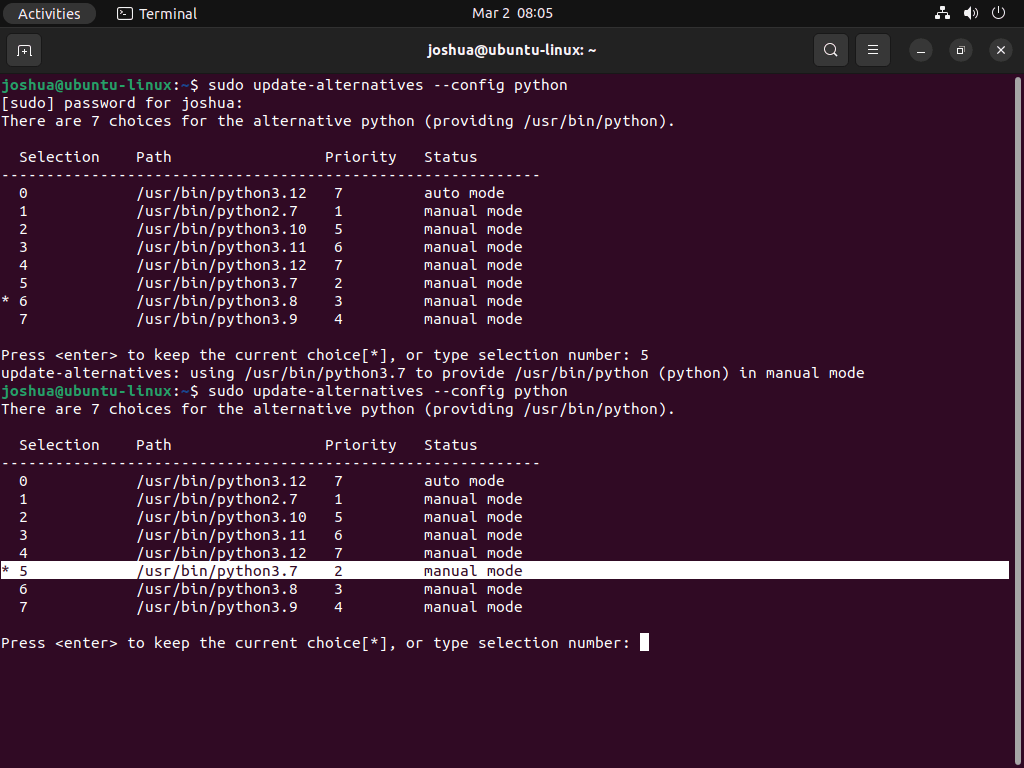
After the command runs successfully, you should see the following output:
update-alternatives: using /usr/bin/python3.7 to provide /usr/bin/python (python) in manual mode
If you list the available alternative options again, you should see that the Python version you selected is now the default version. An asterisk indicates it (*) beside the selection number.
Example:
Closing Thoughts
In conclusion, working with Python on Ubuntu Linux can be a great experience. It is essential to note that Python 3.7 is a very old release and may not receive updates or support in the future. Therefore, it is recommended that you upgrade your project to Python 3.10 or 3.11 at minimum as soon as possible to ensure compatibility and security.