

Debian is a pillar in the Linux community, renowned for its unwavering stability derived from its considered approach to software inclusion. While this ensures system reliability, it occasionally means that users might not have immediate access to the latest software versions, such as Apache HTTP Server. For those aiming to upgrade Apache on Debian 12 Bookworm, Debian 11 Bullseye, or Debian 10 Buster, understanding the nuances and benefits of using alternative repositories, like Ondřej Surý’s Debian PPA, becomes crucial.
Advantages of Upgrading Apache via Ondřej Surý’s Debian PPA:
- Latest Stable Versions: This PPA frequently offers newer stable builds of Apache than Debian’s default repositories, equipping your server with the latest enhancements, security patches, and features.
- Ensured Compatibility: Some server applications might face compatibility challenges with older Apache versions. Accessing recent versions via the PPA can mitigate such issues.
- Trustworthy Upgrades: Ondřej Surý’s PPA holds a strong reputation within the Debian ecosystem, ensuring that the packages are reliable and well-maintained.
- Prompt Security Updates: Leveraging this PPA ensures timely access to crucial security updates for Apache, fortifying your server’s defenses.
In server management, staying updated is about accessing new features and ensuring security and compatibility. The forthcoming guide will elucidate the steps to upgrade Apache on Debian 12 Bookworm, Debian 11 Bullseye, or Debian 10 Buster using Ondřej Surý’s PPA, empowering you with the insights to maintain an optimized and secure server environment.
Pre-Installation Steps Before Apache Upgrade on Debian
Step 1: Updating Debian Before Apache Upgrade
Starting with an updated Debian system before any software upgrade is crucial. Doing this ensures the existing software versions are compatible with the new Apache version. First, update your local software list to make sure your system recognizes the most recent software versions:
sudo apt updateNext, upgrade your system to run the latest software versions. This enhances system performance and security:
sudo apt upgradeStep 2: Import Apache 2 PPA on Debian
To upgrade the Apache web server to its newest version, you must integrate Ondřej Surý’s repository with your Debian system. But before doing that, you must install some necessary packages. These packages help in downloading and handling the needed keys and repositories.
Install the required packages with this command:
sudo apt install dirmngr curl ca-certificates software-properties-common apt-transport-https -yOnce installed, add Ondřej Surý’s repository. Download the setup script from the repository and execute it:
curl -sSL https://packages.sury.org/apache2/README.txt | sudo bash -xInstall or Upgrade Apache on Debian 12, 11 or 10
Step 1: Refresh APT Cache After Apache PPA Import
Once you add the Apache LaunchPAD PPA, synchronize your local package database with the server’s repositories. This ensures that your system recognizes the new repository. To do this, run:
sudo apt updateStep 2: Proceed to upgrade Apache on Debian (or install latest)
After adding the repository, you can install the latest Apache version or update the current one. Even if you already have Apache, run the installation command. This makes sure you have the latest version with all up-to-date dependencies. Install or upgrade Apache using:
sudo apt install apache2Step 3: Verify Apache Installation Source and Version
After installing Apache, check its version and installation source. The apt-cache policy command lets you see if Apache2 comes from Ondřej Surý’s repository. To check, run:
apt-cache policy apache2Please be aware that at the moment this guide was published, Debian 12 (Bookworm) users may not see an updated version, as the distribution was recently released. However, by importing the repository now, you’ll be primed to receive the newer version as soon as it’s released.
Verify Apache Status (Confirm Upgrade) on Debian
Before checking the Apache status, ensure you’ve upgraded and configured it correctly. The systemctl command helps you determine the Apache status and ensures it operates as expected.
To check the status of Apache, run:
systemctl status apache2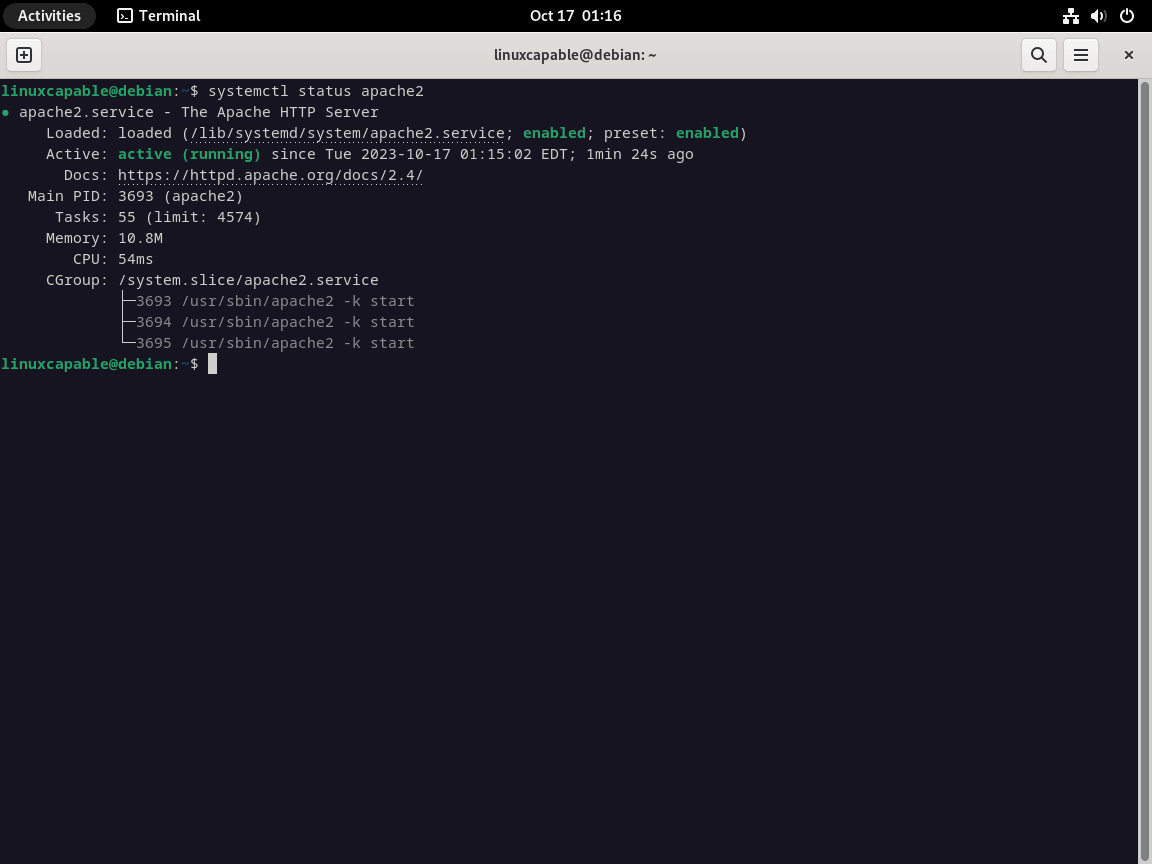
If Apache isn’t running, start the web server with:
sudo systemctl start apache2To set Apache to start when the system boots, execute automatically:
sudo systemctl enable apache2Configure UWF For Apache on Debian (Optional)
After installing or upgrading Apache on your Debian system, it’s essential to take a few more steps to ensure it operates efficiently and securely. This section will guide you through the process of configuring the firewall, updating the system, and how to revert changes if necessary.
Configuring UFW Firewall for Apache
When operating a web server, security should be a top priority. One crucial security layer involves setting up your firewall correctly. If you use UFW (Uncomplicated Firewall), you must adjust the firewall rules to let external users access the default web ports after installing or upgrading Apache. Doing this ensures that users can access your web server.
During Apache’s installation, Apache automatically registers with UFW, providing several profiles for easy setup. But if you don’t have UFW on your system yet, you can install it with this command:
sudo apt install ufwAfter installation, activate UFW and set it to start when the system boots:
sudo ufw enableTo see the Apache profiles available in UFW, use:
sudo ufw app listUsually, you’ll see three profiles: Apache, Apache Full, and Apache Secure. The “Apache” profile permits HTTP traffic on port 80, “Apache Secure” opens up HTTPS traffic on port 443, and “Apache Full” allows both.
For this guide, we’ll assume you haven’t configured SSL. Therefore, activate the Apache profile with:
sudo ufw allow 'Apache'This command will establish rules for both IPV4 and IPV6 traffic. If you need to change this setting, you can easily disable the Apache profile and turn on either the Apache Full or Apache Secure profiles.
Additional Commands for Apache PPA Upgrade on Debian
Update Apache
It’s essential to update your Apache server regularly. Debian’s APT package manager simplifies this process. First, refresh the local software package list:
sudo apt updateIf Apache updates are available, apply them:
sudo apt upgrade apache2Updating ensures your Apache server remains secure and includes the latest features.
Remove Apache Upgrade From PPA on Debian
If you want to undo an Apache upgrade and revert to Debian’s default version, follow these steps.
First, stop the Apache service:
sudo systemctl stop apache2Then, remove the upgraded Apache:
sudo apt remove apache2If you added a PPA for the Apache upgrade, delete it:
/etc/apt/sources.list.d/apache2.listNow, refresh the package list to recognize these changes:
sudo apt updateYou’re set to reinstall Debian’s standard Apache version.
Recap: Upgrading Apache on Debian
In this guide, we walked through the key steps to install and upgrade Apache on a Debian Linux system. Before starting the installation, it’s crucial to update your system. This ensures you avoid any potential conflicts. We then discussed importing the Apache LaunchPAD PPA, followed by the actual installation of Apache.
After installing, we emphasized essential post-installation tasks. These tasks include configuring the UFW Firewall for Apache and updating the server. If the new version doesn’t fit your requirements, you can revert to the standard Debian version. This guide provides a clear path to maintaining an updated, secure, high-performing Apache server on Debian.