

This guide will demonstrate how to install OpenJDK 8 on Ubuntu 24.04, 22.04, or 20.04 LTS Linux releases utilizing the command-line terminal with the APT Package Manager.
OpenJDK 8, a widely adopted open-source implementation of the Java Platform Standard Edition, remains a cornerstone in the development of Java applications despite the emergence of newer versions. Its enduring relevance is anchored in its robustness, comprehensive feature set, and compatibility with a vast array of Java applications. Notably, OpenJDK 8 benefits from ongoing support and updates, ensuring its viability and security for development projects. This version is distinguished by its inclusion of essential tools and libraries that support the creation of sophisticated software solutions. The commitment to maintaining OpenJDK 8 is evident, with support extended until at least May 2026, providing a stable foundation for both current and future Java-based projects.
Key Highlights of OpenJDK 8:
- Long-term Support: Extended until May 2026, ensuring reliability and stability.
- Comprehensive Toolset: Includes the Java Runtime Environment (JRE) and the Java Development Kit (JDK) for development and deployment.
- Cross-Platform Compatibility: Facilitates the development of applications across different environments.
- Performance Enhancements: Optimizations for faster execution and reduced resource consumption.
- Advanced Security Features: Regular updates to address security vulnerabilities and threats.
- Rich API Library: Offers a broad range of functionalities to simplify application development.
- Community-Driven Updates: Benefits from contributions and oversight by a vibrant open-source community.
- Environmental Adaptability: Designed to run efficiently on a variety of hardware configurations, from personal computers to large-scale servers.
Understanding the technical capabilities and the extended support timeframe of OpenJDK 8 is crucial for developers and organizations relying on Java for their applications.
Let’s dive into the installation process.
Install OpenJDK 8 on Ubuntu
Update Ubuntu System Packages Before OpenJDK 8 Installation
Before embarking on the installation of OpenJDK 8, it is paramount that your Ubuntu system is up-to-date. This is a recommended and vital step, as it helps avoid any conflicts or potential errors during installation. Updating ensures that you have the latest security patches, bug fixes, and software improvements for the packages installed on your system.
To update your Ubuntu packages, execute the following command in the terminal:
sudo apt update && sudo apt upgradeHere’s a breakdown of what this command does:
sudoensures you are running the command with superuser privileges.apt updateupdates your local package index to have the latest metadata about the packages that can be installed.- The
&&operator allows the execution of two commands sequentially. apt upgradeis invoked next, which will upgrade all the upgradable packages on your Ubuntu system.
Once you’ve successfully executed this command, your Ubuntu system should be up-to-date and prepared for the OpenJDK 8 installation.
Verify Availability of OpenJDK 8 Packages
Before proceeding with the installation, verifying the availability of OpenJDK 8 packages is crucial. Generally, the default Ubuntu repository is a reliable source for the OpenJDK installation. However, we need to confirm its presence first.
In your terminal, use the following command to find the availability of OpenJDK 8 packages:
apt-cache search openjdk-8 | grep openjdk-8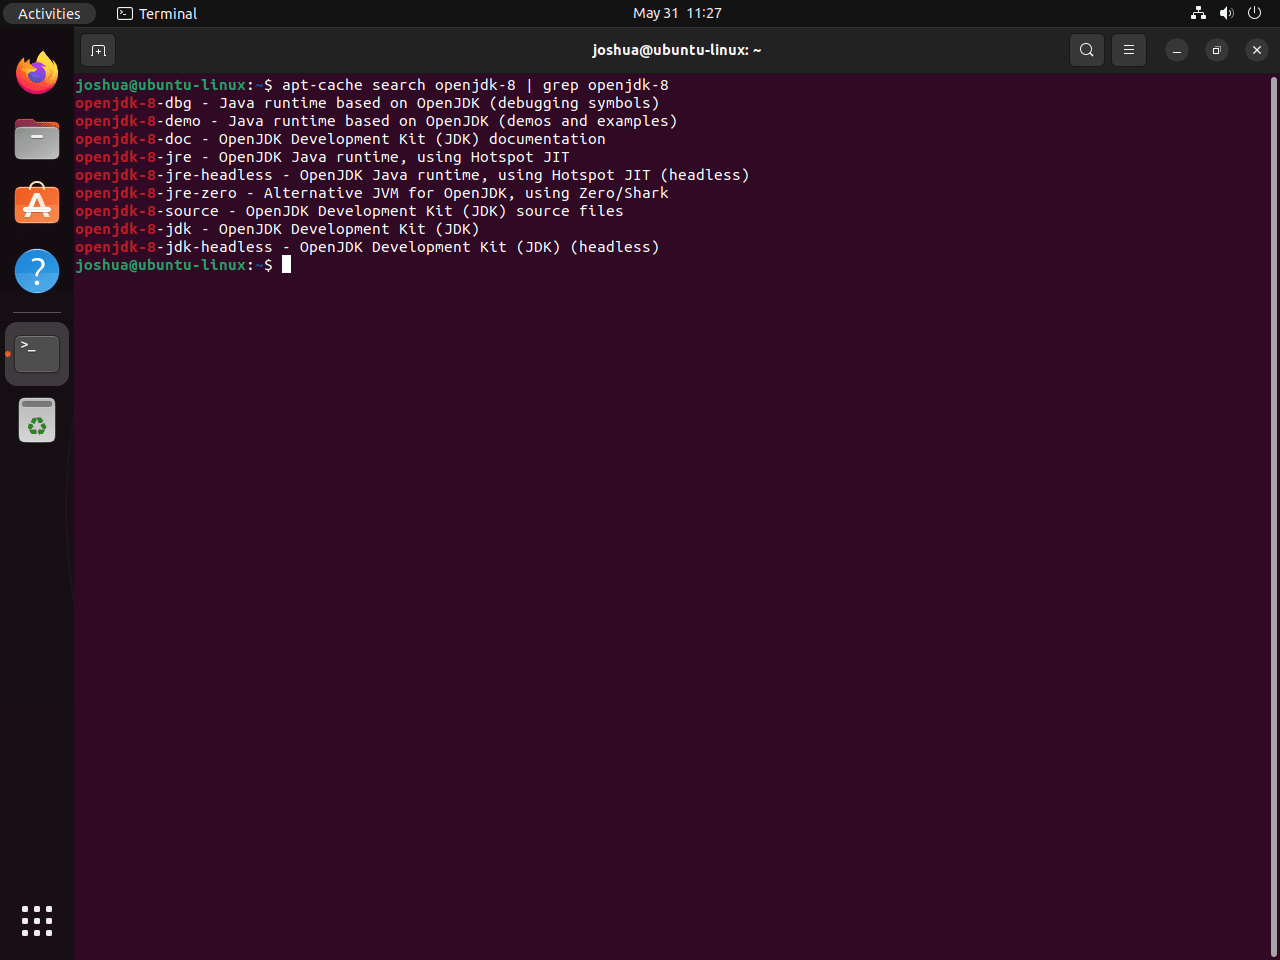
Let’s understand the components of this command:
apt-cache search openjdk-8: This queries the package database for all packages related to ‘openjdk-8’.|: This is the pipe operator. It takes the output from the preceding command and sends it as input to the following command.grep openjdk-8: This filters the output from the ‘apt-cache search’ command to only display lines that contain ‘openjdk-8’.
Install OpenJDK 8 JDK and JRE
With the availability of the OpenJDK 8 packages confirmed, you can now proceed to install them. The following terminal commands will install both the Java Runtime Environment (JRE) and the Java Development Kit (JDK).
To install the OpenJDK 8 JRE, use:
sudo apt install openjdk-8-jre -yFor the OpenJDK 8 JDK, use:
sudo apt install openjdk-8-jdk -yThe -y flag in these commands automatically answers ‘yes’ to the prompts, facilitating a hassle-free installation.
After installation, updates to these packages can be performed using standard apt update and apt upgrade commands.
Switch Between Different Java Versions on Ubuntu
Check Current Java Version
Once OpenJDK 8 is successfully installed on your Ubuntu system, there might be a situation where the java --version command returns a version other than the one you just installed. This is likely because your system already has a newer version of Java installed, which takes precedence.
When running the command java --version, you should see a description of the Java version that’s currently active on your system. By default, your system’s most recent version of Java is set as the active version.
Here’s how to check the active version:
java --versionFor example, if OpenJDK 17 is the latest version installed on your machine, it will be displayed as the active version, even if OpenJDK 8 was installed afterward.
List All Available Java Versions
If you need to switch between different installed Java versions, Ubuntu provides the update-alternatives command for this purpose. This tool is designed to maintain symbolic links determining default commands. In the case of Java, you can use it to manage which version of Java your system uses by default.
Let’s list all the Java versions installed on your system:
sudo update-alternatives --config javaExecuting this command will present you with a list of all Java versions currently installed on your Ubuntu system. Each version is assigned a priority number, with the version with the highest number set as the default.
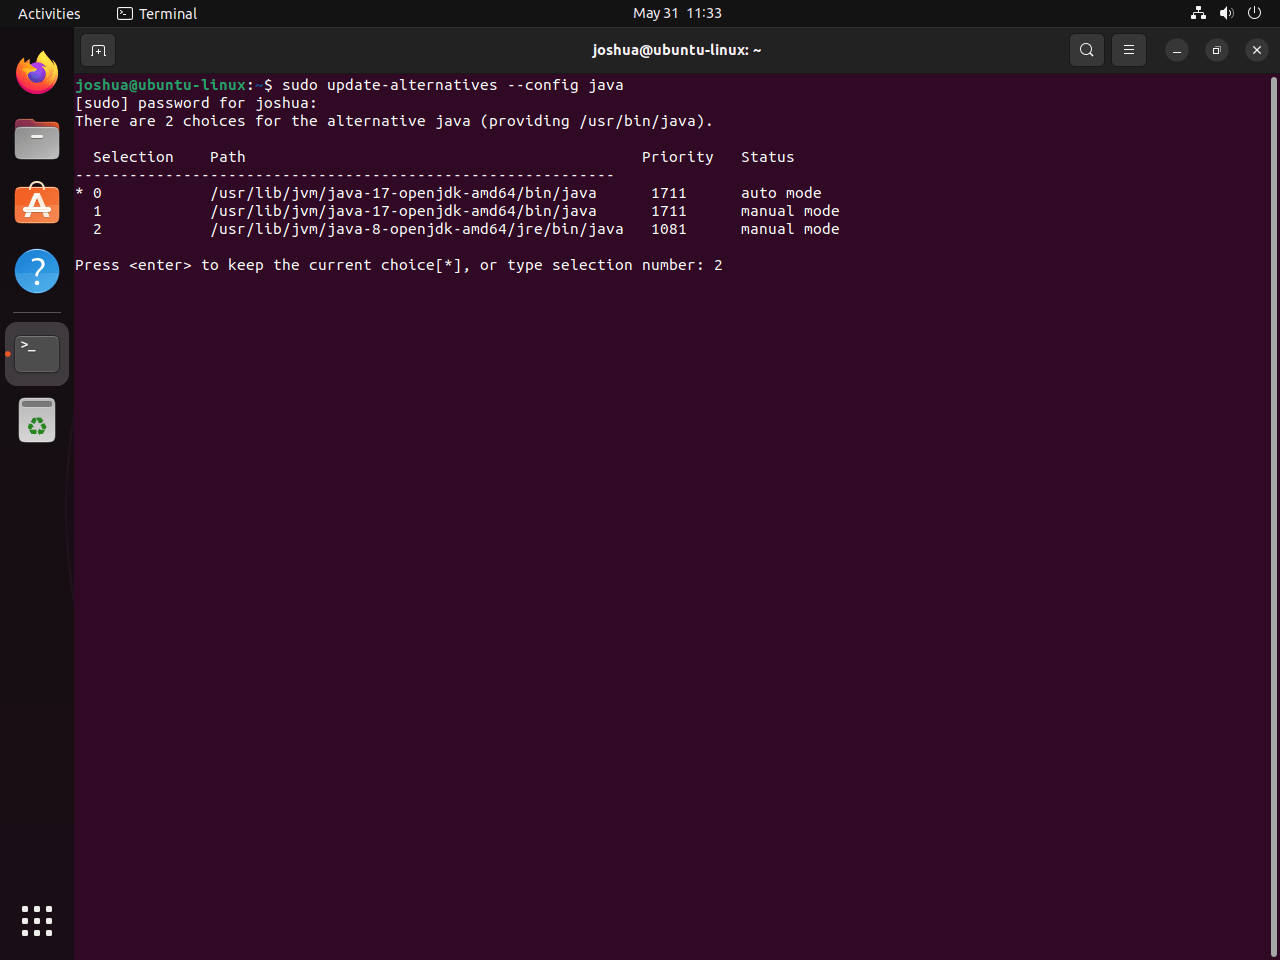
Switch to OpenJDK 8 on Ubuntu
Now that you have a clear understanding of what versions of Java are available on your system, you can choose to switch to any version that fits your requirements. If you want to switch to OpenJDK 8, you can do so using the update-alternatives command again.
Test Java With a ‘Hello World’ Application on Ubuntu
One of the fundamental steps post any software installation is to verify its successful implementation. With the installation and setup of OpenJDK 8 now complete, let’s create a simple ‘Hello World’ application. This will serve as a practical test and confirmation that Java is functioning as expected on your system.
Create Java File
Let’s start by creating a new Java program file. Open your terminal and use the following command:
nano hello.javaThis command instructs the nano text editor to create a new file named ‘hello.java’.
Add Java Code
Inside the ‘hello.java’ file, let’s add a simple Java program. The program will output a message to your console when it’s run. Insert the following code into your ‘hello.java’ file:
public class hello {
  public static void main(String[] args) {
    System.out.println("hi from LinuxCapable!");
  }
}
To save your work in the nano editor, use the keyboard combination CTRL+O, followed by CTRL+X to exit.
Compile Java Code
With our Java program written, it’s time to compile the code. Compiling translates our source code into bytecode, which the Java Virtual Machine (JVM) can then execute.
Run the following command to compile your Java program:
javac hello.javaIf you encounter any issues with compiling, there could be a version mismatch. In that case, specify the release version with the --release flag. Here’s how to do it for OpenJDK 8:
javac --release 8 hello.javaRunn Java Code Test Hello Application
Once the code has been successfully compiled, you can run your Java program. Do this with the java command, followed by the name of the class you want to run (without the ‘.java’ extension).
Run your ‘Hello World’ program with the following command:
java helloExample output:
Hi from LinuxCapable!
Managing OpenJDK 8 on Ubuntu
Over the course of using OpenJDK 8, there may come a time when you wish to uninstall it from your system. This section will discuss how you can easily remove OpenJDK 8 from your Ubuntu system, including both the Java Runtime Environment (JRE) and the Java Development Kit (JDK).
Remove OpenJDK 8 JDK and JRE
Run the following command in your terminal to remove both the OpenJDK 8 JRE and JDK, along with any related dependencies:
sudo apt remove openjdk-8-jre openjdk-8-jdkModify the command to suit your installed packages.
Conclusion
In this guide, we walked through the straightforward steps to install OpenJDK 8 on Ubuntu versions 24.04, 22.04, and 20.04 LTS using the command-line terminal. It’s a solid choice for those sticking with a trusted Java version for their development projects. Remember, with OpenJDK 8’s support running until 2026, you’re covered for a while. Just make sure to keep it updated for security and performance. As a final tip, always test your Java applications after any system updates to avoid surprises. There you have it, a simple wrap-up to get you coding without delay. Happy developing!