

This guide will demonstrate the installation process of novelWriter on Ubuntu 24.04, 22.04, or 20.04 LTS Linux releases. It offers two methods for this purpose: utilizing a LaunchPAD PPA maintained by Veronica Berglyd Olsen.
novelWriter is a markdown-based writing tool designed specifically for novelists, providing an efficient and streamlined environment for crafting your narratives. Its core lies in its simplicity and focus on helping writers organize their thoughts and manuscripts. Notably, novelWriter stands out for its:
- Markdown Formatting: Simplifies text formatting and structuring, allowing writers to focus on content rather than presentation.
- Project Management: Organizes chapters, scenes, and notes within a single project file for easy navigation and editing.
- Focus Mode: Offers a distraction-free writing mode to enhance concentration.
- Document Statistics: Tracks word counts and progress, essential for meeting writing goals.
- Customizable Themes: Supports light and dark themes to suit user preferences and reduce eye strain.
- Cross-Platform Compatibility: Works seamlessly across different operating systems, ensuring accessibility for all users.
- Export Options: Allows for exporting manuscripts to various formats, facilitating sharing and publishing.
- Open Source: Offers the flexibility and security of open-source software, encouraging community contributions and enhancements.
novelWriter is tailored for writers seeking a minimalist yet powerful tool to bring their stories to life. Its emphasis on organization and efficiency without the clutter of unnecessary features makes it an ideal choice for novelists who cherish simplicity and focus.
Now, let’s move on to the installation process.
Install novelWriter on Ubuntu via APT PPA
Updating Your Ubuntu System Before novelWriter Installation
Before proceeding with the novelWriter installation, it’s essential to ensure your Ubuntu system is updated. Updating your system syncs all existing packages to their latest versions, reducing the possibility of software conflicts.
In your terminal, run the following command:
sudo apt update
sudo apt upgrade
In the commands above, ‘sudo’ allows you to perform tasks that require administrative permissions. ‘apt’ is Ubuntu’s package handling utility, ‘update’ refreshes the list of packages, and ‘upgrade’ updates all currently installed software packages to their newest versions.
Importing novelWriter’s Personal Package Archive (PPA)
The recommended method to install novelWriter in Ubuntu is via its PPA, which is maintained by Veronica Berglyd Olsen. You have the option to choose between two versions of this PPA – the stable version and the pre-release version.
Note: The stable PPA has the latest stable release of novelWriter, while the pre-release PPA offers the most recent features, albeit potentially unstable. Note that if you add both repositories, Ubuntu will default to the one with the most recent novelWriter version, usually the pre-release version.
sudo add-apt-repository ppa:vkbo/novelwriter -ysudo add-apt-repository ppa:vkbo/novelwriter-pre -yIn the above commands, ‘add-apt-repository’ is a script that adds an external APT repository to your sources list, while the ‘-y’ flag is used to automatically confirm all prompts.
Refresh APT Package List After PPA Import
Once the novelWriter PPA is added to your Ubuntu system, you should update your APT package list. This will notify the system of the new packages available in the PPA. You can do this with the following command:
sudo apt updateThis command fetches package information from all configured sources, including the newly added novelWriter PPA.
Install novelWriter on Ubuntu via APT Command
Now that your system is updated and the novelWriter PPA has been added, you can proceed to install the novelWriter software. This can be done using the ‘install’ command in conjunction with Ubuntu’s package handling utility, ‘apt’.
Use the following command to download and install novelWriter:
sudo apt install novelwriterThis command instructs the system to download and install novelWriter on your Ubuntu system.
Launching novelWriter on Ubuntu via CLI Commands or GUI Path
Upon successfully installing novelWriter on your Ubuntu system, the next step is to launch the application. You can accomplish this in several ways depending on your preference or specific requirements.
Launching novelWriter from the Command Line
One method to start using novelWriter is by executing a command in the terminal. This approach might appeal to those who are comfortable with command-line interfaces or those who need to launch the application programmatically
Here’s the command to start novelWriter:
novelwriterIn the command above, novelwriter is the name of the executable that starts the application. When you run this command, your system looks for an executable with this name in the directories listed in your PATH environment variable, and when found, it executes the file, thus starting the novelWriter application.
Launching novelWriter from the Graphical User Interface
For desktop users who prefer using graphical interfaces, novelWriter can also be launched using its application icon. This method doesn’t require opening a terminal or writing any command. Instead, you navigate through the system’s graphical interface to find and launch the application. Here are the steps to follow:
- Navigate to
Activities. - Proceed to
Show Applications. - Look for
novelWriter.
In the steps above, Activities and Show Applications are graphical elements in the Ubuntu desktop environment that help you find and start applications. The final step is to locate novelWriter among the list of applications and click on its icon to launch it.
First-time novelWriter Project Novel Setup on Ubuntu
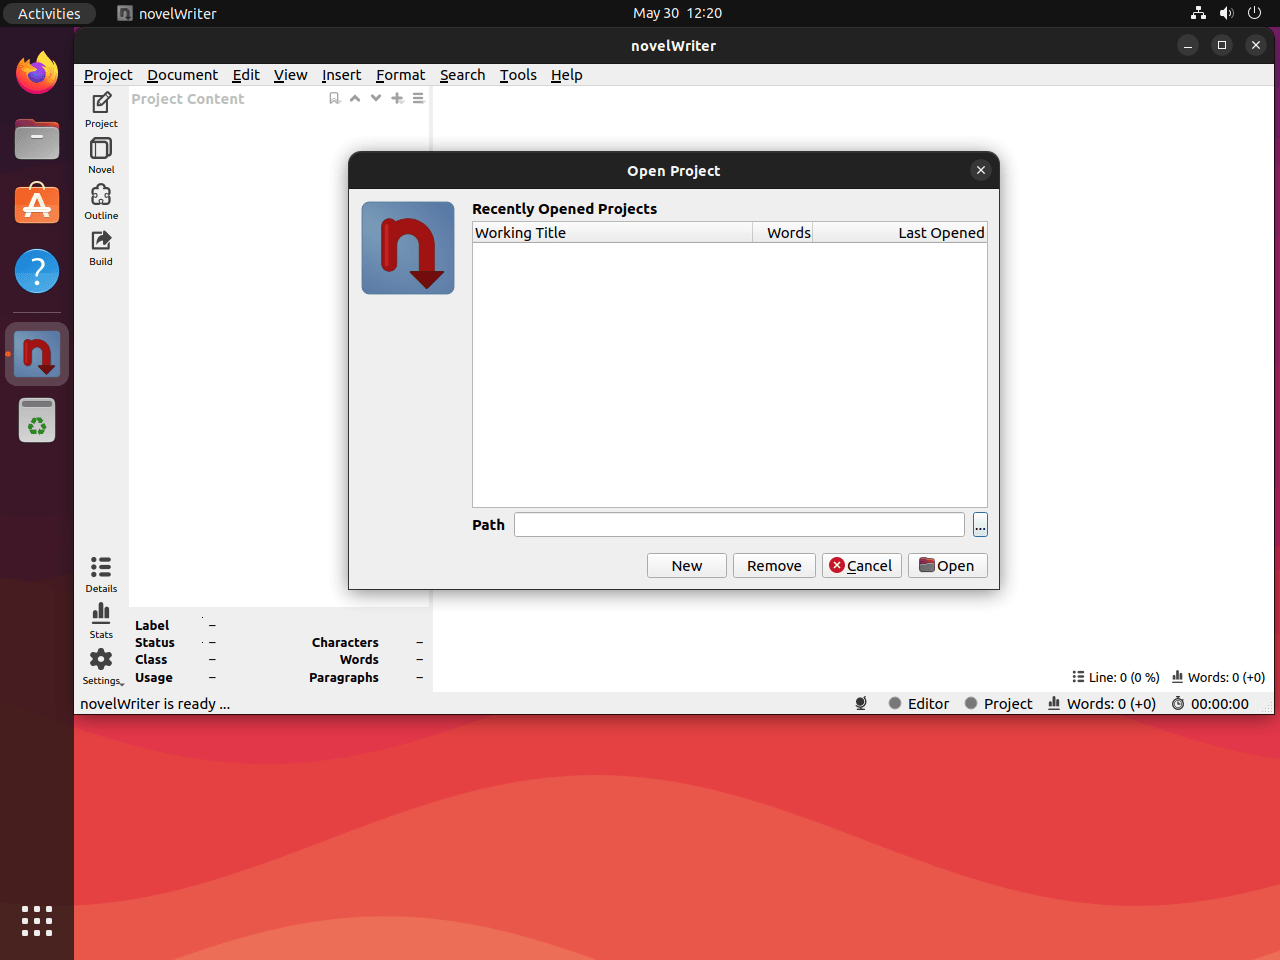
Setting up novelWriter for the first time requires some guidance. Upon launching the application, you are greeted with the “Open Project” screen that is essentially your project management dashboard. Since this is a fresh installation, you likely have no projects yet. So, let’s walk through the process of creating your first project.
Initiating a New Project with novelWriter
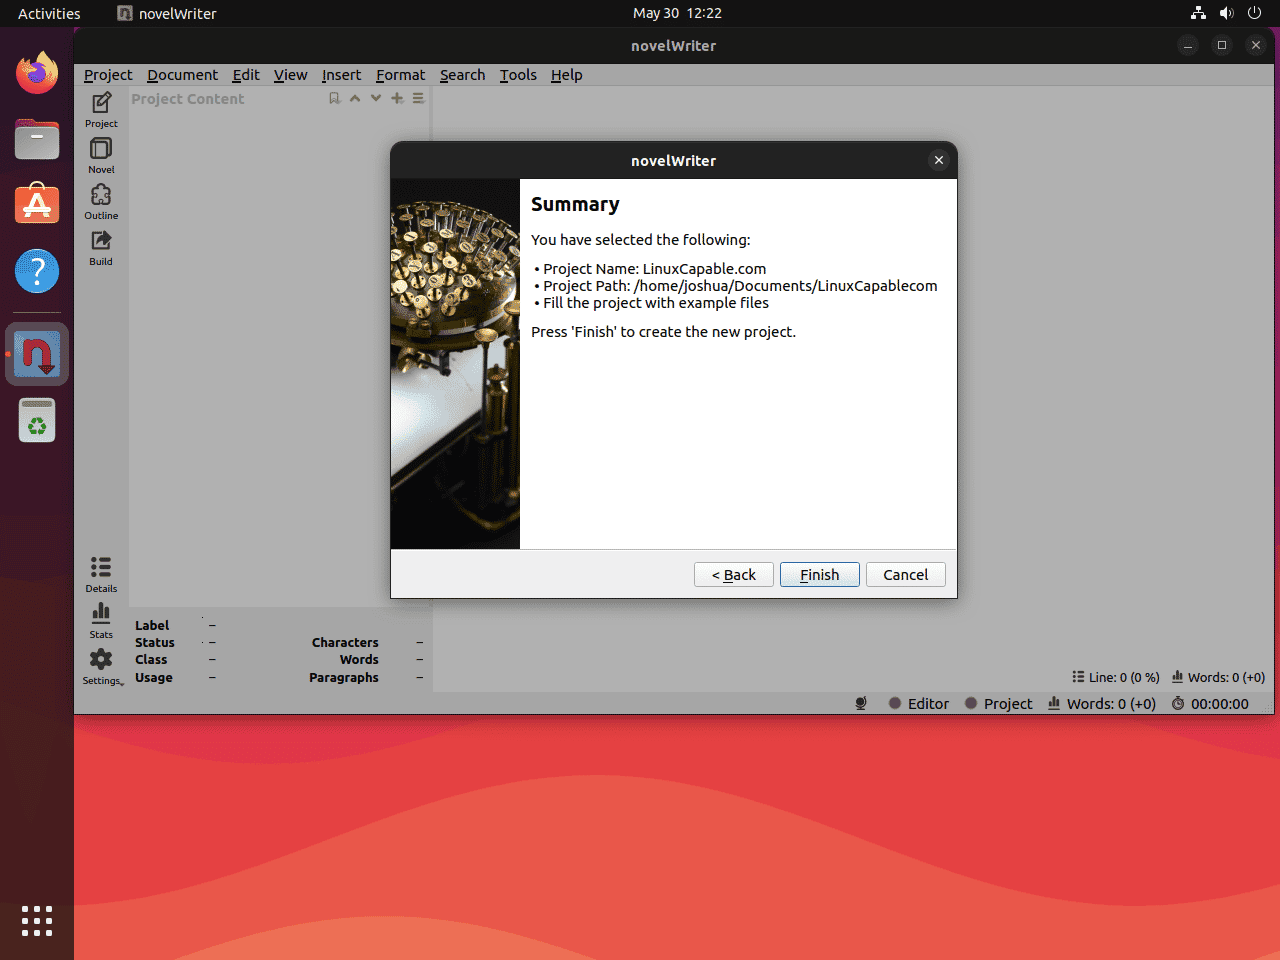
In the “Open Project” screen, initiate the creation of a new project by clicking on the New button. This action directs you to the “Create New Project” tab.
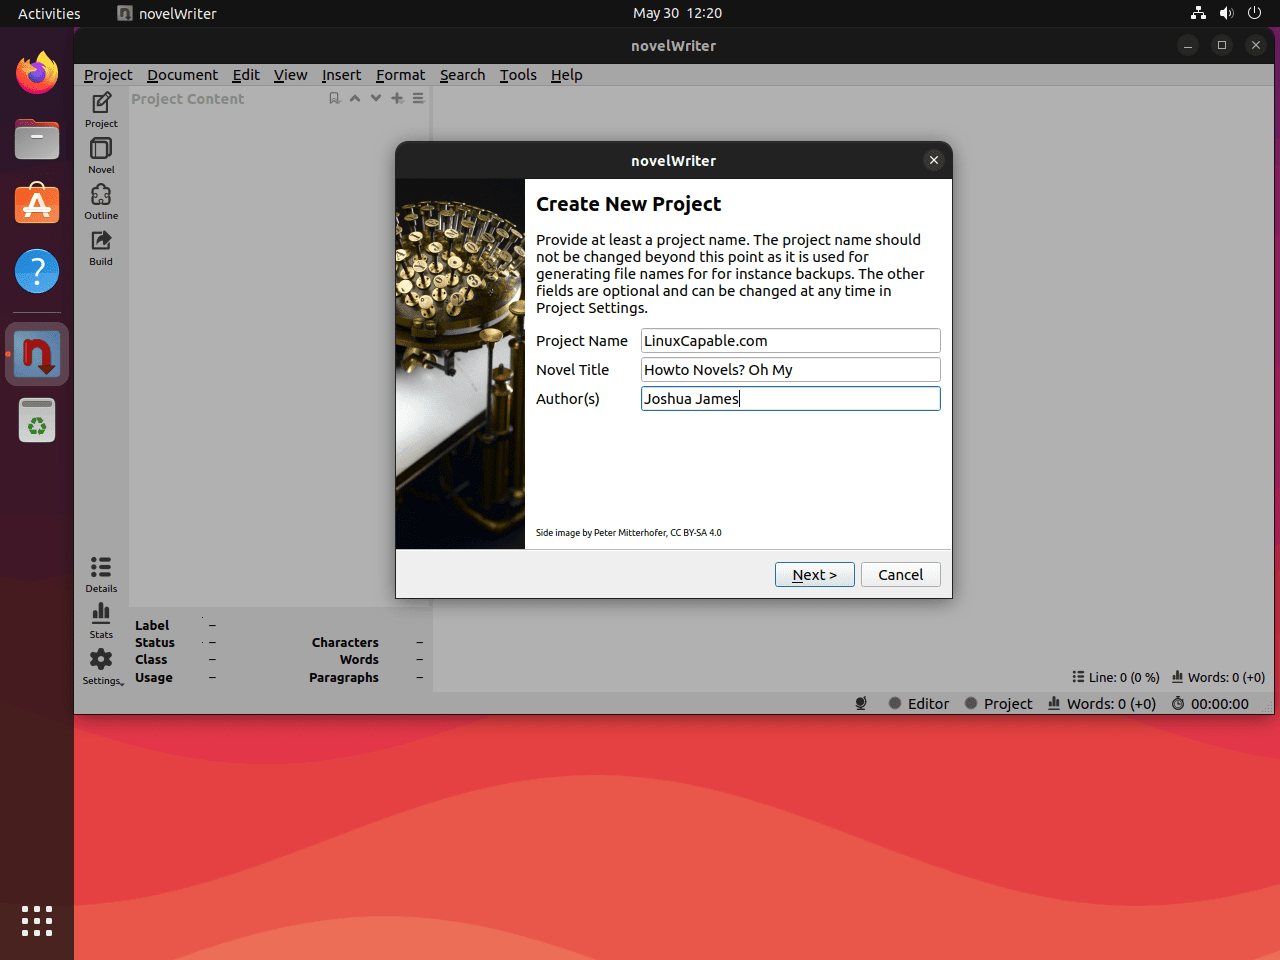
Filling in Project Details with novelWriter
In the “Create New Project” tab, you’ll see a few fields that you need to fill out. These include the project name, the novel title, and the author’s name. As indicated, the fields are quite straightforward, but they’re essential as they define your project’s identity. After filling out these details, proceed by clicking on the Next button.
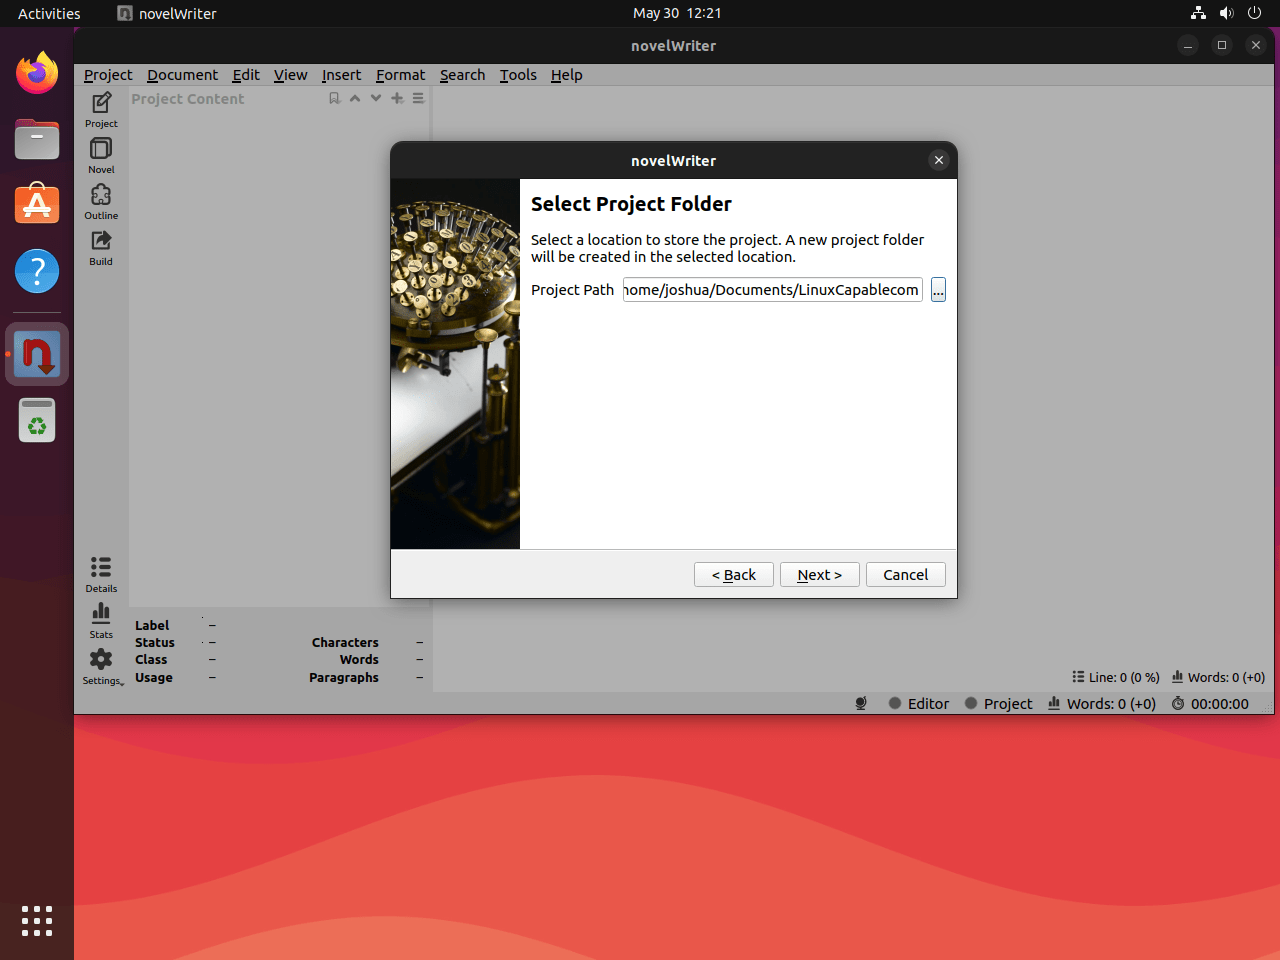
Choosing the Project Path with novelWriter
The following tab prompts you to select the “Project Path.” This step is critical as it defines where on your system your novel project files will be saved. You might want to choose a location that’s easy for you to access and, preferably, one that you can back up to a cloud storage network. This backup option ensures that your work is safe even if your local copy is lost. You can even use services like Github, depending on your project’s size. After choosing a suitable location for your novel project, click on the Next button to proceed.
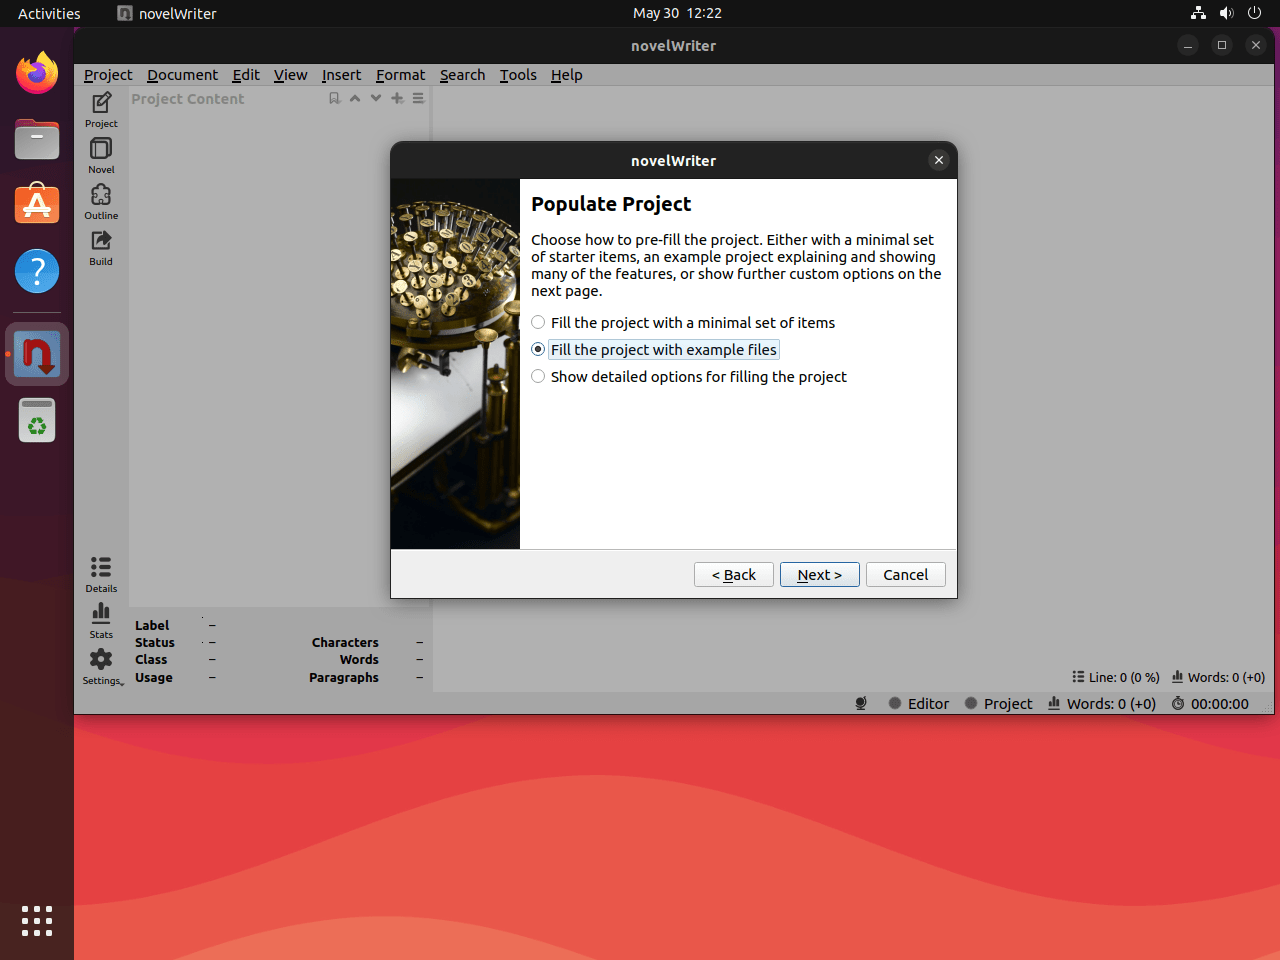
Setting Up the Project Template with novelWriter
Finally, you’ll land on the novel project template page. This interface offers you customization options for your novel layout, user interface, and more. It provides a pre-filled novel layout by default that you can modify according to your preferences.
These steps should help you get started with novelWriter, allowing you to set up your first project comfortably. Now, you’re ready to let your creativity flow and start crafting your novel!
First-Time Tips novelWriter on Ubuntu
Now that novelWriter has been seamlessly integrated into your Ubuntu environment, embarking on your literary project comes with a blend of excitement and the potential for enhanced productivity. To ensure a smooth initiation and make the most of novelWriter’s capabilities, here are several curated tips to elevate your writing journey:
Optimizing Your Workspace
- Adjust the Theme: novelWriter supports both light and dark themes to match your preference or working hours. Navigate to the settings menu to select the theme that best suits your visual comfort.
- Customize the Editor: Tailor the editor’s appearance by adjusting font type, size, and color through the settings. This customization can significantly reduce eye strain and improve focus during long writing sessions.
- Utilize the Focus Mode: Activate focus mode to hide other panels and distractions, centering your text for a more concentrated writing experience.
- Organize with Tags and Keywords: Make extensive use of tags and keywords to categorize notes, chapters, and scenes. This facilitates easier navigation and retrieval of content.
Project Management Essentials
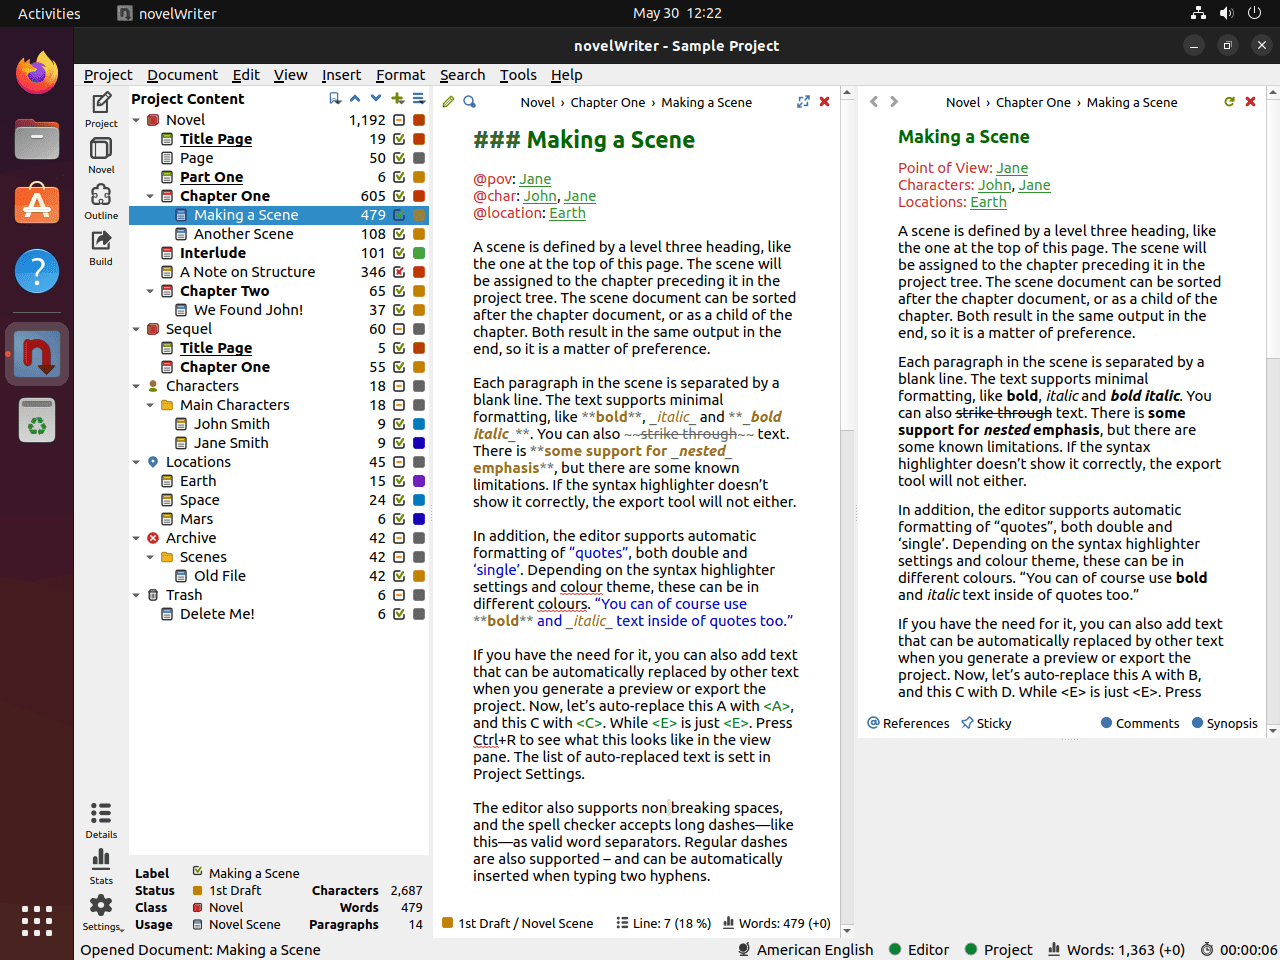
- Use the Project Tree: Familiarize yourself with the project tree for efficient navigation through chapters, scenes, and notes. It’s an invaluable tool for managing large manuscripts.
- Leverage Document Notes: Each document within novelWriter allows for separate notes. Utilize this feature to jot down ideas, research, or character development notes related to specific sections of your work.
- Backup Your Work: Regularly back up your project files. novelWriter projects are saved in plain text files, which can be easily copied or synced to cloud storage services.
- Set Writing Goals: Use novelWriter’s statistics feature to set daily or weekly word count goals. Monitoring progress can be highly motivating and help maintain a consistent writing habit.
Mastering Markdown
- Learn Markdown Syntax: novelWriter utilizes markdown for formatting. Spend some time learning the basics of markdown syntax to streamline your writing and formatting process.
- Use Markdown for Quick Formatting: Embrace markdown for efficient text formatting, such as italics, bold, headings, and lists, without leaving the keyboard.
- Preview Your Work: Regularly preview your work to see how your markdown formatting translates into the final document layout, ensuring your manuscript looks as intended.
Keyboard Shortcuts for Efficiency
- Navigation Shortcuts: Learn and use keyboard shortcuts for quickly navigating between files and sections within your project, such as
Ctrl+Tabfor switching documents. - Formatting Shortcuts: Familiarize yourself with shortcuts for markdown formatting, like
Ctrl+Bfor bold andCtrl+Ifor italics, to streamline the editing process. - Quick Search: Use
Ctrl+Fto quickly find text within the current document orCtrl+Shift+Ffor searching across the entire project. - Access Settings Quickly:
Ctrl+,allows immediate access to the settings menu, where you can adjust your workspace and preferences with ease.
Customizations and Tweaks
- Modify the Writing Environment: Explore the settings to adjust the writing environment to your liking, including window size, pane layout, and document view options.
- Adjust Auto-Save Intervals: Set the auto-save interval to a frequency that suits your writing pace, ensuring that your work is regularly saved without interrupting your flow.
- Experiment with Plugins: While novelWriter is designed to be lightweight, there are plugins available that can add useful functionality without overwhelming the user interface.
- Tailor Notifications: Adjust the notification settings to get alerts for goals reached or reminders to take breaks, which can help manage writing sessions effectively.
Engaging with these tips not only familiarizes you with novelWriter’s functionalities but also enhances your writing efficiency and comfort. As you delve into your project, remember that the tool is designed to adapt to your workflow, allowing you to focus on bringing your narratives to life.
Managing novelWriter on Ubuntu
This section will delve into important aspects of managing your novelWriter application on Ubuntu Linux. Specifically, we’ll cover how to update the software and remove it if necessary.
Update novelWriter
To check for and install updates for novelWriter, utilize the command line terminal on your Ubuntu Linux system. Below is the command you should use:
sudo apt upgrade && sudo apt upgradeThis command does more than just update novelWriter. It ensures all the packages that use the APT package manager, including your system packages, are kept up-to-date.
Remove novelWriter
In case you no longer need novelWriter, you can remove it from your Ubuntu Linux system. Use the following command to uninstall novelWriter:
sudo apt remove novelwriterRemove novelWriter’s PPAs
After uninstalling novelWriter, you might want to remove the corresponding PPAs (Personal Package Archives) if you are not planning on using the software again. The removal of PPAs ensures that your system’s package list remains clean, and it can also help to reduce the time required for system updates.
If you added the stable PPA when installing novelWriter, remove it with this command:
sudo add-apt-repository --remove ppa:vkbo/novelwriter -yIf you added the pre-release PPA, use this command to remove it:
sudo add-apt-repository --remove ppa:vkbo/novelwriter-pre -yThese steps will ensure that novelWriter is completely removed from your system, including the repositories used for its updates.
Closing Thoughts
Looking back, we’ve walked through the steps of setting up novelWriter on Ubuntu 24.04, 22.04, or 20.04 LTS, from installation methods to diving into first-time user tips. We covered everything from choosing the right installation method via a LaunchPAD PPA or Flatpak to optimizing your novelWriter setup for a smoother writing journey. Our discussion aimed to empower you with the knowledge to get novelWriter up and running and use it effectively, enhancing your writing process. This guide has been about making your entry into novelWriter as seamless as possible, ensuring you’re ready to start your next big writing project on Ubuntu confidently.