
MySQL, an open-source relational database management system, has been pivotal in web development and server management for over two decades. Introduced in 1995, its ability to efficiently manage vast data amounts positions it as a favored selection for businesses globally. For those aiming to install MySQL 8.0 on Rocky Linux 9 or the older stable enterprise Linux release of Rocky Linux 8, this database system, with its compatibility and robust security features, is an exemplary choice.
Features of MySQL:
- Relational database management system
- Open-source nature
- Dominant presence in web development and server operations
- Capability to handle large data volumes
- Multi-operating system support, notably Linux
- Enhanced security attributes
- User-friendly installation and management via the command line
In this tutorial, we will navigate the steps to install MySQL 8.0 on Rocky Linux 9 or the older stable enterprise Linux release of Rocky Linux 8. Additionally, we will touch upon methods to secure, update, and uninstall the MySQL service if required.
Update Rocky Linux Before MySQL 8.0 Installation
Before installing MySQL on your Rocky Linux system, it is highly recommended that you ensure all existing packages are up-to-date. This will help to prevent any potential system conflicts during the installation process and maintain the overall health of your system.
sudo dnf upgrade --refreshInstall MySQL on Rocky Linux 9 or 8
Option 1: Install MySQL 8.0 via Default Appstream on Rocky Linux
MySQL 8.0 is readily available as the default option in Rocky Linux. To install MySQL on your Rocky Linux system, run the following command in the terminal.
sudo dnf install mysql mysql-serverWhile there are several optional extra packages that you can install with MySQL on your Rocky Linux system, one popular alternative is to install both the developer kit and the standard MySQL installation. This option is specifically designed for developers building or testing applications and requiring access to the full suite of MySQL development tools.
sudo dnf install mysql mysql-server mysql-devel -yIt’s important to note that this option is not recommended for those using MySQL as a content management system or web server. It includes additional components that may not be necessary for these use cases. However, if you’re a developer looking to work with MySQL at a deeper level, the developer kit and standard installation option are excellent choices.
Once the installation of MySQL on your Rocky Linux system is complete, it is essential to verify the installation to ensure that everything is functioning as expected. You can do this by using the following command in the terminal.
mysql --versionOnce you have verified your MySQL 8.0 installation on your Rocky Linux system, activate the service and ensure that it starts automatically whenever your system boots up. You can use the following command in the terminal to accomplish both of these tasks.
sudo systemctl enable mysqld --nowUsing this command, you can activate your MySQL 8.0 installation and ensure it starts automatically whenever your system boots up. This is important for maintaining the accessibility and reliability of your data, as you’ll be able to access and manage your data without having to manually start the MySQL service every time you need to use it.
Install MySQL 8.0 CE on Rocky Linux 9 or 8
For those who require the latest version of MySQL, the following steps will guide you in accomplishing your goal. The first step is importing the official RPM package of the MySQL 8.0 community, which can be done by using the following command in the terminal.
It is critical you select and import the correct repository for your Rocky Linux distribution release.
Import MySQL 8.0 Community Edition for Rocky Linux 9:
sudo rpm -ivh https://dev.mysql.com/get/mysql80-community-release-el9-1.noarch.rpmImport MySQL 8.0 Community Edition for Rocky Linux 8:
sudo rpm -ivh https://dev.mysql.com/get/mysql80-community-release-el8-4.noarch.rpmAfter importing the official RPM package of the MySQL 8.0 community, the next step is to install the MySQL 8.0 Community Server. To ensure you’re installing the correct version, you must disable the App Stream version and enable the community edition. This can be done by using the following command in the terminal:
sudo dnf install --disablerepo=appstream mysql-community-server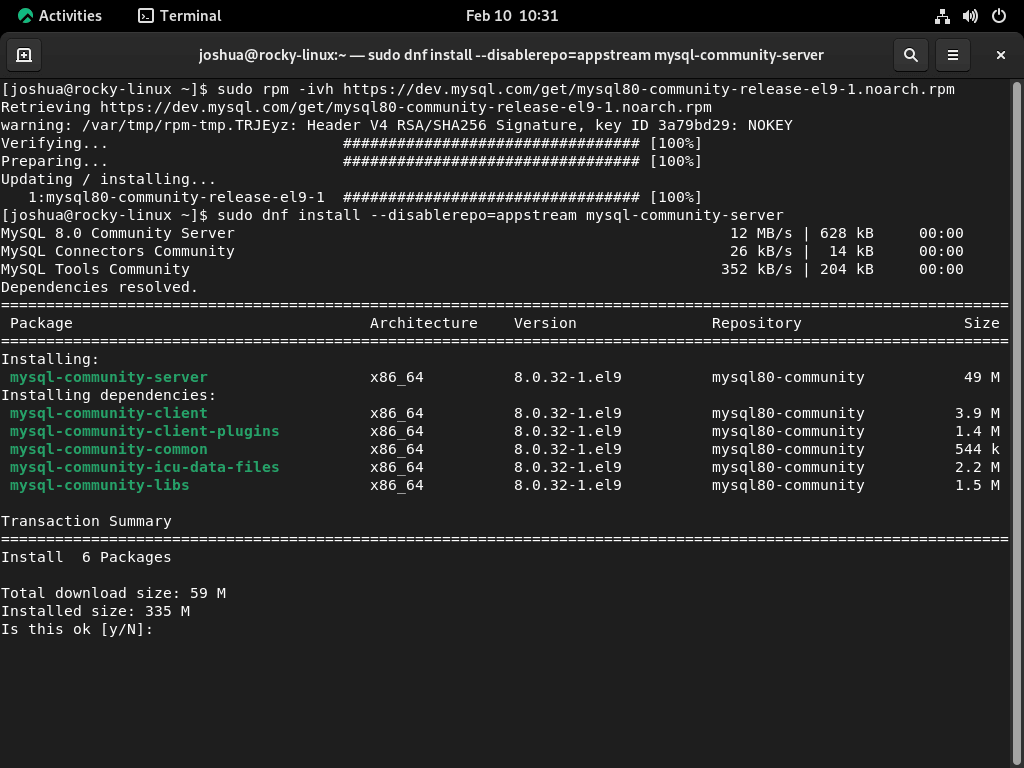
Now that you have installed the MySQL 8.0 Community Server directly from the MySQL RPM repository, the next step is to verify the success of the installation. This can be done by confirming the build version of your MySQL installation with the following command in the terminal.
mysql --versionExample output:
mysql Ver 8.0.32 for Linux on x86_64 (MySQL Community Server - GPL)With the MySQL 8.0 Community Server successfully installed on your Rocky Linux system, the next step is to activate it. This can be done by using the following command in the terminal.
sudo systemctl enable mysqld --nowCheck the Status of the MySQL 8.0 on Rocky Linux 9 or 8
To verify the successful operation of your MySQL service, you can use the following systemctl status command in the terminal.
systemctl status mysqld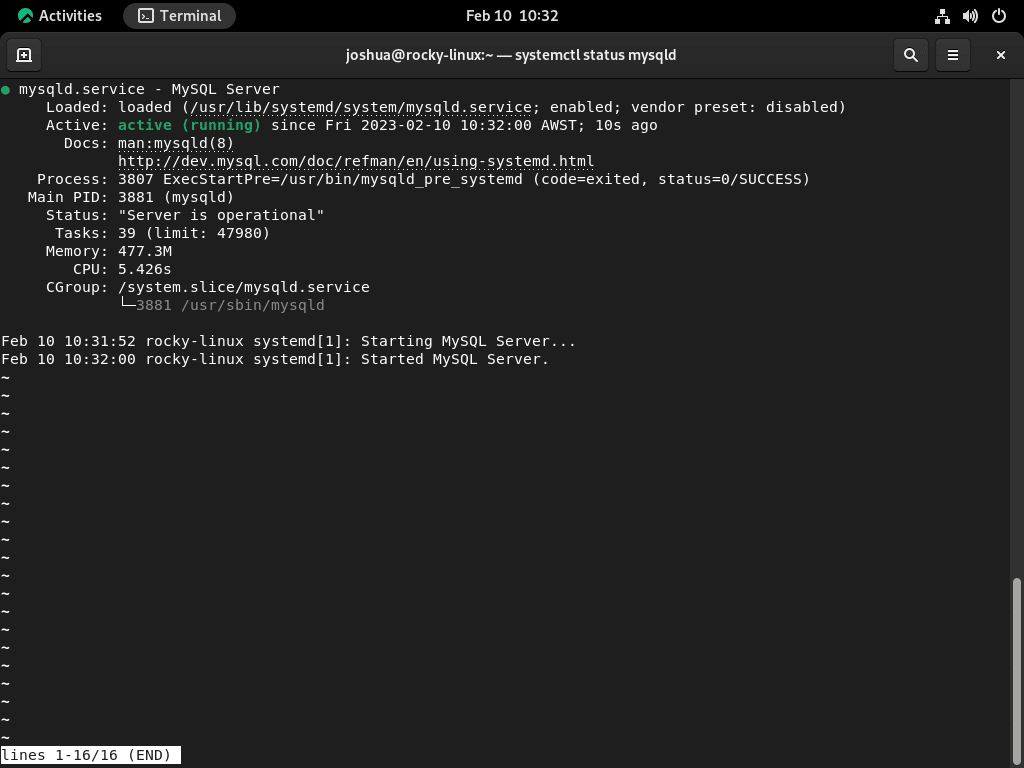
By checking the status of your MySQL service, you can ensure that it’s up and running and ready for use. For new installations of MySQL 8.0 on your Rocky Linux system, the status of the service should be “OK.” The next step is to secure your MySQL instance with the service operational.
Here are some of the most commonly used system commands you will need to manage your MySQL systemd service.
Stop the MySQL service:
sudo systemctl stop mysqldStart the MySQL service:
sudo systemctl start mysqldDisable the MySQL service at system startup:
sudo systemctl disable mysqldActivate the MySQL service at system startup:
sudo systemctl enable mysqldRestart the MySQL service:
sudo systemctl restart mysqldSecure MySQL 8.0 on Rocky Linux 9 or 8 via Security Script
When installing MySQL 8.0 on your Rocky Linux system, industry standards often consider the default security settings weak, raising concerns about the potential for intrusion or exploitation by malicious actors. Running the MySQL Installation Security script during the installation process is recommended to address this issue.
To launch the MySQL Installation Security script (mysql_secure_installation), use the following command.
mysql_secure_installationIf you have installed the MySQL 8.0 Community version and encounter an error regarding the temporary password.
Error: Access denied for user 'root'@'localhost' (using password: NO)As shown above, if you encounter a scenario where the root password for MySQL has already been set, you can use the following command to generate a temporary password and log into the MySQL Security script. You can set a new, secure password for your MySQL installation during this process.
sudo grep 'temporary password' /var/log/mysqld.logExample output with the new password generated:
2023-02-10T02:31:55.813212Z 6 [Note] [MY-010454] [Server] A temporary password is generated for root@localhost: dO064uBpgd)pWhen logging into the MySQL Security script with your temporary password, you will be prompted to change it. This password is intended to be temporary and should be updated to a secure password as soon as possible.
Upon entering your password, you will be asked about the VALIDATE PASSWORD COMPONENT. This component involves setting password complexity checks to ensure the security of your MySQL installation. The default settings are typically sufficient, but you can adjust them to meet your specific security requirements.
An outline of the settings that you need to consider.
- Set a password for root accounts.
- Set a password for all accounts.
- Remove root accounts that are accessible from outside localhost.
- Remove anonymous user accounts.
- Remove the test database that is accessible by default to anonymous users.
Example of recommended settings:
Securing the MySQL server deployment.

Enter password for user root:

The existing password for the user account root has expired. Please set a new password.

New password: <---- SET NEW PASSWORD

Re-enter new password: <---- RE-ENTER NEW PASSWORD

Re-enter new password:
The 'validate_password' component is installed on the server.
The subsequent steps will run with the existing configuration
of the component.
Using existing password for root.

Estimated strength of the password: 100
Change the password for root ? ((Press y|Y for Yes, any other key for No) : Y <---- Type Y then press the ENTER KEY (SKIP IF YOU ALREADY JUST SET)

New password:

Re-enter new password:

Estimated strength of the password: 100
Do you wish to continue with the password provided?(Press y|Y for Yes, any other key for No) : Y <---- Type Y then press the ENTER KEY.
By default, a MySQL installation has an anonymous user,
allowing anyone to log into MySQL without having to have
a user account created for them. This is intended only for
testing, and to make the installation go a bit smoother.
You should remove them before moving into a production
environment.

Remove anonymous users? (Press y|Y for Yes, any other key for No) : Y <---- Type Y then press the ENTER KEY.
Success.


Normally, root should only be allowed to connect from
'localhost'. This ensures that someone cannot guess at
the root password from the network.

Disallow root login remotely? (Press y|Y for Yes, any other key for No) : Y <---- Type Y then press the ENTER KEY.
Success.

By default, MySQL comes with a database named 'test' that
anyone can access. This is also intended only for testing,
and should be removed before moving into a production
environment.


Remove test database and access to it? (Press y|Y for Yes, any other key for No) : Y <---- Type Y then press the ENTER KEY.
 - Dropping test database...
Success.

 - Removing privileges on test database...
Success.

Reloading the privilege tables will ensure that all changes
made so far will take effect immediately.

Reload privilege tables now? (Press y|Y for Yes, any other key for No) : Y <---- Type Y then press the ENTER KEY.
Success.

All done!
Additional Commands for MySQL 8.0 on Rocky Linux 9 or 8
Update MySQL 8.0 on Rocky Linux 9 or 8
To check for updates on both versions of MySQL that were installed via the terminal using DNF repositories, use the following standard update command.
sudo dnf update --refreshRemove MySQL 8.0 From Rocky Linux 9 or 8
To uninstall MySQL, use the following command to remove the database software and all its traces altogether.
sudo dnf remove mysql mysql-serverUsers wishing to remove the Community Edition to scale back too, for example, the appstream version or delete the software, are ideal for removing all the RPM repositories.
sudo rm /etc/yum.repos.d/mysql-community*Conclusion
In conclusion, learning how to install MySQL 8.0 on Rocky Linux is a straightforward process. You can easily install, verify, and secure your MySQL installation using the command line and the DNF repositories. In addition, updating and removing the software is just as simple, making it an excellent choice for users who require a reliable and flexible database management system.
Failed to start mysqld.service: Unit mysqld.service not found.
Hi Alaa,
Thanks for the message, is it Rocky Linux 9 or 8? Some more information would be good. Did everything install correctly originally?
Also, is the package mysql-server installed? if this is not installed then the error message you posted occurs when installing directly from Rocky Linux appstream.
mysql-community-server should be fine.
Let me know. Any logs would be good also.