

This guide will demonstrate how to install MySQL 8.0 on AlmaLinux 9 or 8 utilizing AlmaLinux’s appstream or MySQL RPM for the latest community edition version.
MySQL 8.0 represents a pivotal evolution in database management, offering a suite of new features and improvements that significantly enhance performance, security, and usability. This release, part of the 8.x series, showcases MySQL’s commitment to meeting the dynamic demands of modern data handling, making it a robust choice for developers and database administrators. The improvements in MySQL 8.0 are not just incremental; they are transformative, reshaping the way users interact with and manage databases.
Key Highlights of MySQL 8.0:
- Performance Innovations: Introduction of the MySQL Document Store, enabling schema-less data management for increased flexibility and speed.
- Security Enhancements: Advanced encryption and security protocols, including state-of-the-art password management and authentication systems.
- Query Processing Upgrades: Incorporation of window functions and common table expressions (CTEs), offering sophisticated query processing tools.
- JSON Functionality Expansion: Broadened JSON capabilities, making JSON data manipulation more efficient and user-friendly.
- Geospatial Support: Improved handling of geospatial data, facilitating more effective geographic data management.
- Schema Change Reliability: Atomic Data Definition Language (DDL) statements ensure stability and consistency during schema modifications.
As we transition into the specifics of installing MySQL 8.0 on AlmaLinux, it’s crucial to understand these enhancements. They significantly improve the database’s functionality, addressing both current and future data management challenges. Next, we’ll guide you through the installation process, ensuring you can leverage these powerful features of MySQL 8.0 on your AlmaLinux system.
Update AlmaLinux Before MySQL 8.0 Installation
Ensure System Packages are Up-to-Date
Before initiating the installation of MySQL 8.0 on AlmaLinux, updating all current system packages is essential. This step is crucial to avoid any conflicts that might arise during the MySQL installation and to keep your system’s stability and performance optimized.
Execute the following command to update the packages:
sudo dnf upgrade --refreshThis command refreshes the repository metadata and upgrades all the installed packages to their latest versions.
Install MySQL 8.0 on AlmaLinux via Appstream or MySQL RPM
Option 1: Install MySQL 8.0 on AlmaLinux via Appstream
AlmaLinux includes MySQL 8.0 as a default package. To install it, execute this command in your terminal:
sudo dnf install mysql mysql-server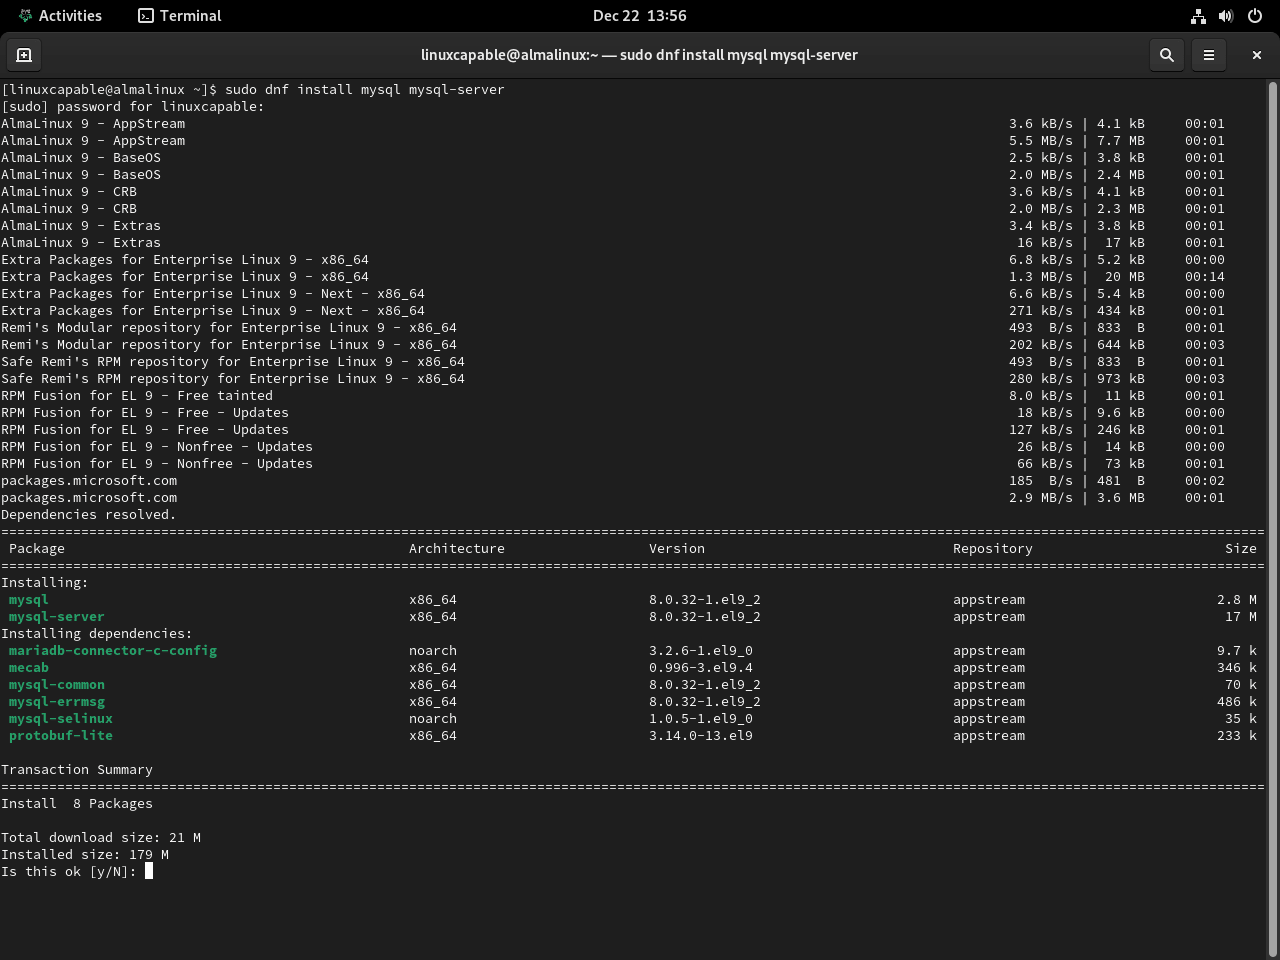
An expanded installation is available for developers requiring extensive MySQL functionalities, including the development tools. This involves installing the MySQL development package alongside the server. Run the following command to install both the MySQL server and the development kit:
sudo dnf install mysql mysql-server mysql-develThis expanded installation is particularly beneficial for developers working on applications that require in-depth interaction with MySQL. It is not typically necessary for content management or web server applications, as it includes additional components that may not be needed in these contexts.
After installing MySQL, verify the installation with:
mysql --versionEnsuring MySQL automatically starts upon system boot enhances data accessibility and management efficiency. To enable this, use:
sudo systemctl enable mysqld --nowOption 2: Install MySQL 8.0 Community Edition on AlmaLinux
Import MySQL 8.0 Community Edition RPM
To install the latest MySQL 8.0 Community Edition, begin by importing the official MySQL RPM package. Select the appropriate repository for your AlmaLinux version.
For AlmaLinux 9:
sudo rpm -ivh https://dev.mysql.com/get/mysql80-community-release-el9-1.noarch.rpmFor AlmaLinux 8:
sudo rpm -ivh https://dev.mysql.com/get/mysql80-community-release-el8-4.noarch.rpmInstall MySQL 8.0 Community Server via DNF Command
After importing the correct repository, proceed to install MySQL 8.0 Community Server. Disable the App Stream version and enable the community edition using the following command:
sudo dnf install --disablerepo=appstream mysql-community-server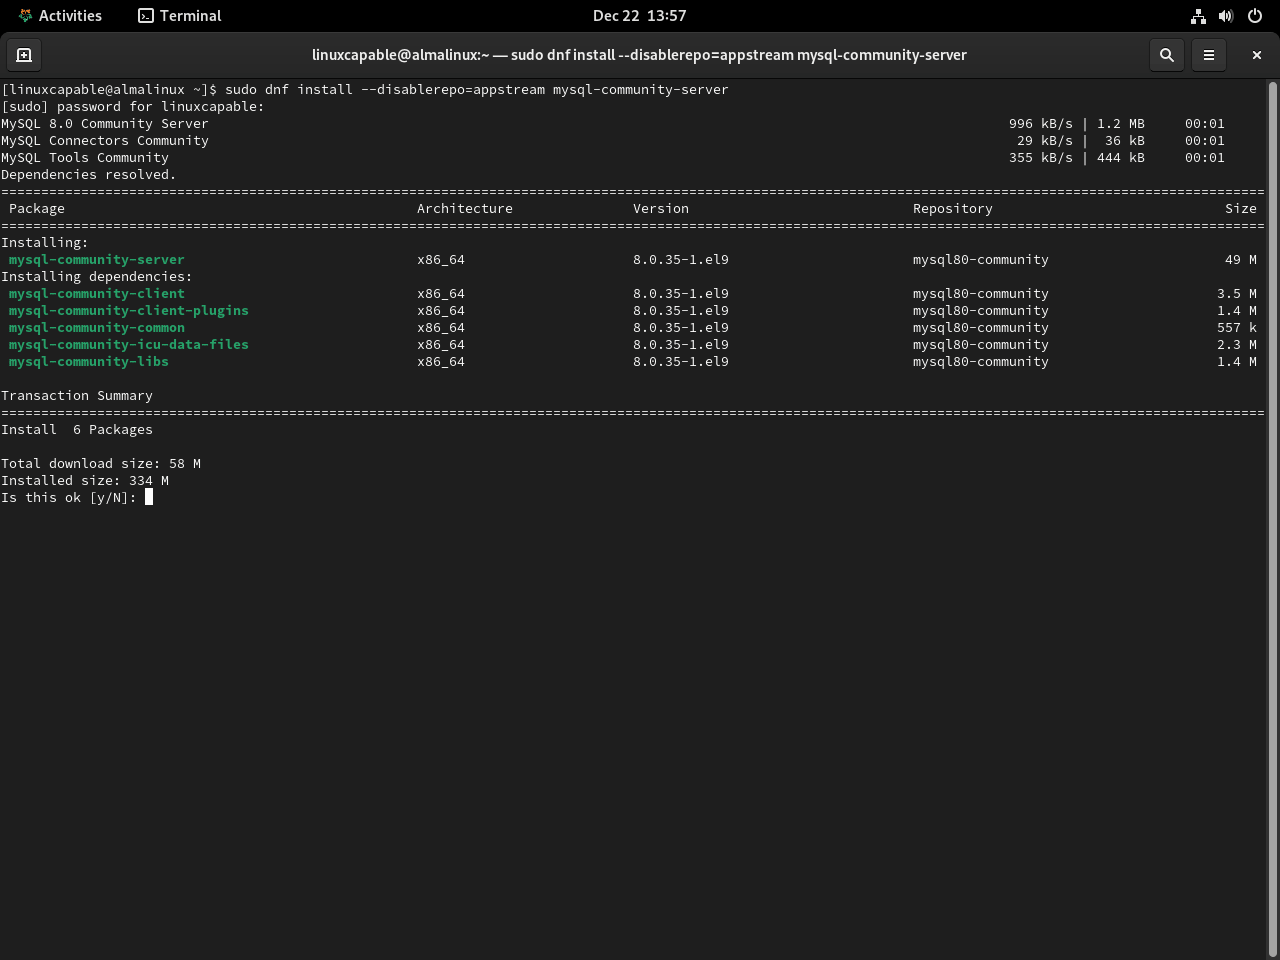
Verifying MySQL 8.0 Community Server Installation
Post-installation, confirm the build version of MySQL to ensure successful installation:
mysql --versionThe expected output might resemble the following:
mysql Ver 8.0.xx for Linux on x86_64 (MySQL Community Server - GPL)
Finally, activate the MySQL service and set it to start automatically:
sudo systemctl enable mysqld --nowThis command secures the readiness and reliability of your MySQL server by automating its startup process.
Check the Status of MySQL 8.0 on AlmaLinux
Verifying MySQL 8.0 Service Status
To confirm that your MySQL service is operational, execute the following command in the terminal:
systemctl status mysqld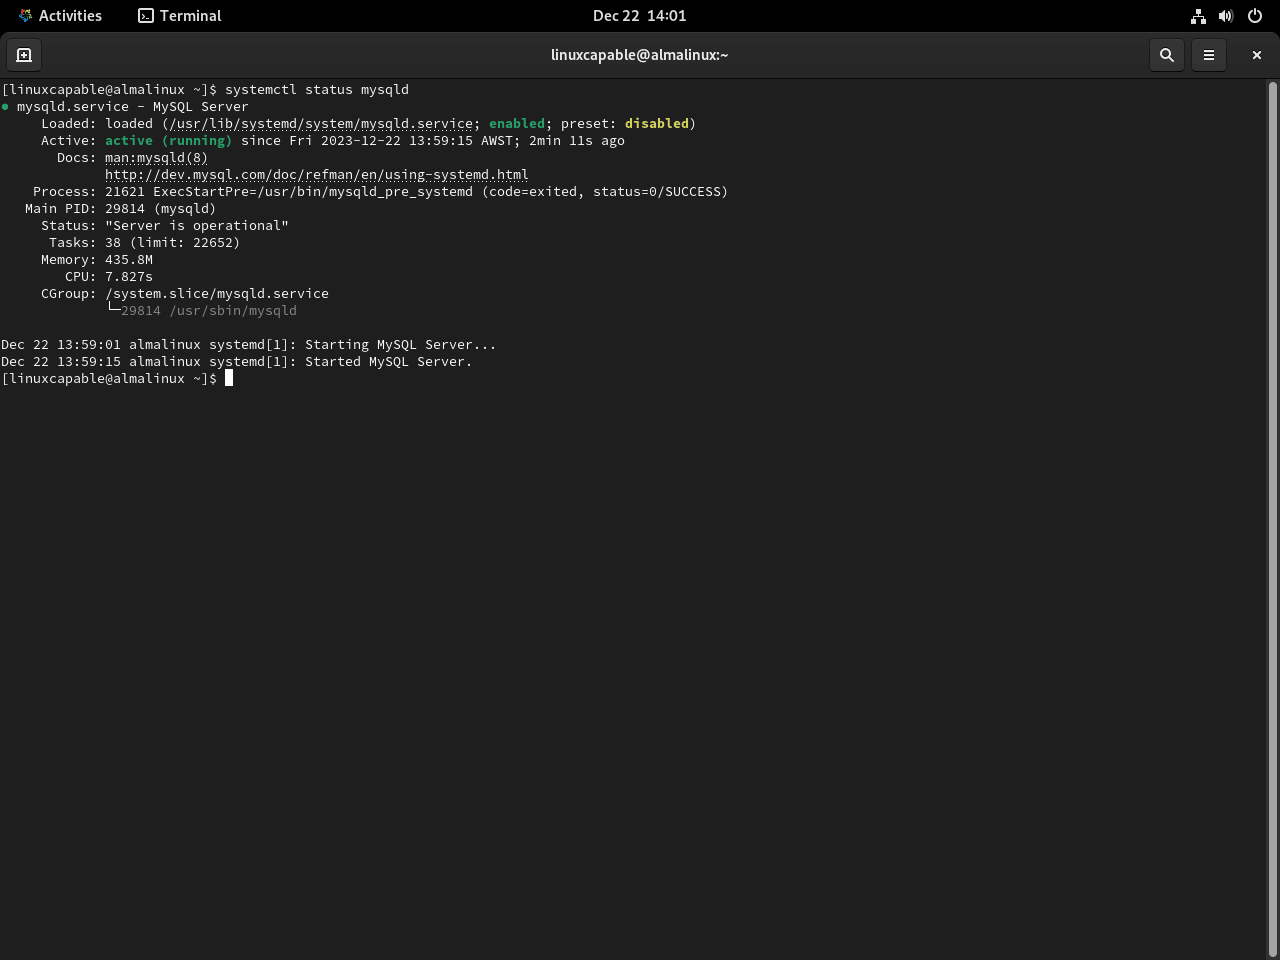
This command allows you to check if the MySQL service is active and functioning correctly. For newly installed MySQL 8.0 instances on AlmaLinux, you should see a status indicating that the service is running properly.
Managing MySQL 8.0 Service with Systemd Commands
Familiarity with systemd commands is essential for effective MySQL management. Below are crucial commands for controlling the MySQL service:
Stop the MySQL Service
To halt the MySQL service:
sudo systemctl stop mysqldStart the MySQL Service
To initiate the MySQL service:
sudo systemctl start mysqldDisable MySQL Service at System Startup
To prevent MySQL from starting automatically on system boot:
sudo systemctl disable mysqldEnable MySQL Service at System Startup
To set MySQL to start automatically at system boot:
sudo systemctl enable mysqldRestart the MySQL Service
To restart the MySQL service, which is particularly useful after configuration changes:
sudo systemctl restart mysqldSecure MySQL 8.0 on AlmaLinux with Security Script
Initiating MySQL 8.0 Security Enhancement
The default security settings of MySQL 8.0 might not meet industry standards, potentially leaving your AlmaLinux system vulnerable to threats. To mitigate these risks, running the MySQL Installation Security script is advisable.
Launch the script using this command:
mysql_secure_installationHandling Temporary Password Issues
If you’re using MySQL 8.0 Community version and encounter an error about a missing temporary password, such as:
Error: Access denied for user 'root'@'localhost' (using password: NO)
Use the following command to retrieve the temporary password from the MySQL logs:
sudo grep 'temporary password' /var/log/mysqld.log
An example of the expected output showing the generated temporary password is:

Password Validation and Configuration
You’ll be prompted to change the temporary password after logging in. This temporary password is critical for initial access and should be replaced with a more secure one immediately.
During this process, you’ll encounter the VALIDATE PASSWORD COMPONENT, which sets up password complexity checks. These checks are crucial for strengthening the security of your MySQL installation. You can adhere to the default settings or customize them according to your security needs.
Key Security Settings to Configure:
- Set a strong password for root accounts.
- Ensure all accounts have robust passwords.
- Remove any root accounts accessible from outside localhost.
- Eliminate anonymous user accounts.
- Delete the default test database, which is typically accessible to anonymous users.
Securing the MySQL server deployment.

Enter password for user root:

The existing password for the user account root has expired. Please set a new password.

New password: <---- SET NEW PASSWORD

Re-enter new password: <---- RE-ENTER NEW PASSWORD

Re-enter new password:
The 'validate_password' component is installed on the server.
The subsequent steps will run with the existing configuration
of the component.
Using existing password for root.

Estimated strength of the password: 100
Change the password for root ? ((Press y|Y for Yes, any other key for No) : Y <---- Type Y then press the ENTER KEY (SKIP IF YOU ALREADY JUST SET)

New password:

Re-enter new password:

Estimated strength of the password: 100
Do you wish to continue with the password provided?(Press y|Y for Yes, any other key for No) : Y <---- Type Y then press the ENTER KEY.
By default, a MySQL installation has an anonymous user,
allowing anyone to log into MySQL without having to have
a user account created for them. This is intended only for
testing, and to make the installation go a bit smoother.
You should remove them before moving into a production
environment.

Remove anonymous users? (Press y|Y for Yes, any other key for No) : Y <---- Type Y then press the ENTER KEY.
Success.


Normally, root should only be allowed to connect from
'localhost'. This ensures that someone cannot guess at
the root password from the network.

Disallow root login remotely? (Press y|Y for Yes, any other key for No) : Y <---- Type Y then press the ENTER KEY.
Success.

By default, MySQL comes with a database named 'test' that
anyone can access. This is also intended only for testing,
and should be removed before moving into a production
environment.


Remove test database and access to it? (Press y|Y for Yes, any other key for No) : Y <---- Type Y then press the ENTER KEY.
 - Dropping test database...
Success.

 - Removing privileges on test database...
Success.

Reloading the privilege tables will ensure that all changes
made so far will take effect immediately.

Reload privilege tables now? (Press y|Y for Yes, any other key for No) : Y <---- Type Y then press the ENTER KEY.
Success.

All done!
Manage MySQL 8.0 on AlmaLinux
Update MySQL 8.0
Regularly updating MySQL ensures you have the latest features and security patches. To update MySQL installed via DNF repositories, use this command:
sudo dnf update --refreshThis command refreshes your repository data and applies available updates to MySQL, maintaining its efficiency and security.
Remove MySQL 8.0
If you need to uninstall MySQL from AlmaLinux, execute the following command. This will remove the MySQL database software and all associated files:
sudo dnf remove mysql mysql-serverFor users who installed the MySQL Community Edition and wish to revert to the AppStream version or completely remove MySQL, it’s important also to delete the RPM repositories. Use this command to remove all MySQL community repositories:
sudo rm /etc/yum.repos.d/mysql-community*This step is crucial for a complete uninstallation, ensuring no remnants of the MySQL Community Edition remain on your system.
Final Thoughts
We’ve successfully navigated through the essentials of installing, updating, and managing MySQL 8.0 on AlmaLinux. From the initial setup to securing your database and handling updates, this guide has covered the key steps to ensure your MySQL experience is smooth and secure. Regular updates are your best bet for keeping things running safely and efficiently. And hey, if you ever need to backtrack or switch versions, you now have the know-how to do it with ease. Keep these tips in your toolkit, and you’re all set to manage your MySQL databases like a pro!