
Ubuntu 22.04 LTS and 24.04 LTS can install the Qt-based LXQt desktop directly from the Ubuntu universe repository when you want a lighter local desktop than GNOME. Ubuntu 26.04 LTS remains blocked as of June 9, 2026: both lxqt and task-lxqt-desktop fail during installation because lxqt-panel conflicts with lxqt-branding-debian.
Check Ubuntu Version Support
Confirm your Ubuntu release before installing LXQt. For additional release-identification commands, use the Ubuntu version check guide.
lsb_release -ds| Ubuntu Release | LXQt Install Status | Notes |
|---|---|---|
| Ubuntu 26.04 LTS | Blocked | As of June 9, 2026, both lxqt and task-lxqt-desktop fail during unpack when lxqt-panel conflicts with lxqt-branding-debian. |
| Ubuntu 24.04 LTS | Working | task-lxqt-desktop resolves LXQt, SDDM, startlxqt, and /usr/share/xsessions/lxqt.desktop from the Ubuntu archive. |
| Ubuntu 22.04 LTS | Working | task-lxqt-desktop resolves LXQt, SDDM, startlxqt, and /usr/share/xsessions/lxqt.desktop from the Ubuntu archive. |
Do not force the Ubuntu 26.04 install with
dpkg --force-overwrite. Wait for the archive packages to be fixed, use Ubuntu 24.04 LTS or 22.04 LTS for an LXQt system, or install the official Lubuntu image when you need an LXQt-first Ubuntu flavor.
Install LXQt on Ubuntu 22.04 or 24.04
After confirming that you are on Ubuntu 22.04 or 24.04, choose one of the two LXQt package paths. The full desktop task is the best fit for most desktop conversions and Ubuntu Server systems that need a complete local GUI. The smaller metapackage is better when you already have a display manager and want less of the desktop task stack.
| Method | Package | Includes | Best For |
|---|---|---|---|
| Full desktop task | task-lxqt-desktop | LXQt, SDDM, task-desktop, LibreOffice packages, Orca, Synaptic, printer tools, scanner tools, and recommended desktop applications | New LXQt desktops, Ubuntu Server GUI installs, and users who want a complete environment |
| LXQt metapackage | lxqt | LXQt session components, panel, file manager, terminal, settings tools, recommended LXQt applications, and an x-display-manager dependency | Existing Ubuntu desktops that can reuse GDM3, LightDM, or another display manager |
The task-lxqt-desktop package is a Tasksel desktop task. It depends on lxqt, sddm, and task-desktop, then recommends the broader desktop application set. The lxqt metapackage is smaller, but it is not a bare minimum core install because Ubuntu installs recommended packages by default. Ubuntu’s LXQt dependency chain uses xfwm4 as the X11 window manager unless another installed window manager satisfies that dependency.
Update Ubuntu Package Lists
Refresh APT metadata before installing a new desktop environment:
sudo apt updatePackage metadata tells APT which LXQt versions, dependencies, and display-manager packages are available from the enabled Ubuntu repositories. For routine maintenance commands, use the Ubuntu package update workflow in the Ubuntu command-line update guide.
Install the Full LXQt Desktop Task
Install the complete LXQt desktop task on Ubuntu 22.04 or 24.04:
sudo apt install task-lxqt-desktopAPT downloads a large desktop set. On Ubuntu 22.04 and 24.04 systems, expect roughly 500 MB of packages and around 1.8 GB of installed files when the full task is not already present. Ubuntu 24.04 can also install Thunderbird through its snap-backed transitional package when recommended packages are enabled.
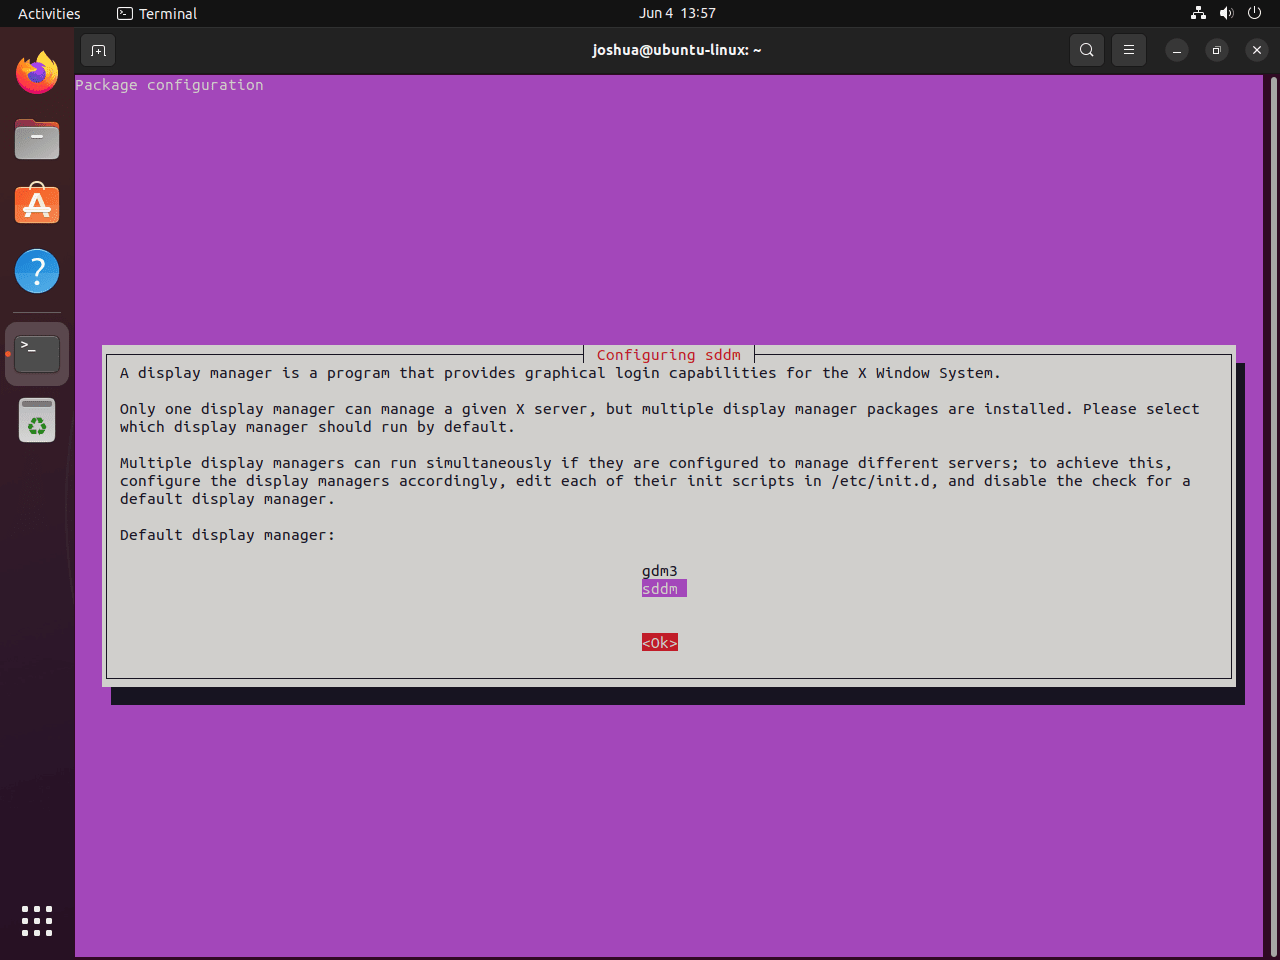
When an interactive display-manager prompt appears, choose either gdm3 or sddm. Select gdm3 to keep the normal Ubuntu login screen. Select sddm if you want the login manager commonly paired with LXQt. Press TAB to highlight <Ok>, then press ENTER.
Install the LXQt Metapackage
Use the LXQt metapackage when an existing display manager is already installed or when you want to avoid the broader desktop task:
sudo apt install lxqtOn an existing Ubuntu desktop, this package can reuse GDM3 because GDM3 already satisfies the display-manager dependency. On a minimal Ubuntu Server install without a display manager, APT may add SDDM or another provider for the x-display-manager dependency. This package still installs recommended LXQt applications unless you intentionally change APT’s recommends behavior.
Reboot After Installation
Restart after the package installation finishes:
sudo rebootThe selected or existing display manager loads after reboot. LXQt appears as an X11 session option when /usr/share/xsessions/lxqt.desktop is present.
Understand Ubuntu 26.04 Wayland and LXQt
Ubuntu 26.04 changed the default Ubuntu Desktop session to Wayland only, but the official release notes state that other desktop sessions can still launch through X.org. LXQt’s packaged session is an X11 session provided by /usr/share/xsessions/lxqt.desktop and launched with startlxqt.
The Ubuntu 26.04 release notes explain the Ubuntu Desktop Wayland change, while the LXQt session documentation describes startlxqt for X11 and startlxqtwayland for Wayland. Ubuntu 26.04 also packages lxqt-wayland-session, but that package only adds the Wayland session entry and startup files. It is not a substitute for a working base LXQt install.
apt policy lxqt-wayland-session labwcOnly evaluate the Wayland session after Ubuntu’s base LXQt packages install without the lxqt-panel conflict. On June 9, 2026, lxqt-wayland-session with labwc installed cleanly and created /usr/share/wayland-sessions/lxqt-wayland.desktop with Exec=startlxqtwayland, but the main lxqt and task-lxqt-desktop installs still failed.
Verify the LXQt Installation
Check the main packages, desktop entry, and startup command:
dpkg -l lxqt lxqt-session lxqt-panel
ls /usr/share/xsessions/lxqt.desktop
command -v startlxqt
A working install shows installed package rows and the LXQt session launcher path:
ii  lxqt
ii  lxqt-session
ii  lxqt-panel
/usr/share/xsessions/lxqt.desktop
/usr/bin/startlxqt
Ubuntu 22.04 installs LXQt 0.17 packages, while Ubuntu 24.04 installs LXQt 1.4 packages. Ubuntu 26.04 lists newer LXQt 2.3 packages in APT metadata, but the package conflict blocks a normal install as of June 9, 2026.
Log Into the LXQt Desktop
At the login screen, open the session selector before entering your password and choose LXQt. GDM3, SDDM, and LightDM can all expose installed desktop sessions, but the selector location differs by login manager.
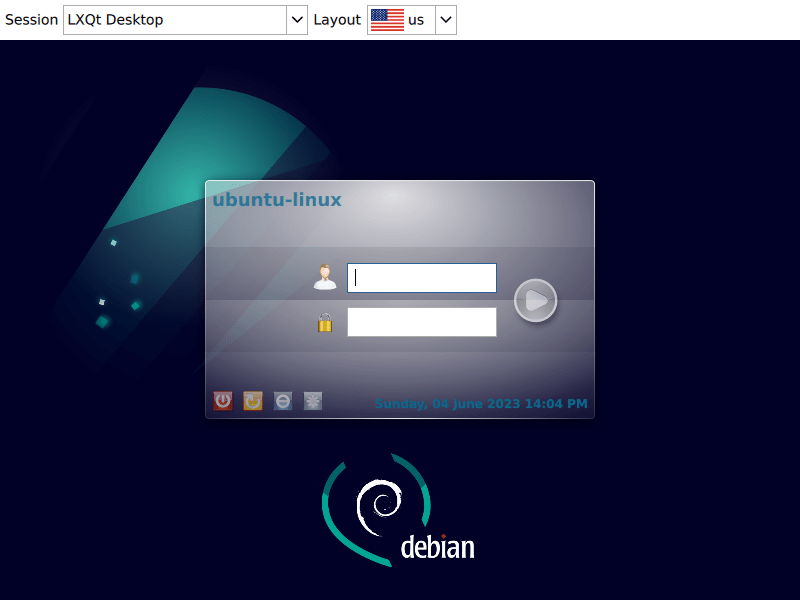
After login, LXQt opens with a panel, application menu, file manager, terminal, settings tools, and the default theme shipped by Ubuntu’s LXQt packages. Open LXQt Configuration Center to adjust themes, icons, display settings, keyboard shortcuts, and session behavior.
Start LXQt from a Text Console
A local text-console launch is useful on a lab system without a running display manager. Install xinit, back up any existing .xinitrc file, create an LXQt startup entry, and start X11:
sudo apt install xinit
if [ -f ~/.xinitrc ]; then cp -n ~/.xinitrc ~/.xinitrc.backup; fi
printf 'exec startlxqt\n' > ~/.xinitrc
startx
Use a local console or VM console for this workflow. SSH sessions and headless servers need a separate remote desktop stack, not only a desktop environment package.
Manage Display Managers
Check the current default display manager and installed login managers:
cat /etc/X11/default-display-manager
dpkg -l gdm3 sddm
If SDDM is installed and you want to switch between SDDM and GDM3, reconfigure SDDM and select the preferred login manager:
sudo dpkg-reconfigure sddm
sudo reboot
If you installed only lxqt on an existing Ubuntu desktop and kept GDM3, no display-manager change is required. Install SDDM only when you specifically want to use it:
sudo apt install sddm
sudo dpkg-reconfigure sddm
Remove LXQt from Ubuntu
Switch back to GDM3 before removing SDDM if SDDM became the default login manager:
sudo dpkg-reconfigure sddmSelect gdm3, then remove the LXQt packages. Skip the reconfigure step if SDDM is not installed or GDM3 is already the default.
sudo apt purge task-lxqt-desktop lxqt 'lxqt-*' sddm
sudo apt autoremove --purge
Review the autoremove list before confirming, especially if APT lists desktop applications, older kernels, or tools you still want to keep.
Restore the standard Ubuntu login and desktop metapackage if the system no longer reaches the normal Ubuntu login screen:
sudo apt install --reinstall gdm3 ubuntu-desktop-minimal
sudo reboot
Confirm that LXQt packages are no longer installed:
dpkg -l | grep -E '^ii[[:space:]]+lxqt'No output means the main LXQt packages are gone. If package names remain, remove them individually after checking that they are not required by another desktop you still use.
Troubleshoot LXQt Issues
APT Cannot Locate LXQt Packages
LXQt packages are in Ubuntu’s universe repository. If APT cannot find lxqt or task-lxqt-desktop, enable the Ubuntu universe repository and refresh package metadata:
sudo apt install software-properties-common
sudo add-apt-repository universe
sudo apt update
Ubuntu 26.04 Shows an lxqt-panel File Conflict
Ubuntu 26.04 LXQt installs can pass APT dependency simulation but still stop during the real dpkg unpack phase with this error:
dpkg: error processing archive ... lxqt-panel_2.3.2-0ubuntu1_amd64.deb (--unpack):
 trying to overwrite '/etc/xdg/lxqt/panel.conf', which is also in package lxqt-branding-debian (0.14.0.7)
E: Sub-process /usr/bin/dpkg returned an error code (1)
This is a package conflict, not a Wayland session-selection problem. Avoid force-overwrite workarounds on regular systems. If APT asks you to repair broken packages after the failed install, check the package state and confirm the overwrite error before cleanup:
sudo dpkg --audit
sudo apt-get check
grep -Ei 'lxqt-panel|trying to overwrite' /var/log/apt/term.log | tail -n 20
When the log shows the lxqt-panel overwrite conflict, build a removable package list from the failed LXQt and SDDM package names:
dpkg -l | awk '/^i[[:alpha:]][[:space:]]+(task-lxqt|lxqt|liblxqt|pcmanfm-qt|qterminal|qtermwidget|sddm|xfwm4)/ {print $2}' | tee /tmp/lxqt-remove-packages.txtReview the package list before continuing. It should contain LXQt, liblxqt, PCManFM-Qt, QTerminal, SDDM, or xfwm4 packages from the failed install. Then purge the listed packages on a non-production system and wait for updated Ubuntu packages before retrying:
xargs --no-run-if-empty sudo apt-get purge < /tmp/lxqt-remove-packages.txt
sudo apt autoremove --purge
rm -f /tmp/lxqt-remove-packages.txt
sudo dpkg --audit
sudo apt-get check
Confirm the autoremove list before continuing because APT can include packages unrelated to LXQt when they were already marked as automatically installed.
LXQt Session Does Not Appear at Login
Verify that lxqt-session and the X11 desktop entry are installed:
dpkg -l lxqt-session
ls /usr/share/xsessions/lxqt.desktop
Restart the display manager or reboot after a successful install. If the package is missing on Ubuntu 22.04 or 24.04, reinstall the chosen LXQt package method:
sudo apt install --reinstall task-lxqt-desktopBlank Screen After Selecting LXQt
A blank screen after login often points to graphics, X11, or display-manager errors. Switch to a text console with Ctrl+Alt+F2, log in, and inspect current-boot errors with the journalctl command guide as a deeper reference:
journalctl -b -p err..alert --no-pager
journalctl -b -u gdm -u sddm --no-pager
Look for driver errors, missing firmware, display-manager failures, and X11 startup problems. Reboot after correcting driver or display-manager settings.
Login Screen Does Not Start
Use a text console or recovery shell to restore GDM3 when the display manager is misconfigured:
sudo apt install --reinstall gdm3 ubuntu-desktop-minimal
printf '/usr/sbin/gdm3\n' | sudo tee /etc/X11/default-display-manager
sudo reboot
Explore Other Desktop Environments
Ubuntu supports several desktop environments with different resource profiles and interface styles:
- XFCE on Ubuntu provides another lightweight desktop with a traditional layout and broad plugin ecosystem
- KDE Plasma on Ubuntu offers a full Qt-based desktop with more integrated applications and visual effects
- GNOME Flashback on Ubuntu keeps a classic GNOME-style workflow while staying close to the Ubuntu GNOME stack
Conclusion
On Ubuntu 22.04 LTS or 24.04 LTS, LXQt is ready when the package path installs, the session entry appears, and the display manager offers LXQt at login. Keep Ubuntu 26.04 LTS systems on hold until the archive conflict is fixed, then recheck package status before trying lxqt or task-lxqt-desktop again.

Formatting tips for your comment
You can use basic HTML to format your comment. Useful tags currently allowed in published comments:
<code>command</code>command<strong>bold</strong><em>italic</em><blockquote>quote</blockquote>