
LAMP, an acronym for Linux, Apache, MySQL/MariaDB, and PHP, is a widely adopted open-source software stack hosting web applications. This guide will provide instructions on how to install LAMP on Debian 12 Bookworm or the older stable releases of Debian 11 Bullseye or Debian 10 Buster, ensuring you have a robust environment for developing and deploying web applications.
Understanding the Components of LAMP:
- Linux: The operating system layer of the stack, providing a stable and secure foundation.
- Apache: The web server component handles HTTP requests and serves web content.
- MySQL/MariaDB: The database layer used for storing and retrieving data required by web applications.
- PHP: The scripting language used for developing dynamic web content and interacting with the database.
Why Choose LAMP?:
- Open Source: All components of the LAMP stack are open-source, providing transparency and the ability to modify the software to meet specific needs.
- Community Support: Being widely used, LAMP benefits from a large community of developers and users who contribute to its development and provide support.
- Flexibility: The LAMP stack is highly flexible, allowing developers to create various web applications ranging from simple websites to complex web applications.
- Ease of Deployment: With extensive documentation and support available, deploying a LAMP stack is straightforward, even for those new to server administration.
With the basics of LAMP now out of the way, you can proceed to the following guide, where you can set up a LAMP stack on your Debian system, providing a solid foundation for hosting and developing web applications.
LAMP Pre-Installation Steps on Debian 12, 11 or 10
Update Your Debian System’s Packages Before LAMP Installation
Before proceeding with the LAMP stack setup, updating your Debian system to ensure all the packages are current is crucial. This step ensures you’re working with the software packages’ latest and most secure versions.
To update your Debian system, execute the command below:
sudo apt update && sudo apt upgradeInstall LAMP on Debian 12, 11, or 10 via APT
Step 1: Install Apache – Part 1 of LAMP Stack Setup
Apache 2, also called HTTPD, is a web server and the first component you’ll need to set up as part of the LAMP stack.
To initiate the installation of Apache 2 on your Debian system, input the command provided:
sudo apt install apache2As a side note, for those seeking a more recent version of Apache, check out our guide on how to upgrade Apache on Debian 12, 11 or 10 Linux.
Once the installation completes, you should verify its success by checking the installed version of Apache. This step ensures that the web server has been installed correctly. To do this, run:
sudo apache2 -vYou should see a response similar to:
Server version: Apache/x.x.x (Debian)To further confirm that the Apache server is operational, use the systemctl command:
systemctl status apache2If the Apache server isn’t running, activate it using the below command. This step ensures that the Apache web server is not just started but also set to run automatically upon system boot:
sudo systemctl enable apache2 --nowOnce the Apache server is up and running, you can check its default page to ensure it’s serving content as expected. Open your preferred web browser and navigate to your server’s local IP address.
Typically, this would be either of the following URLs:
http://127.0.01
http://localhost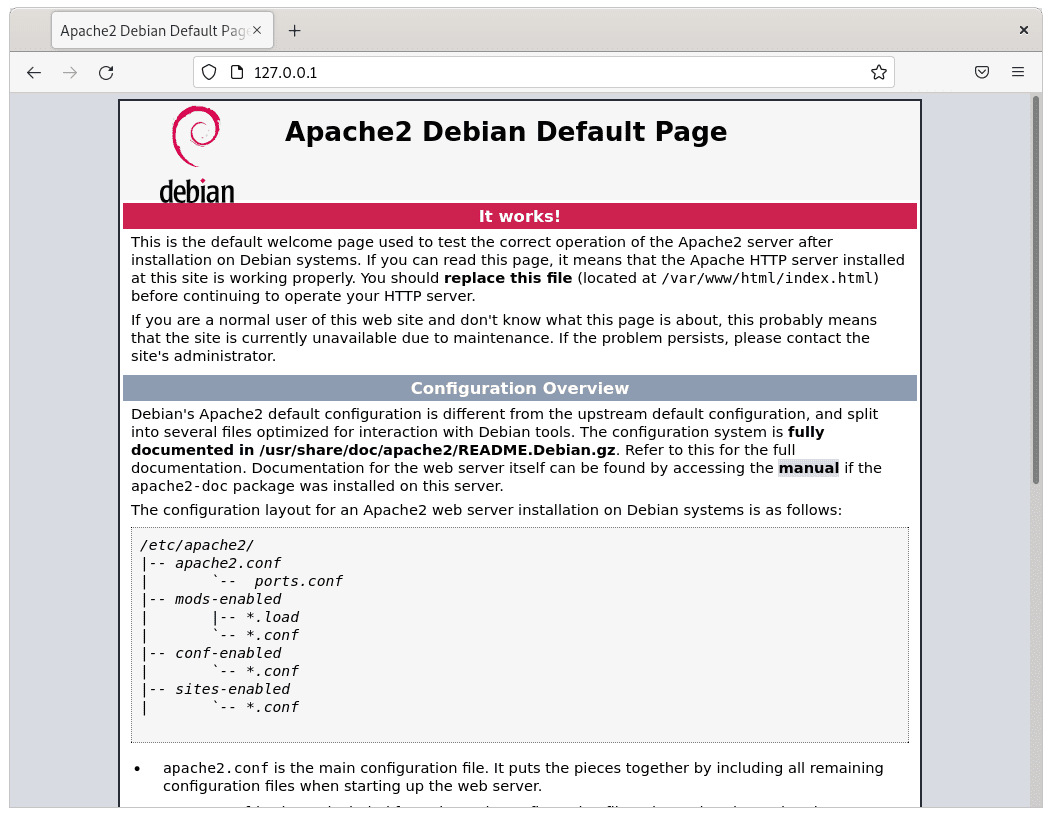
If you cannot access the Apache default page, especially using the UFW Firewall, you might need to permit traffic on port 80. This port is standard for HTTP web traffic. To allow port 80, input the following command:
sudo iptables -I INPUT -p tcp --dport 80 -j ACCEPTThis command modifies the system’s firewall rules to allow incoming connections on port 80, ensuring that web traffic can reach the Apache server without hindrance.
Step 2: Install MySQL or MariaDB – Part 2 of LAMP Stack Setup
The Shift from MySQL to MariaDB in Debian
For those seasoned with Debian, it’s common knowledge that MariaDB has become the standard in newer Debian releases, effectively replacing MySQL. While the classic LAMP setup leveraged MySQL, it’s still possible to use it by referring to our comprehensive guide on installing MySQL 8.0 on Debian 12, 11, or 10.
Moreover, if you are leaning towards MariaDB but are seeking a more recent version—like the long-term support releases 10.5, 10.6, or 10.10 with our guide on installing MariaDB on Debian 12, 11, or 10, which delves into importing additional versions directly from the official MariaDB.org APT Repository.
Install MariaDB on Debian via APT Command
As highlighted, with the newer Debian releases, MariaDB is the default choice for the LAMP stack. To proceed with its installation, input the following command into your terminal:
sudo apt install mariadb-server mariadb-clientPost-installation, validate the successful setup of MariaDB by querying its version and build details:
mariadb --versionThis should produce an output resembling the following:
mariadb Ver 15.1 Distrib x.x.x-MariaDB, for debian-linux-gnu (x86_64) using readline EditLine wrapperDo note that the version might vary. Still, the essence of the installation remains consistent, as elaborated at the beginning of this section. You can verify the status of the database software by using the following systemctl command:
systemctl status mariadbTypically, the MariaDB service will be active post-installation. If it’s not the case, initiate MariaDB using the command below. This command also ensures that MariaDB starts automatically upon system boot:
sudo systemctl enable mariadb --nowNavigating Essential MariaDB Service Commands
For individuals new to MariaDB, here’s a concise guide to some fundamental service commands essential for efficient LAMP stack management on a Debian server:
Halting MariaDB:
sudo systemctl stop mariadbInitiating MariaDB:
sudo systemctl start mariadbSetting MariaDB to Auto-start with the System:
sudo systemctl enable mariadbPreventing MariaDB from Auto-starting:
sudo systemctl disable mariadbRelaunching the MariaDB Service:
sudo systemctl restart mariadbWith these commands at your disposal, managing the MariaDB component of your LAMP stack on Debian becomes a more streamlined process.
Securing MariaDB with the Provided Security Script
For those who recently installed MariaDB, it’s crucial to understand that the default configurations might not be as stringent as expected. These settings could potentially leave vulnerabilities open for unauthorized access or malicious attacks. Thankfully, MariaDB has a built-in security script that aids in tightening these configurations post-installation.
To initiate this security enhancement, launch the mysql_secure_installation script using the command below:
sudo mysql_secure_installationWhile executing the script, you’ll be prompted to make several security-related decisions:
- Define a password for the root accounts.
- Eliminate root accounts that can be accessed from outside the localhost.
- Delete anonymous user accounts.
- Remove the test database, which, in its default state, can be accessed by any anonymous users.
For all these decisions, you’d typically respond with (Y) to approve the recommended security actions.
[joshua@debian ~]$ sudo mariadb-secure-installation

NOTE: RUNNING ALL PARTS OF THIS SCRIPT IS RECOMMENDED FOR ALL MariaDB
      SERVERS IN PRODUCTION USE!  PLEASE READ EACH STEP CAREFULLY!

In order to log into MariaDB to secure it, we'll need the current
password for the root user. If you've just installed MariaDB, and
haven't set the root password yet, you should just press enter here.

Enter current password for root (enter for none):
OK, successfully used password, moving on...

Setting the root password or using the unix_socket ensures that nobody
can log into the MariaDB root user without the proper authorisation.

You already have your root account protected, so you can safely answer 'n'.

Switch to unix_socket authentication [Y/n] Y <---- Type Y then press the ENTER KEY.
Enabled successfully!
Reloading privilege tables..
 ... Success!


You already have your root account protected, so you can safely answer 'n'.

Change the root password? [Y/n] Y <---- Type Y then press the ENTER KEY.
New password:
Re-enter new password:
Password updated successfully!
Reloading privilege tables..
 ... Success!


By default, a MariaDB installation has an anonymous user, allowing anyone
to log into MariaDB without having to have a user account created for
them.  This is intended only for testing, and to make the installation
go a bit smoother.  You should remove them before moving into a
production environment.

Remove anonymous users? [Y/n] Y <---- Type Y then press the ENTER KEY.
 ... Success!

Normally, root should only be allowed to connect from 'localhost'.  This
ensures that someone cannot guess at the root password from the network.

Disallow root login remotely? [Y/n] Y <---- Type Y then press the ENTER KEY.
 ... Success!

By default, MariaDB comes with a database named 'test' that anyone can
access.  This is also intended only for testing, and should be removed
before moving into a production environment.

Remove test database and access to it? [Y/n] Y <---- Type Y then press the ENTER KEY.
 - Dropping test database...
 ... Success!
 - Removing privileges on test database...
 ... Success!

Reloading the privilege tables will ensure that all changes made so far
will take effect immediately.

Reload privilege tables now? [Y/n] Y <---- Type Y then press the ENTER KEY.
 ... Success!

Cleaning up...

All done!  If you've completed all of the above steps, your MariaDB
installation should now be secure.

Thanks for using MariaDB!
Step 3: Install PHP – Part 3 of LAMP Stack Setup
Understanding PHP’s Role in LAMP
PHP is the bridge that facilitates communication between the Apache web server and the MariaDB database. It’s the dynamic backbone, processing requests and serving dynamic content on your web platform. Notably, different Debian distribution releases come packaged with varying PHP versions.
Suppose you’re inclined to install a specific PHP version on Debian 12, 11, or 10 or are exploring the features of the newer PHP 8.x releases. In that case, you might want to delve into our dedicated guide on PHP installation for Debian.
Integrating PHP with the Apache Module
This section elucidates on integrating PHP with Apache, covering both the native Apache PHP module and the PHP-FPM. For most users working with the LAMP stack, the native module is typically preferred over PHP-FPM.
To incorporate the Apache PHP module, execute the following:
sudo apt install phpx.x libapache2-mod-phpx.xFor clarity, a concrete example would be:
sudo apt install php8.1 libapache2-mod-php8.1If you’re uncertain about your PHP version, this command helps ascertain it:
php -vPost-installation, the module generally auto-loads. If there’s a need to load it manually, the command is:
sudo a2enmod php{version}
For instance:
sudo a2enmod php8.1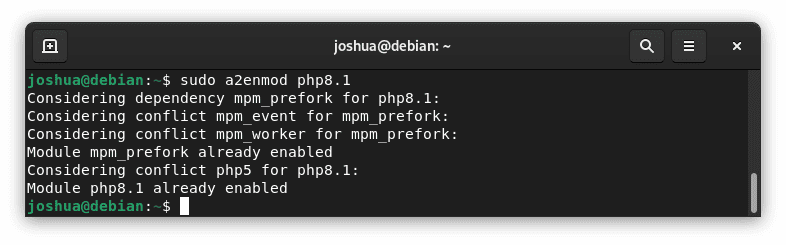
Concluding the installation, it’s pivotal to restart the Apache server to assimilate the PHP module:
sudo systemctl restart apache2In scenarios where you’re considering transitioning between PHP versions, like oscillating between 8.0 and 8.1, disabling the current version is paramount. Here’s how with PHP 8.0:
sudo a2dismod php8.0Subsequently, the new version can be enabled, for example PHP 8.1:
sudo a2enmod php8.1To reinitialize with the updated PHP module:
sudo systemctl restart apache2If you’re veering towards PHP-FPM with Apache, ensure the Apache PHP module is deactivated.
Setting Up Apache with PHP-FPM
For FastCGI Process Manager, PHP-FPM is a renowned alternate PHP FastCGI implementation known for its efficiency.
To embark on the PHP-FPM setup:
sudo apt install phpx.x-fpm libapache2-mod-fcgidFor a practical application:
sudo apt install php8.1-fpm libapache2-mod-fcgidIt’s noteworthy that, by default, PHP-FPM remains inactive for Apache.
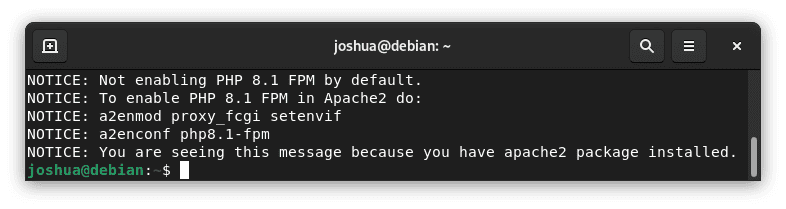
Activate PHP-FPM; an example with version 8.1 is:
sudo a2enmod proxy_fcgi setenvif && sudo a2enconf php8.1-fpmTo complete this setup, a server restart is essential:
sudo systemctl restart apache2To verify PHP-FPM’s operational status:
sudo systemctl status php8.1-fpm
For those who wish to deactivate PHP-FPM for Apache, the following serves as a guide:
sudo a2dismod proxy_fcgi setenvif && sudo a2disconf php8.1-fpmWith that done, restart the service:
sudo systemctl restart apache2Lastly, to reactivate the PHP module Apache extension:
sudo a2enmod php8.1Setting Up a PHP Test Info Page on Debian 12, 11, or 10
Establishing the PHP Test Environment
To ascertain the seamless integration of PHP or PHP-FPM with the Apache web server, initiating a file within the webroot directory is pivotal. For the sake of this guide, let’s designate this file as info.php.
To create the file, execute the following command:
sudo nano /var/www/html/info.phpInside the info.php file, input the following PHP code:
<?php

phpinfo();

?>
After entering the code, save the file by pressing CTRL+O, and subsequently, exit using CTRL+X.
Validating the PHP Configuration
Post-creation, you can validate the PHP configuration by navigating to the file through your web browser. In your browser’s address bar, input server-ip-address/info.php. If your Apache setup is localized on your computer, you can alternatively use 127.0.0.1/info.php or simply localhost/info.php.
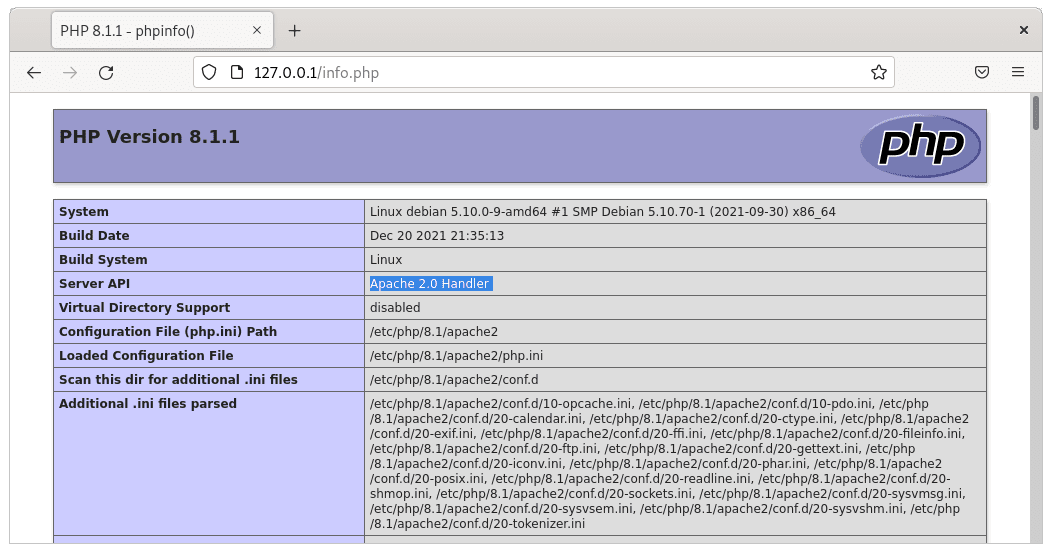
Visualization with Apache PHP Module:
Visualization with Apache PHP-FPM:
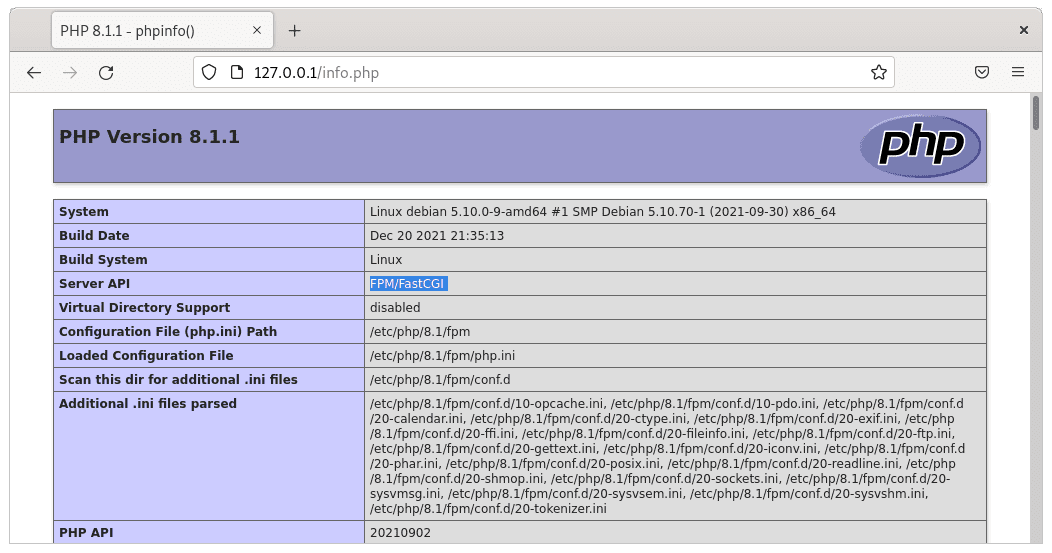
These visuals corroborate that PHP scripts are effectively operational with the Apache web server.
Prioritizing Security: PHP Information File Removal
For maintaining robust security protocols, deleting the test file post-verification is recommended. This precautionary step ensures that potential vulnerabilities are mitigated. To remove the file, use the command:
sudo rm -f /var/www/html/info.phpCreate a Let’s Encrypt SSL Free Certificate on Debian 12, 11 or 10
Introduction to Let’s Encrypt SSL
For enhancing the security and credibility of your Apache server, transitioning to HTTPS through an SSL certificate is crucial. A highly recommended approach is using Let’s Encrypt. It stands out as a free, automated, open-source certificate authority diligently managed by the nonprofit Internet Security Research Group (ISRG).
Setting Up Certbot for SSL Integration
To initiate this process, the first step involves the installation of the certbot package. This can be achieved with the command:
sudo apt install python3-certbot-apache -yUpon successful installation, execute the following command to commence the certificate creation process:
sudo certbot --apache --agree-tos --redirect --hsts --staple-ocsp --email you@example.com -d www.example.comThis configuration enforces HTTPS 301 redirects, incorporates a Strict-Transport-Security header, and integrates OCSP Stapling for optimal security. It’s imperative to customize the email and domain name placeholders (you@example.com and www.example.com) as per your specific needs.
Transitioning to HTTPS
Once the above steps are executed, your web URL will be transitioned from the conventional HTTP://www.example.com to the secure HTTPS://www.example.com. Any traffic directed towards the HTTP URL will be automatically rerouted to its HTTPS counterpart, ensuring a secure browsing experience for your users.
Setting Up UFW Firewall for LAMP Stack on Debian 12, 11, or 10
Introduction to UFW Firewall with Apache
After successfully setting up your Apache 2 web server, adjusting your UFW (Uncomplicated Firewall) rules is essential, especially if you’ve previously installed UFW. This adjustment allows external access to the standard web ports. The silver lining here is that Apache automatically registers itself with UFW during its installation, providing a set of profiles that can be effortlessly toggled on or off. This seamless integration makes the configuration both straightforward and rapid.
Installing and Enabling UFW
If you’ve not yet equipped your system with UFW, you can easily install it by executing the following command:
sudo apt install ufw -yOnce the installation completes, activate UFW and configure it to run upon system startup automatically:
sudo ufw enableReviewing Apache’s UFW Profiles
To view the range of Apache profiles at your disposal, use the command:
sudo ufw app listAn illustrative output might resemble:
Available applications:
  Apache
  Apache Full
  Apache Secure
From this output, it’s evident that three primary profiles are available. Specifically, Apache operates on port 80 (HTTP), Apache Secure functions on port 443 (HTTPS), and Apache Full amalgamates both ports. Commonly, professionals tend to gravitate towards either Apache Full or Apache Secure, depending on their precise requirements.
Considering our current tutorial doesn’t delve into SSL, we’ll activate the Apache profile using:
sudo ufw allow 'Apache'Expected output:
Rule added
Rule added (v6)
This confirmation signifies that the rules for both IPV4 and IPV6 have been integrated. As your project progresses, you may opt to switch off this profile in favor of the Apache Secure profile or deactivate the Apache rule to exclusively utilize the Apache Full rule.
Additional Examples
For those keen on permitting HTTPS traffic, the following command enables the Apache Secure profile:
sudo ufw allow 'Apache Secure'
If you later decide to allow both HTTP and HTTPS traffic, you can use:
sudo ufw allow 'Apache Full'To verify the status of your UFW rules and confirm that they’ve been correctly established, execute:
sudo ufw statusThis command offers a comprehensive view of all active rules, assisting in troubleshooting or further configuration endeavors.
Conclusion
In conclusion, installing LAMP on Debian 12 Bookworm, Debian 11 Bullseye, or Debian 10 Buster provides a reliable and robust environment for hosting and developing a wide range of web applications. This open-source software stack, comprising Linux, Apache, MySQL/MariaDB, and PHP, is supported by a vast community, offering extensive resources and support. Its flexibility and ease of deployment make it an excellent choice for newcomers and experienced developers, ensuring a solid foundation for your web hosting needs.