
The Ionic Framework is an open-source UI toolkit for building performant, high-quality mobile applications using web technologies — HTML, CSS, and JavaScript. It primarily focuses on frontend user experience, offering a rich array of pre-designed components, gestures, and tools for developing fast, easy-to-use applications. Ionic’s primary benefit lies in its ability to write once and run everywhere, meaning the same codebase can be used to deploy apps across multiple platforms like iOS, Android, and the web.
Why an Ubuntu User Would Choose Ionic Framework Over Other Alternatives?
- Platform Agnostic Development: Ionic provides a platform-agnostic development experience. The same codebase can be utilized to create applications for Android, iOS, and the web. This characteristic significantly decreases development time and effort, which is a boon for developers working on Ubuntu systems.
- Based on Web Standards: Ionic is based on widely used web technologies like HTML, CSS, and JavaScript. This means that developers with a background in web development will find it easier to transition into mobile app development with Ionic.
- Rich Library of Components: Ionic comes with a rich library of pre-developed components, allowing developers to build complex interfaces with ease. These components are both visually appealing and functionally robust.
- Integration with Angular, React, and Vue: Ionic offers seamless integration with popular JavaScript frameworks like Angular, React, and Vue.js. This makes it an excellent choice for developers who are already familiar with these frameworks.
- Strong Community Support: Ionic has a robust and active community. This support network is vital for troubleshooting, learning new techniques, and staying up-to-date with the latest developments in the framework.
Why Ionic is a Compelling Option Compared to Other Popular Software?
- Compared to Native App Development: Native app development requires developers to write separate codebases for different platforms (e.g., Swift for iOS, Java for Android). In contrast, Ionic allows for a single codebase that can be deployed across multiple platforms, thus saving time and resources.
- Compared to Other Hybrid App Frameworks: While other hybrid app frameworks are available, such as React Native and Flutter, Ionic stands out due to its complete focus on web technologies. This focus makes Ionic an excellent choice for developers with a strong background in web development, as it allows them to leverage their existing skills.
- Compared to Progressive Web Apps (PWAs): PWAs are web applications that can be installed on a user’s device like a native app. However, PWAs can sometimes lack the smoothness and functionality of a native app. On the other hand, Ionic provides a more native-like experience while maintaining the benefits of a PWA.
The following guide will demonstrate how to install the Ionic Framework on Ubuntu 22.04 Jammy Jellyfish or Ubuntu 20.04 Focal Fossa using CLI commands, starting with the installation of the latest Node.js source and then the Ionic CLI framework.
Section 1: The Installation of Node.js on Ubuntu
Node.js is a crucial component for the Ionic framework as it serves as the runtime environment that allows JavaScript to be executed server-side. This section will guide you through the steps necessary to install Node.js on your Ubuntu system. We will be using the command-line interface (CLI) to accomplish these tasks.
Step 1: Ensuring Your Ubuntu System is Up-to-Date
Before we commence with the installation process, it’s imperative to ensure that your Ubuntu system is updated. This step helps to avoid potential conflicts by making sure all existing packages are current. Execute the following command to update your system:
sudo apt update && sudo apt upgradeThis command will fetch the latest versions of your system’s packages from the Ubuntu repositories and then upgrade your system to these latest versions.
Step 2: Installing Necessary Packages
Certain packages are required to facilitate the smooth installation of Node.js. We will install these using the apt package manager. The following command will install curl (a tool for transferring data using various protocols) and git (a distributed version control system):
sudo apt install curl git -yStep 3: Importing the NodeSource Repository
To install Node.js, we will be utilizing the NodeSource repository, which provides more up-to-date versions of Node.js compared to the default Ubuntu repositories. You can opt for either the current stable version or the latest Long-Term Support (LTS) version of Node.js.
The current version will have the most recent features, but the LTS version offers greater stability and is often a better choice for production environments. Depending on your preference, run one of the following commands to import the NodeSource repository:
Option 1 – Import Node.js – Current Version
curl -fsSL https://deb.nodesource.com/setup_current.x | sudo -E bash -Option 2 – Import Node.js – LTS Version
curl -fsSL https://deb.nodesource.com/setup_lts.x | sudo bash -With the chosen NodeSource repository added to your system, you will need to run another update to ensure the system recognizes the new repository:
sudo apt updateOnce the system is updated, you can install Node.js with the following command:
sudo apt install nodejsAfter installation, verify the version and build of Node.js that was installed to ensure everything has been set up correctly. You can do this by running the command:
node --versionThis will output the version of Node.js currently installed on your system, confirming the success of your installation.
Section 2: Installing the Ionic Framework
With Node.js now installed on your Ubuntu system, we can proceed to the installation of the Ionic Framework. To install Ionic, we need to first install Cordova, a mobile development framework that provides JavaScript APIs to access native device functions from hybrid applications.
Step 1: Updating NPM
The Node Package Manager (NPM) is a crucial tool for JavaScript developers that comes bundled with Node.js. It allows us to install, update, and manage software packages in Node.js. To ensure that NPM is up-to-date before we proceed, run the following command:
sudo npm install npm@latest -gThe -g flag in this command specifies that NPM should be updated globally on your system.
Step 2: Installing the Ionic Framework
Now we can proceed to install the Ionic Framework. The Ionic command-line interface (CLI) provides a number of helpful tools for developers throughout the Ionic development process. You can install the Ionic CLI with the following command:
sudo npm i -g @ionic/cliPlease note that @ionic/cli is the new name for the Ionic package. If you have previously installed Ionic, this is the package name you should now use.
After the installation, it is a good practice to verify the version of Ionic that was installed. You can check this by running the following command:
ionic -vThis command will return the version number of your Ionic installation, confirming that the installation process has been completed successfully.
Section 3: Initiating a Project for Testing Purposes
Now that we have the Ionic Framework installed on our Ubuntu system, we can create a test project to confirm everything is functioning correctly. The Ionic CLI provides a powerful project generation command that sets up the foundational files and directories for an Ionic project, significantly reducing the initial setup time.
Step 1: Creating a New Ionic Project
To create a new Ionic project, use the ionic start command followed by the name of your project. For this guide, we will create a project named TestProject. It’s recommended to replace TestProject with the actual name of your project when you start working on your own applications. Run the following command:
ionic start TestProjectWhen you run this command, Ionic will create a new directory with the same name as your project (TestProject in this case). Inside this directory, Ionic generates a basic application structure with all the necessary files and directories for a standard Ionic application.
Step 2: Navigating into the Project Directory
To start working on your new Ionic project, you need to navigate into the project’s directory. This can be done using the cd command followed by the name of your project directory. Run the following command:
cd TestProjectStep 3: Previewing the Application
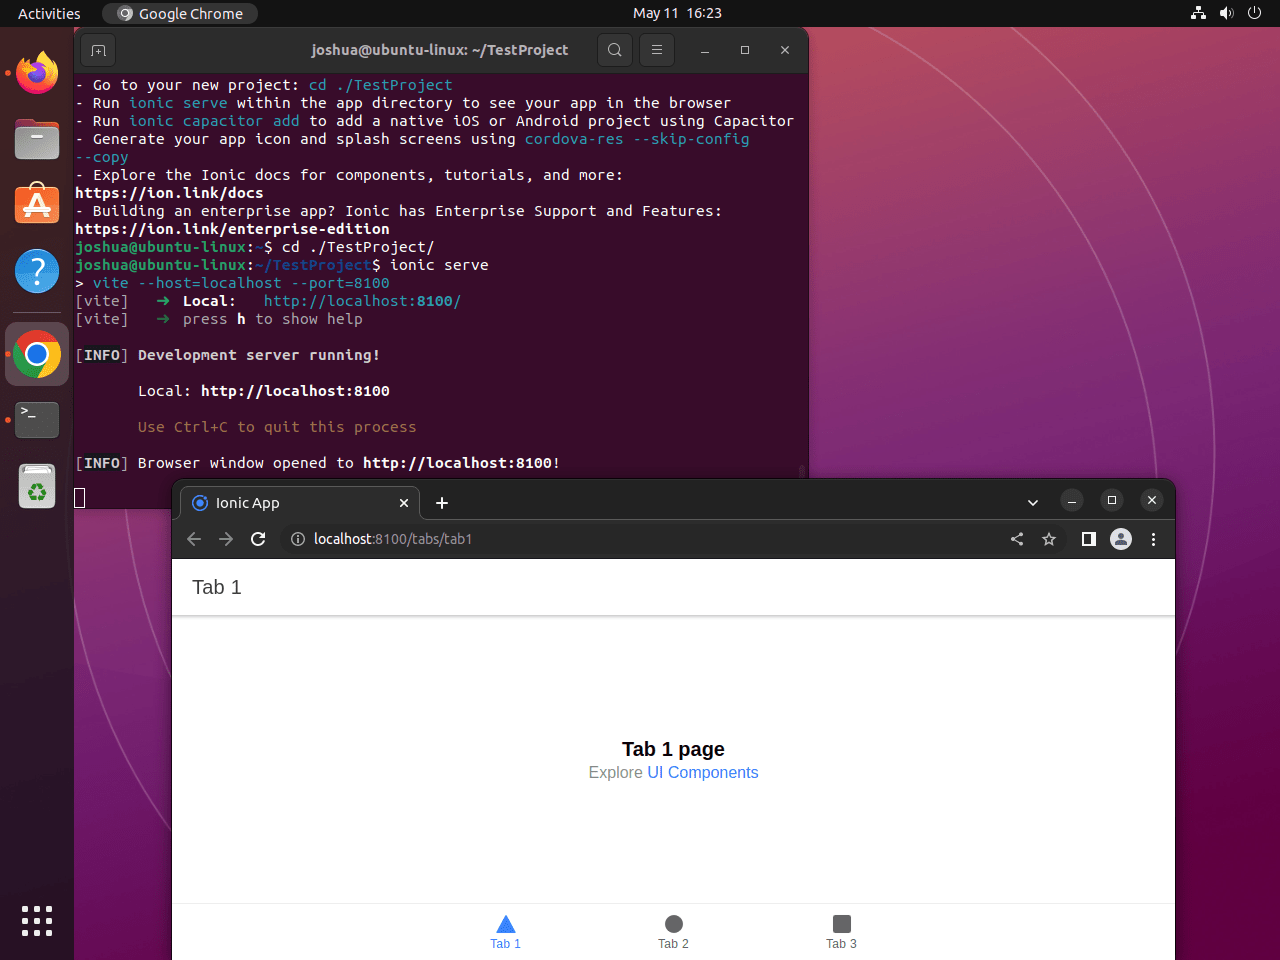
Ionic includes a built-in development server that allows you to preview your application in a web browser. This feature is incredibly handy for quickly testing changes and debugging your application during development. To start the development server and preview your application, run the following command:
ionic serveUpon executing this command, the Ionic CLI will compile your application and start a local development server. Once the server is running, your default web browser will automatically open a new tab displaying your application.
Example:
Step 4: Building the Application
To create a production-ready version of your application, you need to run a build command. Building your application will minify your code and perform other optimizations to ensure your application runs as efficiently as possible. Run the following command to build your Ionic application:
ionic buildThis command will create a www directory in your project directory if one does not already exist. The www directory will contain the built (production-ready) version of your application.
Step 5: Deploying the Application
After building your application, you might want to deploy it on a real device or an emulator to see how it works in a real-world scenario. For this, you can use Cordova or Capacitor, both of which allow you to package your Ionic application into a native wrapper for deployment on different platforms like iOS, Android, and Electron.
Before you can deploy your application, you need to add the desired platform to your project with the ionic capacitor add command, replacing platform with android, ios, or electron based on your preference. For example:
ionic capacitor add androidOnce the platform is added, you can open your application in the platform-specific IDE with the ionic capacitor open command, which will allow you to run your application on an emulator or real device. For example:
ionic capacitor open androidClosing Thoughts on Installing Ionic Framework on Ubuntu Linux
To recap, we’ve embarked on a thorough journey to install the Ionic Framework on Ubuntu 22.04 or 20.04. We started with installing Node.js, then moved on to installing the Ionic Framework itself, and finally, we created a test project to verify our installation. This comprehensive guide aimed to provide you with the necessary knowledge and tools to get started with Ionic on Ubuntu, a powerful combination for building high-quality mobile applications.
The Ionic Framework is a versatile tool that can enhance your mobile app development process, offering a flexible environment that supports multiple popular web frameworks like Angular, React, and Vue. By choosing Ionic for your projects, you’re embracing a world of efficient app development and high-performance applications.
Additional Resources and Links
For those who want to delve deeper into the Ionic world, here are a few resources that you might find beneficial. These are official sources that provide a wealth of knowledge about the Ionic Framework:
- Ionic Framework Official Documentation – The official documentation of Ionic is an excellent starting point to learn about the framework’s capabilities, get to know its APIs, and discover tips and best practices.
- Ionic Framework GitHub Repository – The GitHub repository of Ionic offers a closer look at the framework’s codebase and allows you to keep track of updates, bug fixes, and new feature implementations.
- Ionic Forum – The Ionic Forum is a community-driven platform where Ionic developers worldwide share their experiences, discuss issues, and help each other out. It’s an excellent place to connect with other developers and broaden your Ionic knowledge.