
The Ionic Framework emerges as a powerhouse for crafting high-quality web and mobile applications in web development. For developers operating on Debian systems, integrating the Ionic Framework can significantly elevate their development process. This guide is tailored to demonstrate how to install Ionic Framework on Debian 12 Bookworm, Debian 11 Bullseye, or Debian 10 Buster, ensuring a seamless development experience.
Key Advantages of the Ionic Framework:
- Universal Deployment: Ionic’s core strength lies in its platform-agnostic nature. Developers can craft an application once and deploy it across iOS, Android, or the web, epitomizing the “write once, run anywhere” ethos.
- Modular Design: Ionic’s component-based architecture simplifies the development workflow, promoting cleaner, more maintainable code.
- Harmony with Leading Frameworks: Ionic integrates with renowned frameworks such as Angular, React, and Vue. This interoperability amplifies the efficiency and scalability of applications.
- Pre-built UI Elements: Ionic has many customizable UI components, themes, and animations. These ready-to-use elements facilitate the creation of aesthetically pleasing and user-centric applications.
- Optimized Performance: Ionic apps harness the power of a device’s web view, ensuring swift performance. Their ability to tap into native APIs also means they can fully utilize the device’s hardware capabilities.
- Developer-Centric: Ionic places a premium on the developer experience. Comprehensive documentation, a vibrant community, and intuitive CLI tools support developers throughout their journey from inception to deployment.
With these attributes, the Ionic Framework solidifies its position as a top-tier developer choice. As we delve deeper into this guide, you’ll acquire the expertise to install and utilize the Ionic Framework on your Debian system.
Install Node.js on Debian 12, 11 or 10
Node.js is a fundamental element of the Ionic framework. It provides a runtime environment that allows the execution of JavaScript on the server side. This section is designed to guide you through a step-by-step process of installing Node.js on your Debian system. We’ll execute the required commands using the command-line interface (CLI).
Step 1: Preparing Your Debian System
To ensure a smooth installation process, your Debian system must be updated. Keeping your system updated helps to avoid possible conflicts by ensuring all the existing packages are up-to-date. You can update your system by running the following command:
sudo apt update && sudo apt full-upgradeWhen executed, this command retrieves the most recent versions of your system’s packages from the Debian repositories and then upgrades your system to these latest versions.
Step 2: Installing Initial Packages
Some specific packages are necessary to ensure the seamless installation of Node.js. These packages can be installed using the apt package manager. The command provided below will install curl (a utility used for data transfer through various protocols) and git (a distributed version control system):
sudo apt install curl git -yStep 3: Import NodeSource Repository for Debian
We will install Node.js from the NodeSource repository. This repository provides more recent versions of Node.js compared to the default Debian repositories. Depending on your requirements, you can choose either the current stable version or the latest Long-Term Support (LTS) version of Node.js.
The current version comes with the most recent features, while the LTS version provides more excellent stability and is usually recommended for production environments. Depending on your preference, execute one of the following commands to incorporate the NodeSource repository:
For the current version:
curl -fsSL https://deb.nodesource.com/setup_current.x | sudo -E bash -LTS version:
curl -fsSL https://deb.nodesource.com/setup_lts.x | sudo bash -Once you’ve added the chosen NodeSource repository to your system, you must rerun an update. This ensures the system recognizes the new repository:
sudo apt updateStep 4: Installing Node.js
After updating the system, Node.js can be installed with the following command:
sudo apt install nodejsStep 5: Verify Node.js Installation
Upon completion of the installation, it’s essential to verify the version and build of Node.js installed. This step confirms whether Node.js has been successfully set up on your system.
Run the following command to check the installed version of Node.js:
node --versionThe command will return the version of Node.js currently installed on your system, thereby confirming the success of your installation.
Install Ionic Framework on Debian 12, 11 or 10
With Node.js successfully set up on your Debian system, the next stage involves the installation of the Ionic Framework. This robust framework facilitates the development of hybrid mobile applications with various tools and features.
Step 1: Updating Node Package Manager (NPM)
Node Package Manager (NPM), a key tool for JavaScript developers, is bundled with Node.js. It plays a pivotal role in installing, updating, and managing software packages in Node.js.
To ensure the smooth installation of the forthcoming packages, NPM must be up-to-date. This precaution helps avert potential conflicts.
You can update NPM on your system with the following command:
sudo npm install npm@latest -gIn this command, the -g flag indicates a global update of NPM across your system. This means the update is system-wide rather than confined to a specific directory.
Step 2: Install Ionic Framework on Debian via NPM Command
Now, we are ready to install the Ionic Framework. The Ionic command-line interface (CLI) is replete with helpful tools for developers, offering support throughout the Ionic development process.
You can install the Ionic CLI with the following command:
sudo npm i -g @ionic/cliNote that @ionic/cli is the updated package name for the Ionic Framework. If you have previously installed Ionic under an old package name, this is the name you should now use.
Step 3: Verifying the Ionic Installation
Once the installation of the Ionic Framework is complete, it’s advisable to verify the installed version of Ionic. This step confirms the successful execution of the installation process.
To check the version of your Ionic installation, run the following command:
ionic -vThis command will return the version number of your Ionic installation, confirming that the installation process has been completed.
Create a Test Project with Ionic on Debian 12, 11, or 10
Next, we aim to lead you through initiating a test project using the Ionic framework on Debian. This will help confirm that everything is functioning as it should. Using the powerful Ionic CLI, we’ll generate a project that puts into place all the foundational files and directories you require, making the initial setup a breeze.
Establishing a New Ionic Project
One of the first things you’ll want to do is create a new Ionic project. This relatively straightforward process involves using the ionic start command, followed by the name of your project. Let’s assume for the purpose of this guide that we’re creating a project named TestProject. When embarking on your own applications, you’d replace TestProject with your project’s actual name.
So, to get started, run the following command:
cd TestProjectPreviewing Your Application
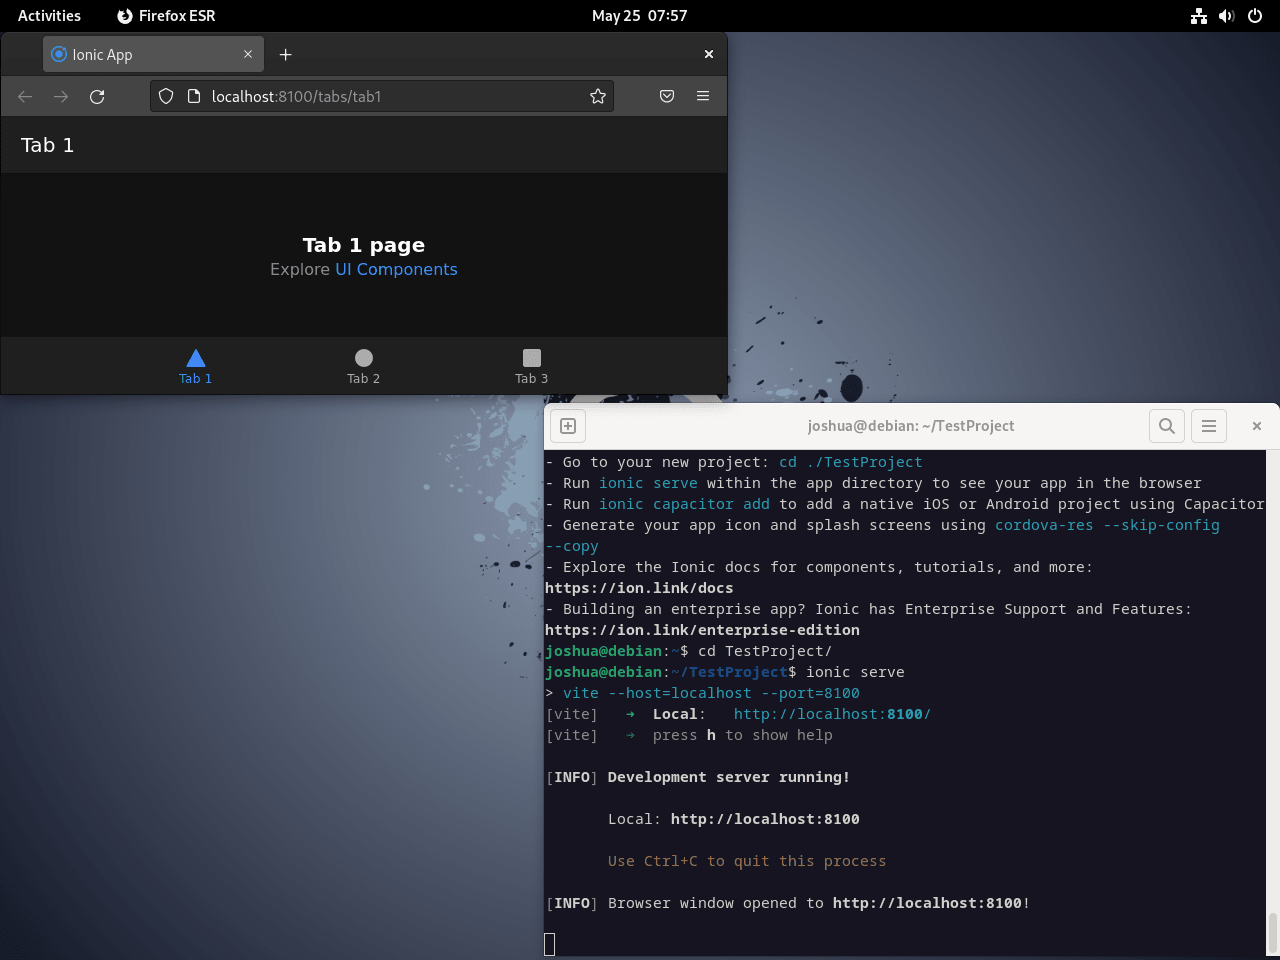
One of the great features of Ionic is its built-in development server, which allows you to preview your application via a web browser. This is an invaluable tool for quickly assessing changes and debugging your application throughout the development process.
To get the development server running and preview your application, run the following command:
ionic serveUpon running this command, the Ionic CLI will compile your application and initiate a local development server. Once this server is operational, your default web browser will automatically open a new tab, displaying your application.
Building the Application
You’ll need to run a build command to develop a production-ready version of your application. This process minifies your code and conducts various other optimizations to ensure your application runs smoothly and efficiently.
To build your Ionic application, execute the following command:
ionic buildThis command will result in the creation of a www directory within your project directory. If this doesn’t already exist, it will be established for you. The www directory will contain the production-ready (or built) version of your application.
Deploying the Application
Once you’ve built your application, it’s time to think about deployment. This could be on an actual device or an emulator, so you can see how it operates within a real-world scenario. There are tools available to help you do this, such as Cordova or Capacitor. These allow you to package your Ionic application into a native wrapper for deployment on various platforms, such as iOS, Android, and Electron.
However, before you can deploy your application, you’ll need to add the preferred platform to your project. This is accomplished with the ionic capacitor add command, replacing ‘platform’ with either ‘android’, ‘ios’, or ‘electron’, depending on your needs.
For instance:
ionic capacitor add androidOnce the platform is added, you can open your application in the platform-specific IDE with the ionic capacitor open command. This enables you to run your application on an emulator or device.
For example:
ionic capacitor open androidRunning this command opens your application in the specific IDE, which is Android. This step is necessary because it allows you to test your application on an emulator or deploy it on an actual device. These steps offer valuable insight into how your application will function in real-world scenarios, paving the way for necessary adjustments and improvements.
Always remember that each step in the development process plays a vital role in creating a well-rounded and high-performing application. By following this guide, you ensure you take all the necessary steps to deliver a production-ready application that can function efficiently across different platforms.
Final Thoughts
In conclusion, setting up the Ionic Framework on a Debian Linux distribution is integral to web and mobile application development. This guide provided a comprehensive walkthrough of creating, previewing, building, and deploying an Ionic project. Following these steps enables you to establish a development environment on Debian efficiently and allows you to focus on crafting applications that meet your needs and expectations.