

Monitoring system resources is crucial for understanding your computer’s performance and diagnosing issues. Htop, an interactive process viewer, serves this need effectively. This guide focuses on how to install Htop on Rocky Linux 9 or its older enterprise-based release, Rocky Linux 8.
Key Features of Htop for Rocky Linux Users
- Real-Time Monitoring: Htop provides real-time updates, allowing you to monitor system usage and running processes.
- User-Friendly Interface: Htop offers an easy-to-read, color-coded display, making it accessible for users of all experience levels.
- Resource Efficiency: Unlike traditional system monitoring tools, Htop is known for its minimal resource consumption, making it ideal for older systems or servers.
Installing Htop on your Rocky Linux system gives you a powerful tool for monitoring and managing your computer’s resources. Stay tuned for the step-by-step installation guide that follows.
Step 1: Update Packages on Rocky Linux Before Htop Installation
First, before proceeding, update your system to ensure no conflicts occur during the installation.
sudo dnf upgrade --refreshStep 2: Install Htop on Rocky Linux 9 or 8
By default, Rocky Linux does not have Htop available from its appstream. So, you will need the EPEL repository first. Ensure you import the correct EPEL repository that matches your enterprised-based Rocky Linux version.
Enable EPEL Repository on Rocky Linux for Htop
Import EPEL for Rocky Linux 9 (EL9) for Htop on Rocky Linux
First, enable the CRB.
sudo dnf config-manager --set-enabled crbNext, install EPEL using the following (dnf) terminal command.
sudo dnf install \
    https://dl.fedoraproject.org/pub/epel/epel-release-latest-9.noarch.rpm \
    https://dl.fedoraproject.org/pub/epel/epel-next-release-latest-9.noarch.rpm
Import EPEL for Rocky Linux 8 (EL8) for Htop on Rocky Linux
Like Rocky Linux 9, install EPEL using the following (dnf) terminal command to install the EPEL repository for Rocky Linux 8.
sudo dnf install \
    https://dl.fedoraproject.org/pub/epel/epel-release-latest-8.noarch.rpm \
    https://dl.fedoraproject.org/pub/epel/epel-next-release-latest-8.noarch.rpm
Install Htop on Rocky Linux
To proceed with the installation, use the following command.
sudo dnf install htop -yConfirm the installation and version build using the htop –version command.
htop --versionExample output:
[joshua@rocky-linux ~]$ htop --version
htop 3.2.1
Step 3: Basic Htop Terminal Commands on Rocky Linux
As the name suggests, use the following command to bring up Htop in your terminal.
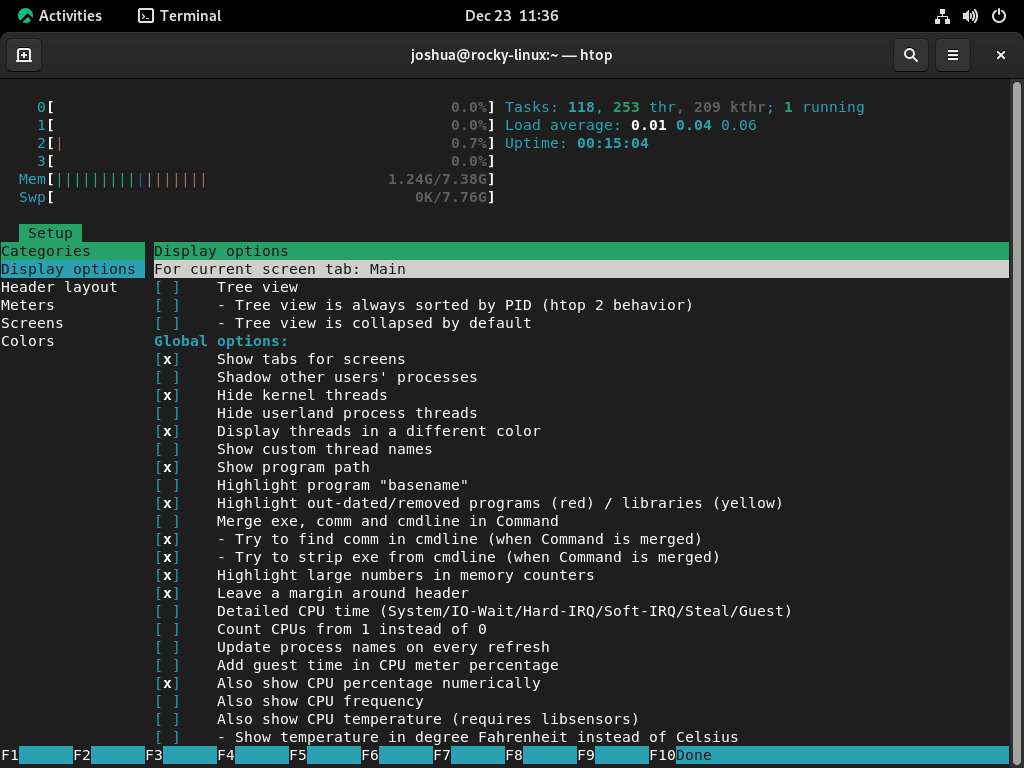
htopThe first time you open Htop, and after having a look, I would suggest pressing the F2 button and beginning to do some configurations, as you can customize or add missing things you would like to see.
Further options can be added to the Htop command, such as some standard parameters below.
| Parameter | Function |
|---|---|
-d –delay= 10 | Specify the update rate in 1/10 seconds |
| -C –no-color –no-color | Start without colors |
| -h –help | Show quick help |
| -u –user=username | Show only the specified user |
| -s –sort-key | Sort by a specific column. A list of the permitted column names can be htop -s help output with |
| -v –version | Show Htop version |
One of the most common parameters is delaying the update frequency of Htop, as many have the application constantly running to monitor system or network performances.
htop -d 10As mentioned above, this has added a ten-second delay, but you can specify anything you want in seconds.
Htop Keyboard Shorts
Below is a list of the most commonly used shortcuts.
| Keys | Function |
|---|---|
| ← , ↑ , → , ↓ | Scroll through the process list |
| ⇧ + U | Remove all tags |
| . or , | Incremental search for the PID |
| F1 , ? , H | Show help |
| U | Show the processes of a user |
| F2 , ⇧ + S | Open setup and change settings |
| ⇧ + H | Show/hide user threads |
| F3, ⇧ + / | Incremental process name search |
| ⇧ + K | Show/hide kernel threads |
| F4, \ | Filter by name |
| ⇧ + F. | Pin the cursor to a process |
| F5 , T | Activate/deactivate tree view |
| + , – | Expand/collapse the tree |
| F6, > | Select the column to sort |
| ⇧ + P | Sort processes by CPU usage |
| F7 | Decrease Nice value |
| ⇧ + M | Sort processes by memory usage |
| F8 | Increase Nice value |
| ⇧ + T | Sort processes by the time |
| F9, K | End the process or processes of a day |
| L | Open files with lsof open |
| F10 , Q , Ctrl + C | break up |
| S | System calls to stracetrace |
| Space bar | Tag process |
| ⇧ + L | Track library ltracecalls |
| I | I / O control |
Additional Commands & Tips for Htop on Rocky Linux
Remove (Uninstall) Htop
Removing Htop from your system is straightforward. Use the following command.
sudo dnf autoremove htop -yIt is advised to keep EPEL installed, as this repository provides many alternative packages you may require in the future.
Conclusion
The tutorial has demonstrated how to install the Htop interactive viewer on Rocky Linux 9 or 8 by importing the EPEL repository and installing the viewer for your alternative “top command” replacement. Overall, most users prefer using Htop over the traditional Top viewer. It’s fantastic and lightweight compared to other options, such as Glance’s system monitor and works well for desktop or server users.