

For Ubuntu users looking to streamline their HP device management, learning how to install HPLIP on Ubuntu 22.04 Jammy Jellyfish or its older stable release of Ubuntu 20.04 Focal Fossa is a smart move. The HP Linux Imaging and Printing (HPLIP) software brings a wealth of functionality to your HP devices, from printing to scanning and faxing, all within the comfort of your Linux environment.
Here’s a snapshot of what HPLIP brings to the table:
- Broad Device Support: With compatibility with over 3,000 HP printer models, HPLIP will likely support your device.
- All-in-One Solution: Enjoy features like automatic printer discovery, integrated print spooling, and advanced printing options, including duplex and borderless printing.
- Scan and Fax: HPLIP isn’t just for printing; it fully supports scanning and faxing functions on multifunction HP devices.
- Frequent Updates: Regular updates from HP ensure that your drivers remain up-to-date with the latest enhancements and fixes.
- User-Friendly Interface: The HP Device Manager, HPLIP’s graphical tool, makes device management straightforward and accessible.
- Community-Driven: As an open-source project, HPLIP is free and continuously refined by community input.
Equipped with these features, Ubuntu users can enjoy a seamless and efficient experience with their HP printers and multifunction devices. Our upcoming guide will cover the steps to install HPLIP on Ubuntu 22.04 or Ubuntu 20.04, ensuring you have the latest drivers and tools for optimal performance.
Install HPLIP on Ubuntu 22.04 or 20.04 via DEFAULT APT
Step 1: Update Ubuntu Packages Before Installation Packages
Before we begin the HPLIP installation, updating your system packages is crucial. This ensures that all existing packages are up-to-date and minimizes the chance of conflicts during the installation process. Run the following command in your terminal to update and upgrade your packages:
sudo apt update && sudo apt upgradeStep 2: Install HPLIP on Ubuntu via APT Command
In your terminal, proceed to install the default HPLIP driver packages. These packages should work for most Ubuntu users, including users on Ubuntu short-term releases:
sudo apt install hplip hplip-data hplip-gui hplip-docInstall HPLIP on Ubuntu 22.04 or 20.04 via APT LaunchPAD PPA
These upstream HPLIP PPA are for Ubuntu 22.04 and 20.04 long-term releases. You cannot use this PPA on short-term Ubuntu releases as it will not work.
Please use the default Ubuntu repository method first before the PPA method as this is the best option unles your hardware is not supported.
The secondary method to install upstream drivers is to use a well-known LaunchPAD PPA that maintains backports for the HPLIP; for users who find the default method does not work for their drivers, importing the PPA and installing the drivers from here may be more beneficial.
Step 1: Install Required Packages
Next, we must install some prerequisite packages necessary for the installation process. The software-properties-common package provides tools to manage distribution and software repositories, while the apt-transport-https package enables the use of repositories accessed via the HTTPS protocol. Run the following command to install or check if these packages are already installed:
sudo apt install software-properties-common apt-transport-https -yStep 2: Import HPLIP PPA on Ubuntu
To install HPLIP, we will use a well-known Launchpad PPA maintained by Butterfly. This PPA is frequently updated and ensures access to the latest HPLIP package.
To add this PPA to your system, run the following command:
sudo add-apt-repository ppa:kelebek333/hplip -yStep 3: Update APT Package Index
After importing the HPLIP PPA, we must update the package index to include the new repository. This will allow your system to recognize the HPLIP package from the added PPA. Run the following command to update the package index:
sudo apt updateStep 4: Install HPLIP on Ubuntu via APT Command
With the PPA added and the package index updated, you can install HPLIP on Ubuntu. Run the following command to install the HPLIP package on your Ubuntu system:
sudo apt install hplip hplip-guiConfigure and Test HPLIP Basic Setup on Ubuntu 22.04 or 20.04
After successfully launching HPLIP, it’s essential to configure and test the basic setup to ensure your HP devices are working correctly with the software. In this section, we will walk you through configuring and testing your HP devices using HPLIP.
Step 1: Run HPLIP Setup
The setup process is similar whether you use the CLI or GUI method to launch HPLIP. If you haven’t already, run the hp-setup command in the terminal or launch HPLIP via the GUI method described in the previous section.
hp-setup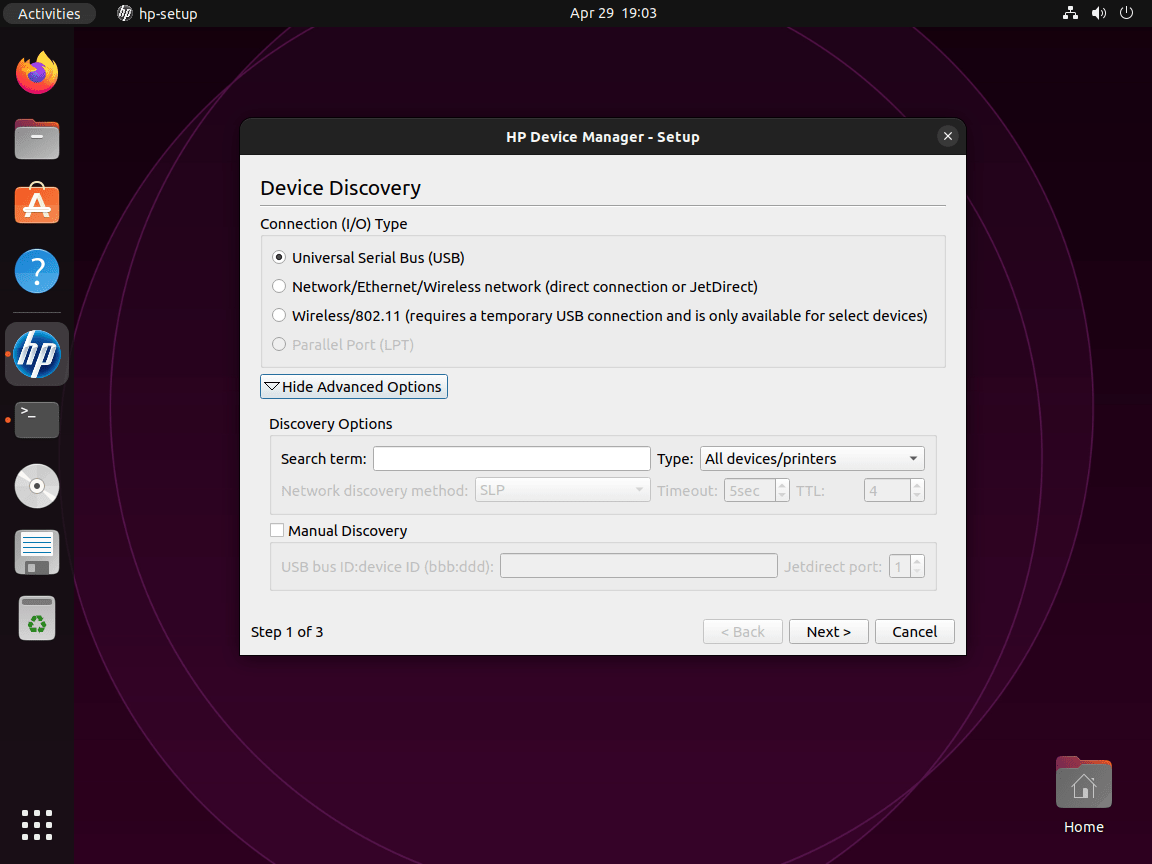
Step 2: Select Connection Type
When the HPLIP setup window appears, you will be prompted to choose the connection type for your HP device. You can choose USB, Network/Ethernet/Wireless, or Parallel. Select the appropriate connection type for your device and click “Next.”
Step 3: Discover and Select Your Device
HPLIP will now scan for connected HP devices based on the connection type you selected. If your device is not automatically detected, you may need to enter its IP address or hostname manually (for Network/Ethernet/Wireless connections). Once your device appears in the list, select it and click “Next.”
Step 4: Configure Printer Settings
In this step, you will configure the basic settings for your HP printer, such as the printer name and description. You can also share the printer on your local network if desired.
After configuring the settings, click “Next.”
Step 5: Install the Printer Driver
HPLIP will now prompt you to install the appropriate printer driver for your device. It will automatically select the recommended driver, but you can also choose a different driver from the list if needed. Click “Next” to begin the driver installation process.
Testing HPLIP Installation on Ubuntu 22.04 or 20.04
Once you have configured your HP devices using either the CLI or GUI method, it’s essential to test the installation to ensure that your devices are functioning correctly with HPLIP. In this section, we will provide instructions on testing your HPLIP installation for both printing and scanning tasks.
Print a Test Page
To confirm that your HP printer is functioning correctly, it’s recommended to print a test page. This can be done through the HPLIP setup process or directly from your operating system.
CLI Method:
In your terminal, enter the following command, replacing “printer_name” with the name of your HP printer:
lp -d printer_name /usr/share/cups/data/testprintGUI Method:
- Open the Printers application on your Ubuntu system.
- Locate and select your HP printer in the list of available printers.
- Right-click on the printer and choose Properties.
- In the printer properties window, click on the Print Test Page button.
If the test page prints successfully, your HP printer is appropriately set up and functioning with HPLIP.
Test Scanning Functionality
If you have an HP all-in-one device with scanning capabilities, you can test the scanning functionality using HPLIP’s built-in scan utility.
CLI Method:
In your terminal, enter the following command to initiate a test scan:
hp-scan --output=my-test-scan.pngThis command will create a test scan and save it as “my-test-scan.png” in your current working directory.
GUI Method:
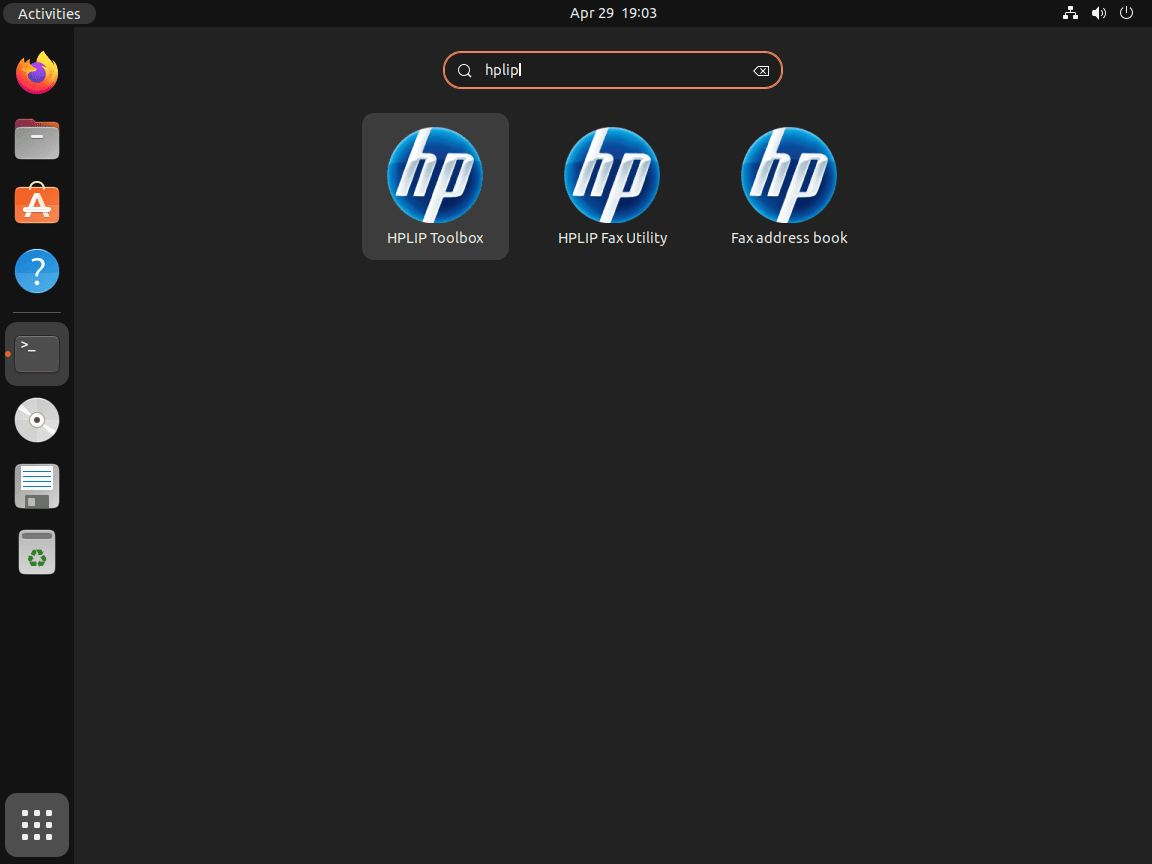
- Launch the HPLIP Toolbox by searching for “HPLIP” in your application menu and clicking on the HPLIP Toolbox icon.
- In the HPLIP Toolbox window, locate and select your HP all-in-one device.
- Click on the Scan button to open the scanning utility.
- Follow the on-screen instructions to perform a test scan, adjusting the scan settings as needed.
If the test scan completes successfully, your HP all-in-one device’s scanning functionality is properly set up and working with HPLIP.
Additional HPLIP Commands with Ubuntu 22.04 or 20.04
In this section, we will cover some useful HPLIP-related commands for Ubuntu users, such as updating HPLIP, removing HPLIP, and removing the HPLIP PPA repository.
Update HPLIP
HPLIP should update automatically with your system packages if you use the APT package manager on a desktop system. However, if you want to check for updates manually, you can use the following command in your terminal:
sudo apt update && sudo apt upgradeThis command will update your package index and upgrade the installed packages, including HPLIP, to their latest versions.
Remove HPLIP
If you no longer need HPLIP on your system, you can remove it using the following command:
sudo apt remove hplipThis command will uninstall the HPLIP software from your Ubuntu system.
Remove the HPLIP PPA Repository
After removing HPLIP, you may want to remove the HPLIP PPA repository as well, since it is no longer needed. The command to remove the repository is similar to the one used for adding it, but with the --remove syntax added. Enter the following command in your terminal to remove the HPLIP PPA repository:
sudo add-apt-repository --remove ppa:kelebek333/hplip -yConclusion: Installing HPLIP on Ubuntu
In this guide, we’ve covered the essential steps to install HPLIP on Ubuntu Linux. We’ve walked you through updating your system packages, adding the HPLIP PPA repository, installing HPLIP, and managing the software using various commands. Following these steps, you can successfully set up your HP printer or scanner on your Ubuntu system and ensure optimal performance.
Did not work. I get an error cannot communicate with printer
Excellent. Thanks!