
Glances stands out for its real-time capabilities and user-centric features in the realm of system monitoring tools. For those utilizing Debian systems, the ability to install Glances on Debian 12 Bookworm or the older stable releases of Debian 11 Bullseye or Debian 10 Buster can significantly enhance system oversight. This guide aims to streamline the installation process, ensuring you can harness the full potential of Glances on your Debian system.
Distinguishing Features of Glances:
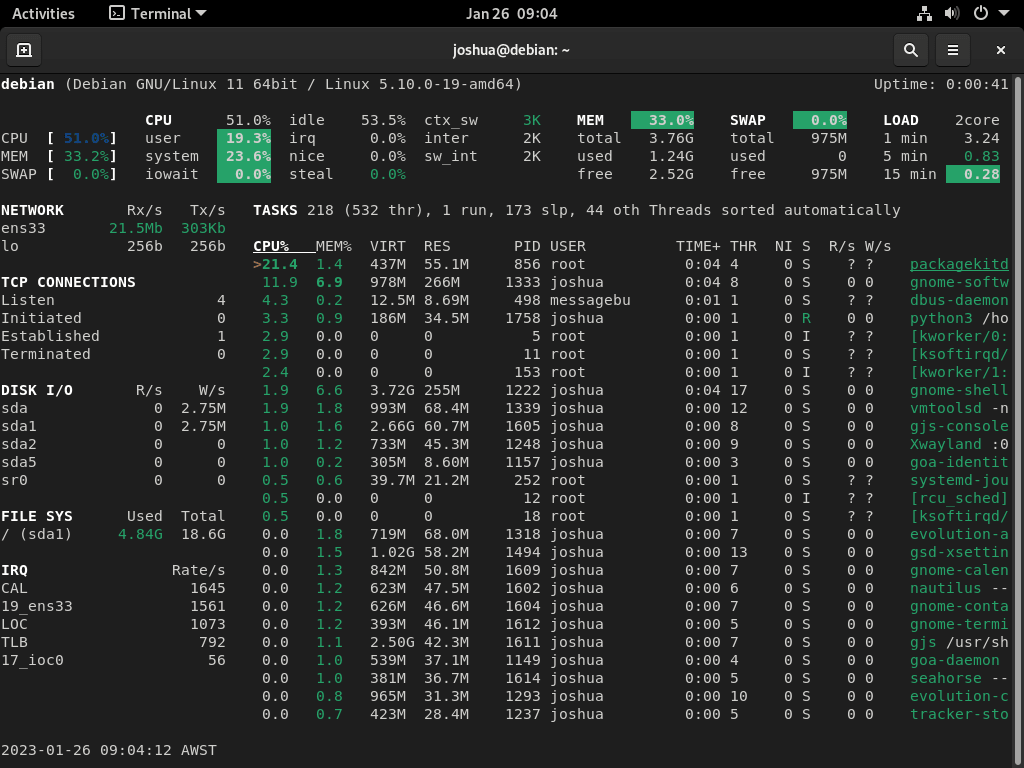
- Instantaneous Updates: Glances continuously monitors and displays system metrics such as CPU, memory, and network usage, ensuring you’re always informed.
- Intuitive Alerts: With color-coded indicators, Glances immediately draws attention to potential system issues, facilitating timely interventions.
- Adaptable Interface: Designed for ease, Glances boasts a modifiable interface that caters to individual user preferences.
- Broad Compatibility: Beyond Debian, Glances extends its support to other platforms, including BSD and Windows, underscoring its versatility.
- Expandability via Plugins: Users can augment Glances’ core functionalities by integrating various plugins, enhancing its monitoring scope.
- Centralized Oversight: The remote monitoring feature of Glances empowers users to manage and monitor multiple systems from a singular point, optimizing efficiency.
- Simplified Setup: Glances is designed for easy installation, making it a go-to choice for both novices and seasoned Debian users.
As we delve deeper, this guide will elucidate the steps to seamlessly integrate Glances into your Debian environment, setting the stage for robust system monitoring.
Install Glances on Debian 12, 11, or 10 via APT
Step 1: Update Debian Before Glances Installation
Before installing Glances on your Debian system, it is important to ensure that all existing packages are up to date. You can update your Debian operating system using the following command:
sudo apt update && sudo apt upgradeThis will ensure your system has installed the latest packages and security updates, making it more secure and stable.
Step 2: Install Glances via APT Command on Debian
The best method for installing Glances is to install the application software via APT. A popular method was to use PIP previously. Still, given from Debian 12 onwards, you now need to set up PIP installations by default in virtual environments due to security concerns, making APT once again the easiest method for users.
To install Glances, run the following command:
sudo apt install glancesStep 3: Back Up Glances Configuration File
Before modifying the default configuration settings of Glances on a Debian system, you should change the configuration file located at /etc/glances/glances.conf. But first, back up the original configuration file.
To do this, create a copy of the file in a different location using the command:
cp /etc/glances/glances.conf /etc/glances/glances.conf.bakAfter backing up the original configuration file, open it with a text editor and make the desired changes.
Glances Configuration Examples on Debian 12, 11 or 10
Glances Color-Coded Alters Explained
Color-coded alerts to indicate the status of various system resources. The colors used in the alerts can indicate whether a resource is normal, a warning, or critical.
- GREEN: OK (good)
- BLUE: CAREFUL (attention)
- VIOLET: WARNING (alert)
- RED: CRITICAL (critical)
The default threshold levels for the various system resources in Glances are as follows:
- CPU usage: The normal threshold is set at 80%, the warning threshold is set at 90%, and the critical threshold is set at 95%.
- Memory usage: The normal threshold is set at 80%, the warning threshold is set at 90%, and the critical threshold is set at 95%.
- Network usage: The normal threshold is set at 1000Kbps, the warning threshold is set at 5000Kbps, and the critical threshold is set at 10000Kbps.
It’s worth noting that these thresholds are customizable, and users can adjust them to suit their needs and system environment better.
The next step is to open the main configuration file at /etc/glances/glances.conf. One way to do this is by using the nano text editor. You can open the file by running the command.
sudo nano /etc/glances/glances.confWhen you open the main configuration file, /etc/glances/glances.conf, using a text editor, you can view and modify various settings for the color-coded alters.
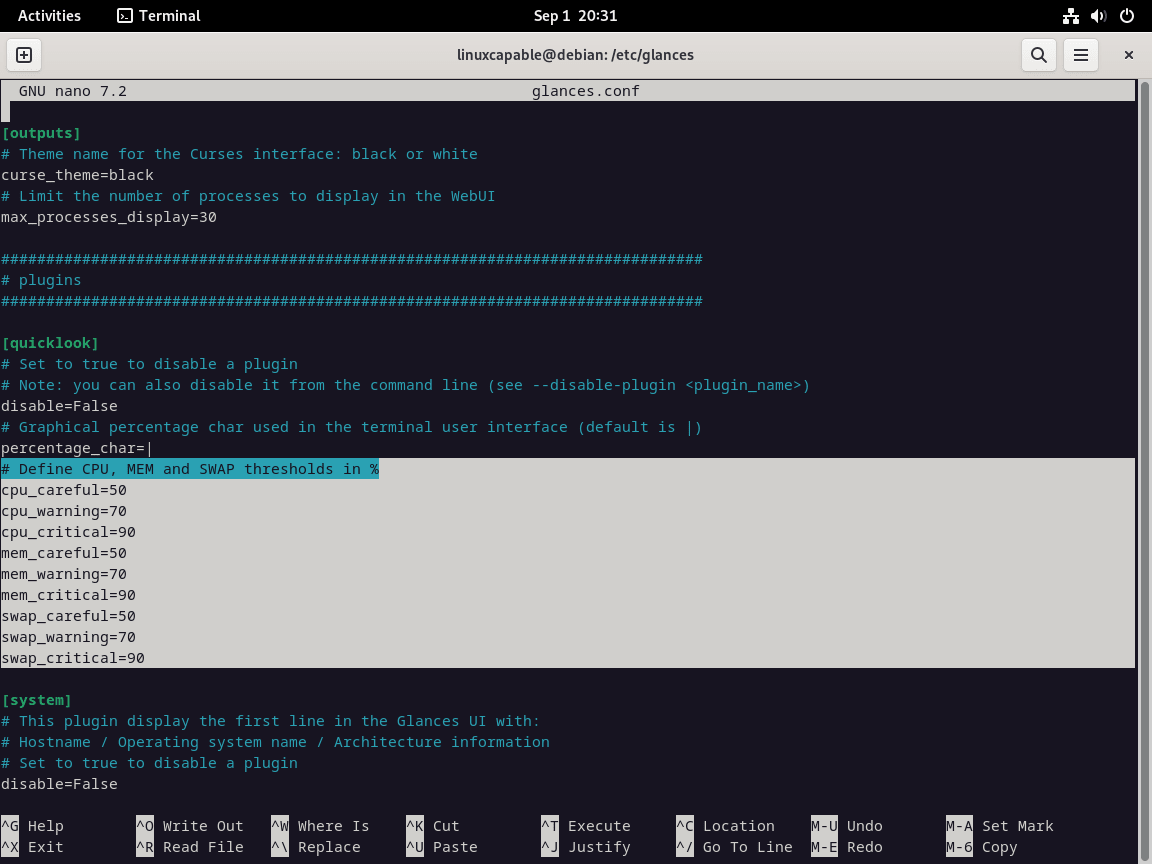
After locating the settings options in the configuration file, adjust the numbers to change them. Keep in mind that most user setups find the default values acceptable, so only edit them if you have strong reservations about the values.
To save the changes, press “CTRL+O.” To exit the text editor and apply the changes to the Glances configuration, press “CTRL+X.”
Glances Terminal Command Options
Here are ten quick examples of Glance’s terminal commands that may be useful in your day-to-day operations with Glances.
Terminal mode:
glancesWeb server mode:
glances -wCSV output mode:
glances -CJSON output mode:
glances -JDisplay system information for a specific process by name.
glances -p <process_name>Specific process by PID.
glances -P <PID>Display information for a specific process by the user.
glances -u <user_name>Display information for a specific process by name and sort by CPU usage.
glances -p <process_name> --sort-by cpu_percentStart Glances in quiet mode.
glances -qHelp on Glance’s command line options.
glances --helpThese are just a few examples of the many commands and options available to customize Glances.
Glances in Web Browser Mode on Debian 12, 11 or 10
With Glances, you can monitor your system performance and resource usage in a web browser of your choice without the need to install additional dependencies. Run the following command in the terminal to start the Glances web interface.
glances -wWhen you run the command “glances -w” to initiate the web interface feature, you may see a message in the terminal that says, “Glances Web User Interface started on http://0.0.0.0:61208.” This message might be confusing because it shows the IP address “0.0.0.0” instead of the actual IP of your server. This is because the IP address “0.0.0.0” is a placeholder that means “all available IP addresses on the host,” This way, you can access the web interface from any device on the same network. You can access the web interface by replacing “0.0.0.0” with the server’s IP address and the same port number, 61208.
Now, set a password for the Glances web-based monitor; you can use the following command.
glances --web-password=yourpasswordNote that you must replace ‘your password’ with the password you want to set. This will enable password protection for the web interface and prompt users to enter the password before accessing the web interface.
Access the Glances web interface in a browser; you can enter the IP address of the server running Glances and the default port 61208 in the address bar of your web browser.
For example: “http://192.168.1.100:61208.” This will open the web interface in your browser, where you can monitor your system performance and resource usage.
http://<ip address>:61209To keep Glances running in the background on your primary client, you can use the following command:
glances -w &When you run the command “glances &”, you start the Glances process in the background. However, it remains attached to the terminal. To detach it, use the “disown” command as follows:
disown %1This will remove the process from the shell’s job control and make it run independently of the terminal. This way, even if you close the terminal, the Glances process will continue running in the background.
You can use the following command to stop the Glances process from running in the background.
pkill -f glancesThis command will kill all active Glances processes running in the background. Please be aware that this command will also kill any other processes running in the background that contain the string “glances” in their command.
Glances Client Mode on Debian 12, 11 or 10
The Glances client-server architecture lets you monitor multiple remote servers from one central location. You can use this feature to operate Glances on various servers and link them to a main client. Remember, you must install Glances on every server you aim to monitor.
Start Glances in server mode on the server machine by running the command.
glances -s <ip:port>For example, if the server’s IP address is 192.168.1.100 and the port is 61208.
glances -s 192.168.1.100:61208Start Glances in client mode on the client machine by running the command.
glances -c <ip:port>For example, if the server’s IP address is 192.168.1.100 and the port is 61208.
glances -c 192.168.1.100:61208Glances will connect to the server and display real-time information about the server’s system performance and resource usage.
To find the IP address and port of the server, check the output of the “glances -s ip:port” command executed on the server machine.
For example, you can connect with a password using the –client-password option.
glances --client-password=<your_password> -c <ip:port>This way, you can securely monitor the performance of multiple systems from a central location.
Conclusion
Installing Glances on a Debian system is a simple process. Once installed, Glances provides real-time information about the system’s resources, including CPU, memory, and network usage, displayed in a terminal window. The tool also provides color-coded alerts to indicate the status of various system resources, making it easy for users to identify and address any potential issues with their system quickly. Glances help monitor and manage a system’s resources on Debian and other platforms.