This guide will demonstrate how to install Flask on Ubuntu 24.04, 22.04, or 20.04 LTS Linux releases utilizing the command-line terminal with the APT Package Manager, Python, and PIP.
Flask stands as a beacon of simplicity and flexibility in the web development world, offering a lightweight approach to building web applications. Its design philosophy centers on providing developers with the tools they need to get started quickly without imposing the constraints that come with a full-fledged framework.
Here’s why Flask captures the attention of developers from novices to experts:
- Minimalistic and Easy to Learn: Flask’s straightforward syntax and lack of boilerplate code make it an ideal starting point for beginners.
- Highly Flexible: Developers have the freedom to choose their tools and libraries, allowing for a tailored development experience.
- Built-in Development Server and Debugger: Simplifies the development process with tools for testing and debugging directly within the framework.
- RESTful Request Dispatching: Supports the creation of RESTful applications with ease, making it suitable for backend API development.
- Extensibility: A wide array of extensions available to add additional functionality such as ORM, form validation, and authentication mechanisms.
- Lightweight: With its focus on simplicity, Flask requires minimal resources, making it a great choice for projects of any scale.
- Integrated Support for Unit Testing: Encourages the development of reliable applications through built-in support for testing.
- Widely Adopted: A large and active community provides a wealth of resources, tutorials, and support for developers.
As we transition into the technical aspects of Flask installation on Ubuntu, remember that mastering Flask opens doors to rapid web development with a focus on your unique project requirements.
Now, let’s get started with the installation process.
Flask Pre-Installation Steps on Ubuntu
Update Ubuntu Before Flask Installation
To ensure a smooth installation process, keeping your Ubuntu system up-to-date with the latest packages and security patches is essential.
Run the following command to update your system:
sudo apt update && sudo apt upgradeImport Python PPA (Optional)
Depending on the version of Ubuntu installed, you might want to consider adding the well-known deadsnakes/ppa LaunchPAD PPA, which contains the latest Python versions. This step is particularly helpful if you require a specific Python version unavailable in the official Ubuntu repositories.
To add the deadsnakes/ppa repository, run the following command:
sudo add-apt-repository ppa:deadsnakes/ppa -yAfter adding the repository, update the package list to include the new Python versions:
sudo apt updateInstall Python 3 and PIP 3 on Ubuntu
Using a Python virtual environment is highly recommended to set up and run a Flask project successfully. This allows you to isolate dependencies and maintain a clean, organized workspace for your Flask application.
Install Python 3
First, ensure that Python 3 is installed on your system. If it’s not already installed, the following command will install it; otherwise, it will return a message stating that Python 3 is already installed:
sudo apt install python3Install PIP for Python 3
Next, you must install PIP (Python Package Installer) for Python 3. PIP allows you to manage and install Python packages, including the Flask framework and the virtual environment package.
To install PIP for Python 3, run the following command:
sudo apt install python3-pipInstall Python 3 Virtual Environment Package
With Python 3 and PIP installed you can now install the Python virtual environment package. This package enables you to create and manage isolated environments for your Python projects.
To install the virtual environment package, run the following command:
sudo apt install python3-venvInstall Flask on Ubuntu
This section will walk you through installing Flask in a virtual environment. This ensures a clean, organized workspace for your Flask project.
Create Flask Project Directory
First, create a directory for your Flask project and navigate to it using the following command:
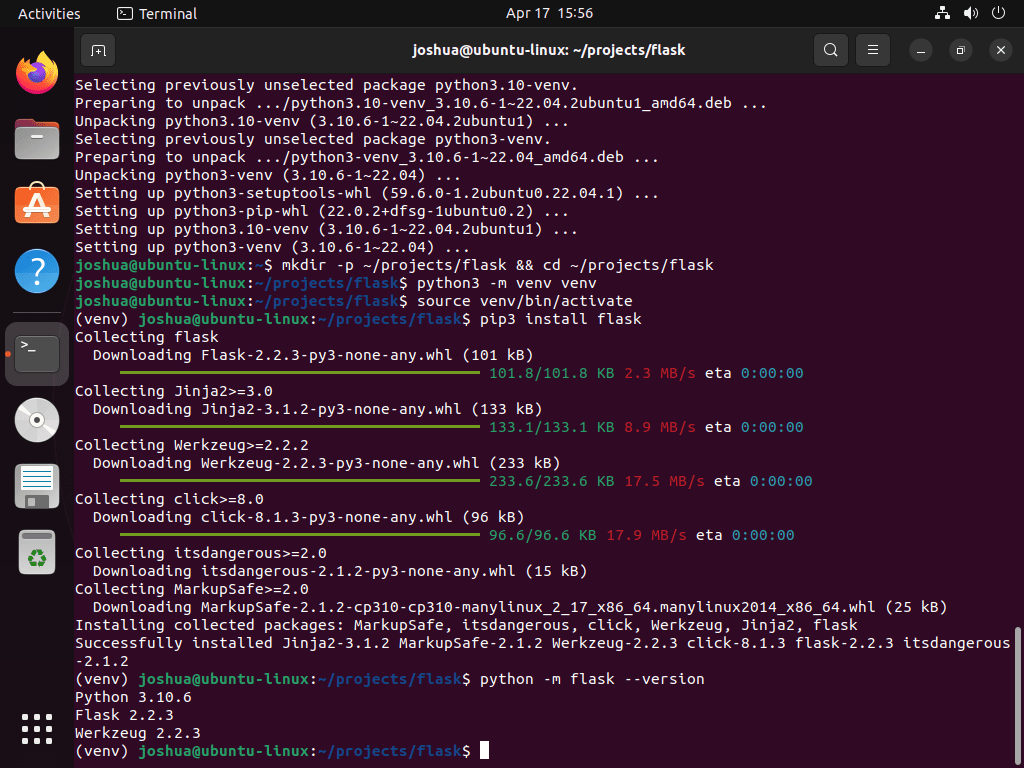
mkdir -p ~/projects/flask && cd ~/projects/flaskThis command creates a new directory called flask within the projects folder in your home directory. You can modify the path according to your preferences.
Create and Activate the Virtual Environment
Next, create a virtual environment within your project directory by running the following command:
python3 -m venv venvThis command creates a new virtual environment named venv. To activate the virtual environment, run the following:
source venv/bin/activateUpon activation, you’ll notice the terminal command line now displays (venv) to indicate that you are currently working within the created virtual environment.
Install Flask via PIP3 Command
Finally, it’s time to install Flask in your virtual environment. Use pip to install all the necessary components, such as Jinja2, Werkzeug WSGI web application library, and its modules:
pip3 install flaskTo ensure that Flask has been installed correctly, check its version by running:
python -m flask --versionCreate a Test Flask Application
This section will guide you through testing Flask. This includes setting up a basic Flask application, configuring the environment variables, and running the development server.
Create a Basic Flask Application
First, create a new Python file for your Flask application within the project directory:
nano app.pyIn the app.py file, add the following code:
from flask import Flask

app = Flask(__name__)

@app.route('/')
def hello():
    return 'Hello, Flask!'

if __name__ == '__main__':
    app.run()
This code creates a simple Flask application with a single route that returns a “Hello, Flask!” message when accessed.
Configure Environment Variables
Flask requires specific environment variables to be set for proper functioning. Set the FLASK_APP variable to the name of your application file:
export FLASK_APP=app.pyFor development purposes, you may also want to enable debug mode. This allows for automatic reloading of the application when changes are made and provide more detailed error messages:
export FLASK_ENV=debugRun the Flask Development Server
With the environment variables configured, you can now start the Flask development server:
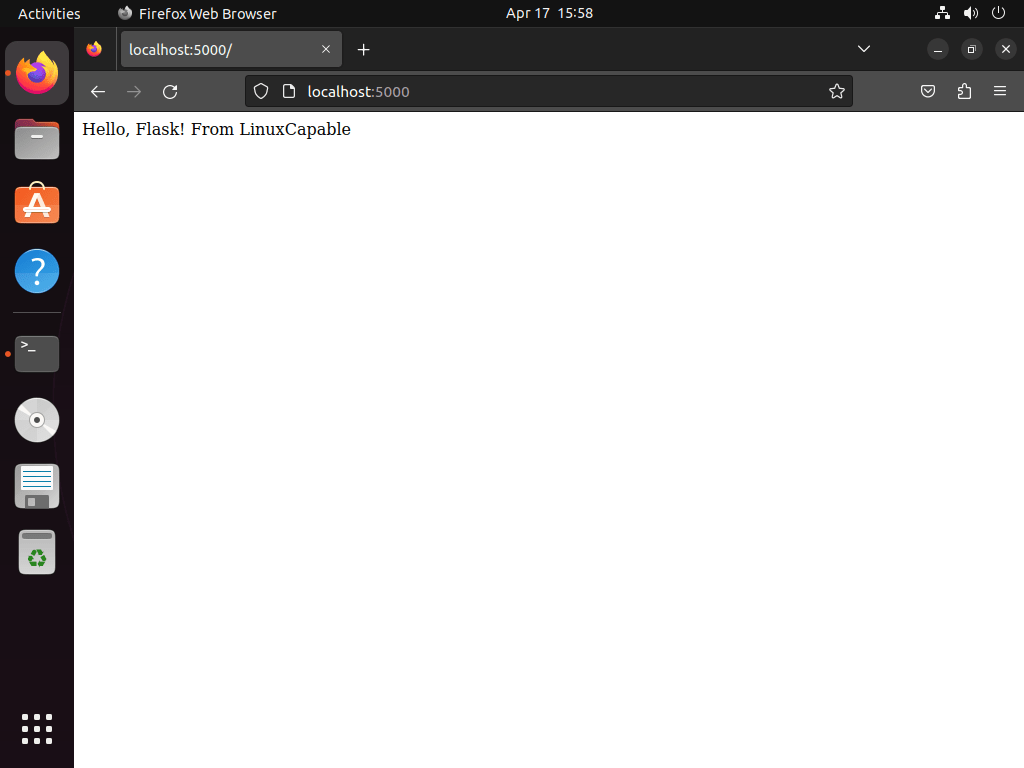
flask runThe server will start listening on localhost:5000. Open your web browser and navigate to http://localhost:5000 to see the “Hello, Flask!” message displayed.
Remember to stop the development server when you’re done by pressing Ctrl+C in the terminal.
Conclusion
In wrapping up, this guide walked you through installing Flask on Ubuntu 24.04, 22.04, or 20.04 LTS, using the command-line terminal with the APT Package Manager. Remember, Flask is your go-to for building web applications with ease and flexibility. It’s all about making your development journey a bit smoother, whether you’re crafting a simple project or something more complex. Just keep exploring Flask’s possibilities and don’t hesitate to dive into its vibrant community for tips, tricks, and support. Happy coding, and here’s to bringing your innovative ideas to life on Ubuntu!


