
FileZilla is available in Ubuntu’s default repositories on all supported LTS releases (26.04, 24.04, and 22.04), and alternative channels like the XtraDeb PPA and Flatpak provide newer builds. Installing FileZilla on Ubuntu gives you a graphical client for transferring files between your local machine and remote servers over FTP, SFTP, or FTPS. Common workflows include uploading website files to a web host, backing up server data locally, and managing files on a remote VPS through SSH/SFTP on Ubuntu.
This guide covers FileZilla Client, the graphical application for transferring files. FileZilla Server, which hosts FTP connections for others to connect to, is a separate package not covered here.
Install FileZilla on Ubuntu
Ubuntu provides three ways to install FileZilla, each balancing version freshness, sandboxing, and release support differently.
| Method | Channel | Version | Updates | Best For |
|---|---|---|---|---|
| APT (Default Repository) | Ubuntu Repos | Distribution default | sudo apt upgrade | Stability-focused users who prefer distro-tested packages |
| XtraDeb PPA | Launchpad PPA | Latest stable | sudo apt upgrade | Ubuntu 24.04 users who want newer releases |
| Flatpak | Flathub | Latest stable | flatpak update | Users who want sandboxed apps with automatic updates |
Default FileZilla versions vary significantly by Ubuntu release. The table below shows what each method provides:
| Method | Ubuntu 26.04 LTS | Ubuntu 24.04 LTS | Ubuntu 22.04 LTS |
|---|---|---|---|
| Default Repository | 3.69.x | 3.66.x | 3.58.x |
| XtraDeb PPA | – | 3.69.x | – |
| Flatpak (Flathub) | 3.69.x | 3.69.x | 3.69.x |
These steps cover Ubuntu 26.04 LTS, 24.04 LTS, and 22.04 LTS. The XtraDeb PPA currently provides packages only for Ubuntu 24.04 LTS; it has broken dependencies on 22.04 and no builds for 26.04. Flatpak and default repository methods work identically across all supported releases.
Ubuntu 26.04 LTS releases April 2026. Commands in this guide are verified against the development branch and will be updated for the final release if anything changes.
For most users, the default APT repository provides a reliable FileZilla installation with no extra configuration. Choose Flatpak if you want the newest build on Ubuntu 22.04 (where the default repo ships the aging 3.58.x series), or the XtraDeb PPA on Ubuntu 24.04 if you want a newer APT-managed build without Flatpak.
Update Ubuntu Before Installing FileZilla
Refresh your package lists and upgrade existing packages to avoid dependency conflicts during installation:
sudo apt update && sudo apt upgradeThis guide uses
sudofor commands that need root privileges. If your user is not in the sudoers file yet, see how to add a sudo user on Ubuntu.
Install FileZilla from Ubuntu’s Default Repository
The default repository provides a distro-tested FileZilla build that receives security patches through standard system updates:
sudo apt install filezillaConfirm the installation succeeded:
filezilla --versionFileZilla 3.66.5, compiled on 2024-04-01
The version shown above is from Ubuntu 24.04. Ubuntu 26.04 ships 3.69.x and Ubuntu 22.04 ships 3.58.x. All versions support FTP, SFTP, and FTPS transfers.
Install FileZilla from the XtraDeb PPA
The XtraDeb PPA provides a newer FileZilla build managed through APT, avoiding the need for Flatpak.
The XtraDeb PPA currently supports Ubuntu 24.04 LTS only. On Ubuntu 22.04, the PPA has broken library dependencies (
libfilezilla40is missing), and Ubuntu 26.04 has no PPA builds yet. Use the default repository or Flatpak on those releases.
Install the prerequisite package for managing PPAs, then add the repository:
sudo apt install software-properties-common -y
sudo add-apt-repository ppa:xtradeb/apps -y
Refresh the package list and install FileZilla:
sudo apt update
sudo apt install filezilla -y
Confirm the installation succeeded:
filezilla --versionFileZilla 3.69.5, compiled on 2025-11-14
Install FileZilla with Flatpak
Flatpak installs FileZilla in a sandboxed environment, isolated from system packages. This method works across all Ubuntu LTS releases and delivers the same version regardless of your Ubuntu version.
Flatpak must be installed before proceeding. See how to install Flatpak on Ubuntu for setup instructions.
Enable the Flathub repository and install FileZilla:
sudo flatpak remote-add --if-not-exists flathub https://flathub.org/repo/flathub.flatpakrepo
sudo flatpak install flathub org.filezillaproject.Filezilla -y
Confirm the installation succeeded:
flatpak run org.filezillaproject.Filezilla --versionFileZilla 3.69.5, compiled on 2025-11-10
Launch FileZilla on Ubuntu
FileZilla can be opened from the terminal or the GNOME Activities menu. Terminal launches display diagnostic messages that help with troubleshooting connection issues.
Launch FileZilla from the Terminal
APT users launch FileZilla directly:
filezillaFlatpak users launch FileZilla through the Flatpak runtime:
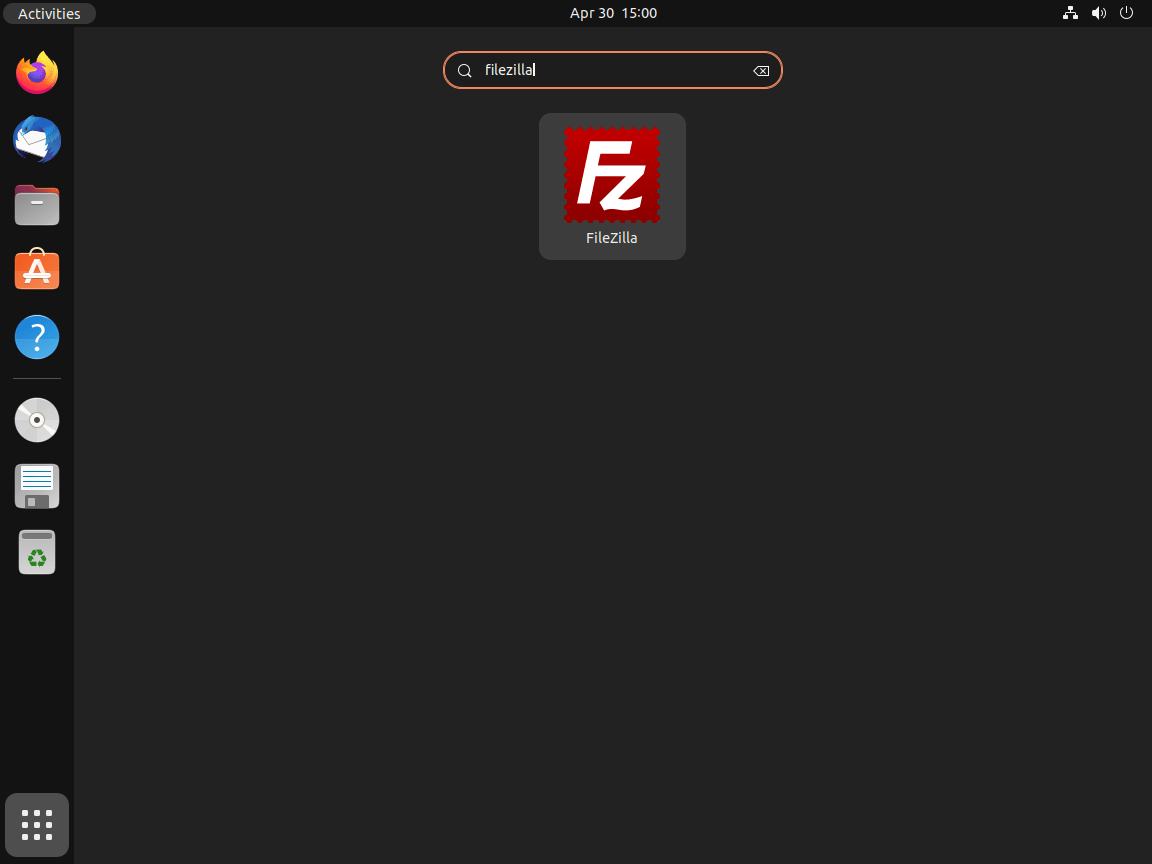
flatpak run org.filezillaproject.FilezillaLaunch FileZilla from the Applications Menu
Desktop users can launch FileZilla through the GNOME application launcher:
- Click Activities in the top-left corner of your desktop.
- Type FileZilla in the search bar.
- Click the FileZilla icon to launch the application.

Connect to a Remote Server with FileZilla
FileZilla provides two ways to connect: the Quickconnect bar for one-off sessions and the Site Manager for saved profiles.
FileZilla Quickconnect Bar
The Quickconnect bar at the top of the FileZilla window connects to a server without saving credentials. Fill in the four fields:
- Host: Server address with protocol prefix (e.g.,
sftp://server.example.comorftp://files.example.com) - Username: Your login username
- Password: Your password (leave blank for SSH key authentication)
- Port: 22 for SFTP, 21 for FTP, or leave blank for the protocol default
Prefix the host with
sftp://for SFTP connections. Without a prefix, FileZilla defaults to plain FTP, which transmits credentials in cleartext.
FileZilla Site Manager
For servers you connect to regularly, the Site Manager stores credentials, protocol settings, and default directories. Open it from File → Site Manager (or press Ctrl+S), then click New Site to create an entry. Key settings include:
- Protocol: Choose SFTP for encrypted transfers or FTP for legacy servers
- Logon Type: Set to Key file for SSH key authentication, or Normal for password-based login
- Default Directories: Set local and remote paths so FileZilla opens the right folders automatically
Saved sites appear in the Site Manager dropdown next to the Quickconnect bar for one-click access.
Update and Remove FileZilla on Ubuntu
Update FileZilla on Ubuntu
Regular updates deliver security patches and protocol improvements. The update command depends on your installation method.
Update FileZilla with APT
Check for and apply available FileZilla updates through APT:
sudo apt update && sudo apt upgradeTo update only FileZilla without upgrading other packages:
sudo apt install --only-upgrade filezillaUpdate FileZilla with Flatpak
Flatpak updates FileZilla independently from your system packages:
sudo flatpak updateRemove FileZilla from Ubuntu
Remove FileZilla Installed with APT
Remove FileZilla and its unused dependencies:
sudo apt remove --autoremove filezillaIf you added the XtraDeb PPA, remove it to keep your APT sources clean:
sudo add-apt-repository --remove ppa:xtradeb/apps -yThe following command permanently deletes saved server passwords, site entries, and transfer queue history. Export your Site Manager entries from File → Export before proceeding if you want to keep them.
Delete the FileZilla configuration directory to remove saved credentials and connection profiles:
rm -rf ~/.config/filezillaVerify FileZilla has been removed:
apt-cache policy filezillafilezilla:
Installed: (none)
Candidate: 3.66.5-2build2
Version table:
3.66.5-2build2 500
500 http://au.archive.ubuntu.com/ubuntu noble/universe amd64 Packages
Installed: (none) confirms the package is removed. The candidate version still appears because FileZilla remains available in the repository for reinstallation.
Remove FileZilla Installed with Flatpak
The
--delete-dataflag removes all Flatpak-specific settings and saved passwords. Export your Site Manager entries first if needed.
Remove FileZilla and its sandboxed data:
sudo flatpak remove --delete-data org.filezillaproject.Filezilla -yTroubleshoot FileZilla Connection Issues on Ubuntu
Connection failures in FileZilla typically fall into three categories: network/firewall blocks, FTP passive mode issues, and SFTP authentication errors.
FileZilla Connection Timed Out or Refused
FileZilla displays this error when it cannot reach the remote server:
Error: Connection timed out after 20 seconds of inactivity
Error: Could not connect to server
A firewall blocking the connection or the server not running are the most common causes. Verify your firewall allows outbound connections on the required ports:
- FTP: Port 21 (control) and passive mode ports (typically 49152-65535)
- SFTP: Port 22 (same as SSH)
- FTPS: Port 990 (implicit) or 21 (explicit)
If you use UFW firewall on Ubuntu, check your outbound policy:
sudo ufw status verboseStatus: active Default: deny (incoming), allow (outgoing), disabled (routed)
The default policy allow (outgoing) permits FileZilla connections. If your policy shows deny (outgoing), add explicit allow rules for the ports listed above.
FileZilla Passive Mode Failures
FileZilla connects but fails when listing directories or transferring files:
Status: Retrieving directory listing...
Response: 227 Entering Passive Mode (192,168,1,100,195,80)
Error: Connection timed out
Error: Failed to retrieve directory listing
FTP uses passive mode by default, where the server specifies a port for data transfers. If the server’s passive port range is blocked by a firewall, directory listings and transfers fail.
In FileZilla, navigate to Edit → Settings → Connection → FTP and switch between passive and active mode. Active mode requires your firewall to allow inbound connections, which may not work behind NAT.
FileZilla SFTP Authentication Failures
When SFTP authentication fails, FileZilla returns:
Error: Disconnected: No supported authentication methods available (server sent: publickey)
Error: Could not connect to server
For SFTP connections using SSH keys, confirm FileZilla can access your private key:
- Go to Edit → Settings → Connection → SFTP.
- Click Add key file and select your private key (usually
~/.ssh/id_rsaor~/.ssh/id_ed25519). - FileZilla converts PuTTY-format keys (
.ppk) automatically if needed.
Verify your SSH key works independently before troubleshooting FileZilla:
ssh -i ~/.ssh/id_rsa user@server.example.comIf SSH connects successfully, the issue is FileZilla-specific (check key file path in settings). If SSH also fails with a permission denied error, regenerate your SSH keys or verify the public key exists in the server’s ~/.ssh/authorized_keys file.
Frequently Asked Questions About FileZilla on Ubuntu
Yes. FileZilla is available directly from Ubuntu’s universe repository on all supported LTS releases (26.04, 24.04, and 22.04). Install it with sudo apt install filezilla. No external repositories or PPAs are required.
FileZilla Client is the graphical application for uploading and downloading files to remote servers over FTP, SFTP, and FTPS. FileZilla Server is a separate package that hosts FTP connections, allowing other users to connect to your machine. This guide covers the client only.
No. The XtraDeb PPA currently works only on Ubuntu 24.04 LTS. Ubuntu 22.04 has broken dependencies (missing libfilezilla40), and Ubuntu 26.04 has no PPA builds yet. Use the default repository or Flatpak on those releases.
FileZilla Server is a separate application from FileZilla Client and is not available in Ubuntu’s default repositories or the XtraDeb PPA. If you need to host FTP connections on Ubuntu, consider vsftpd for FTP or the built-in OpenSSH server for SFTP transfers.
Conclusion
FileZilla is configured for file transfers over FTP, SFTP, and FTPS from your Ubuntu system, with connection profiles stored in the Site Manager for quick access. For production workflows, prefer SFTP over plain FTP; SFTP encrypts both authentication and file data through your existing SSH setup on Ubuntu. Pairing FileZilla with SSH key authentication removes password prompts and streamlines recurring transfers.

Even though FileZilla Server is not distributed with Ubuntu, a .deb package is available for download from the official FileZilla website.