
This guide explains how to install Brightness Controller on Ubuntu using its dedicated PPA, along with launch methods, troubleshooting tips, and removal steps. Brightness Controller is a free, open-source GUI application that adjusts screen brightness and color temperature from a single interface, which is useful for reducing eye strain across multiple monitors during extended sessions. Brightness Controller is not available in Ubuntu’s default repositories and requires a third-party PPA for installation.
Brightness Controller is a software-based screen dimmer that uses xrandr with a brightness range of 0.01 to 1.0. It can only reduce brightness below your display’s current hardware level and cannot increase brightness above the maximum set by your monitor or backlight. If you need to increase screen brightness, use your monitor’s physical controls or your desktop environment’s built-in brightness settings.
Update Ubuntu Before Brightness Controller Installation
Before installing new software, refresh your package lists and upgrade any outdated packages. This step helps avoid dependency conflicts and ensures you install the latest available version of Brightness Controller.
sudo apt update && sudo apt upgradeYour Ubuntu user account needs sudo privileges to run the commands in this guide. If you have not configured sudo access, see our guide on adding a user to sudoers on Ubuntu.
The first command refreshes the list of available packages from Ubuntu’s repositories. The second command upgrades any packages that have newer versions available.
Import the Brightness Controller PPA
Brightness Controller is not available in Ubuntu’s default repositories. Instead, install it from a Personal Package Archive (PPA) maintained by Archisman Panigrahi. PPAs provide a direct channel to obtain software and updates that may not be available in official repositories.
The Brightness Controller PPA provides packages for Ubuntu 24.04 LTS and 22.04 LTS only. Ubuntu 26.04 is not supported by the PPA because no package has been published for that release. Users on unsupported releases can install directly from the Brightness Controller GitHub repository using pip. Flatpak and Snap versions are not available. Note that project development activity is low, with the last commit in February 2024.
Add the PPA to your system with the following command:
sudo add-apt-repository ppa:apandada1/brightness-controller -yThe command registers the PPA and imports its signing key. Expected output:
Repository: 'deb https://ppa.launchpadcontent.net/apandada1/brightness-controller/ubuntu/ noble main'
Description:
Brightness Controller PPA
More info: https://launchpad.net/~apandada1/+archive/ubuntu/brightness-controller
Adding repository.
Adding deb entry to /etc/apt/sources.list.d/apandada1-ubuntu-brightness-controller-noble.sources
Adding disabled deb-src entry to /etc/apt/sources.list.d/apandada1-ubuntu-brightness-controller-noble.sources
Adding key to /etc/apt/trusted.gpg.d/apandada1-ubuntu-brightness-controller.gpg
After adding the PPA, refresh the package list to include packages from the new repository:
sudo apt updateInstall Brightness Controller
With the PPA configured, install Brightness Controller using the standard APT package manager:
sudo apt install brightness-controllerAPT downloads and installs the package along with any required dependencies. Once the installation completes, verify the package is properly installed by checking the version information from the package manager:
dpkg -s brightness-controller | grep VersionExpected output:
Version: 2.3.4-4~ubuntu24.04.1
This confirms the package is installed and shows which PPA version is active on your system.
Launch Brightness Controller
Launch from Terminal
For quick access, start Brightness Controller directly from the terminal. This method is useful for troubleshooting or when you prefer command-line workflows:
brightness-controllerLaunch from Applications Menu
Alternatively, launch Brightness Controller through Ubuntu’s graphical interface. Navigate to your applications menu following this path:
Activities > Show Applications > Brightness Controller
Manage Brightness Controller
Update Brightness Controller
Since Brightness Controller is installed from a PPA, updates arrive through Ubuntu’s standard package management system. To update only Brightness Controller without upgrading other packages, run:
sudo apt update
sudo apt install --only-upgrade brightness-controller
The first command refreshes the package lists, and the second upgrades only the Brightness Controller package if a newer version is available in the PPA.
Remove Brightness Controller
If you no longer need Brightness Controller, you can remove it along with any orphaned dependencies. First, uninstall the package and then clean up unused dependencies:
sudo apt remove --purge brightness-controller
sudo apt autoremove
The --purge flag removes the package along with any system-level configuration files. The second command cleans up dependencies that were installed automatically and are no longer needed by other packages.
Remove the PPA
Removing the Brightness Controller package does not remove the PPA from your system’s repository list. If you want to keep your repositories clean, remove the PPA as well. For more details on managing PPAs, see our guide on removing PPAs from Ubuntu:
sudo add-apt-repository --remove ppa:apandada1/brightness-controller -y
sudo apt update
After running apt update, the package cache refreshes to reflect the removed repository. To confirm the package and PPA are both removed, run:
apt-cache policy brightness-controllerExpected output when both the package and PPA are removed:
brightness-controller:
  Installed: (none)
  Candidate: (none)
  Version table:
Troubleshoot Brightness Controller on Ubuntu
Brightness Controller Does Not Work on Wayland
Brightness Controller relies on X11 APIs to adjust display brightness. Wayland uses a different architecture that does not expose the same controls, so Brightness Controller cannot function on Wayland sessions.
To check if you are running Wayland or X11, run the following command:
echo $XDG_SESSION_TYPEExpected output for X11:
x11
If the output shows wayland, log out and select “Ubuntu on Xorg” from the gear icon on the login screen before signing back in. Brightness Controller will function normally once you switch to an X11 session.
Ubuntu 26.04 removes the GNOME X11 session entirely, so the “Ubuntu on Xorg” login option is no longer available. Brightness Controller cannot function on Ubuntu 26.04 without a manually installed X11 session.
Brightness Settings Keep Resetting
If your brightness or color temperature settings reset unexpectedly, another application is likely overriding them. Common culprits include Ubuntu’s built-in adaptive brightness, Night Light, Redshift, or f.lux. Because Brightness Controller cannot prevent other applications from changing display settings, you must disable the brightness or color adjustment features in the conflicting application to resolve this issue.
Controls Do Nothing on NVIDIA Laptops
On laptops with NVIDIA Optimus (hybrid graphics), Brightness Controller may show EGL or DRI2 errors and the controls may have no effect. This occurs because the internal display (typically eDP-1) connects through the integrated GPU while NVIDIA handles rendering. If you need to install or update NVIDIA drivers, see our guide on installing NVIDIA drivers on Ubuntu. To check your current graphics mode:
prime-select queryIf the output shows nvidia, switch to on-demand mode and reboot:
sudo prime-select on-demand
sudo reboot
After rebooting, launch Brightness Controller again. The on-demand mode lets the integrated GPU handle display output directly, which resolves most xrandr compatibility issues. If the problem persists, force software rendering by launching Brightness Controller with:
QT_XCB_GL_INTEGRATION=none brightness-controllerThis environment variable bypasses the EGL initialization that fails on some hybrid graphics configurations.
Frequently Asked Questions About Brightness Controller on Ubuntu
No. Brightness Controller uses xrandr with a brightness range of 0.01 to 1.0, which means it can only reduce brightness below your display’s current hardware maximum. It cannot increase brightness above what your monitor or backlight hardware provides. To increase brightness, use your monitor’s physical controls or your desktop environment’s built-in brightness settings.
No. Brightness Controller relies on X11 APIs (specifically xrandr) to adjust display brightness. Wayland uses a different display architecture that does not expose the same controls. You must switch to an X11 session for Brightness Controller to function.
The Brightness Controller PPA does not provide packages for Ubuntu 26.04. Additionally, Ubuntu 26.04 removes the GNOME X11 session, which Brightness Controller requires to function. Users on 26.04 would need to install both an X11 session and the application manually from the GitHub repository.
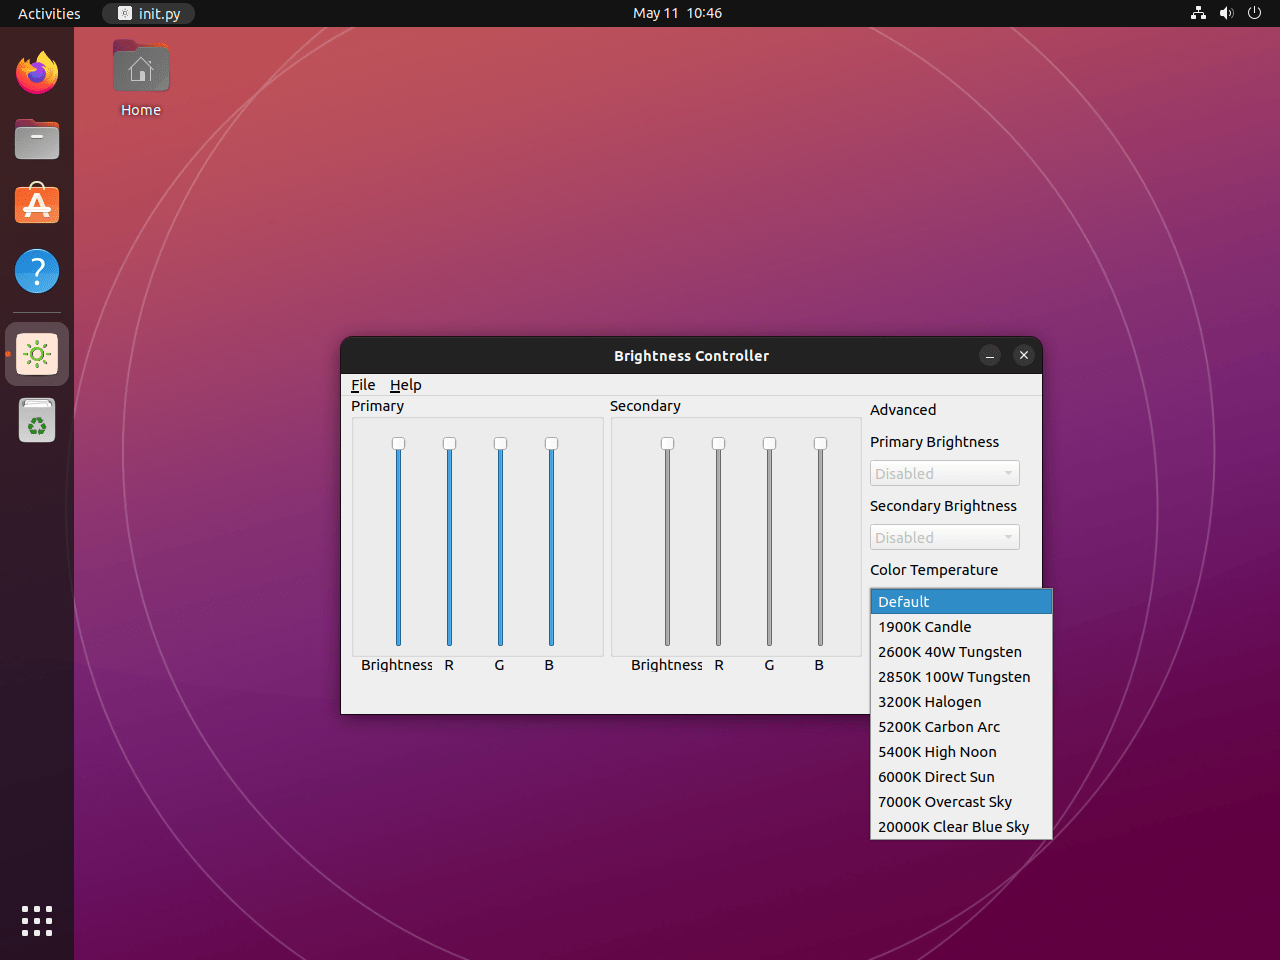
Yes. Brightness Controller provides separate sliders for primary and secondary displays, allowing independent brightness and color temperature adjustments for each monitor connected to your system.
Conclusion
You now have Brightness Controller installed on Ubuntu with the ability to reduce screen brightness and adjust color temperature for both primary and secondary displays. Keep in mind that this tool is a software-based dimmer and cannot increase brightness above your hardware maximum. It works exclusively on X11 sessions and provides a straightforward interface for reducing eye strain during extended use. If you work with multiple monitors or need granular brightness control beyond what hardware buttons provide, Brightness Controller offers a practical solution that integrates directly with your desktop environment.

Helped me a lot! Thank you!
Very nice write up. Program installed exactly as instructed.
Only problem – this tool doesn’t enable users to actually increase brightness, only decrease.
Spot on. Brightness Controller is a software-based dimmer that uses
xrandrto scale brightness between 1% and 100% of your display’s hardware maximum. It cannot increase brightness above what your panel natively outputs. The slider at 100% matches your monitor’s default brightness, and moving it down reduces the output from there.This is a limitation of
xrandr --brightness, which adjusts a software gamma multiplier (0.01-1.0) rather than controlling the backlight hardware directly. The article has been updated to clarify this. Thanks for flagging it.Thank you very much, here it worked correctly following the steps! helped a lot
I installed brightness-controller, and nothing happens when I adjust the controls. The software is referencing eDP-1.
When I start brightness-controller, I get the following on the console:
QSocketNotifier: Can only be used with threads started with QThread
libEGL warning: egl: failed to create dri2 screen
I am using an HP laptop with nVidia GeForce RTX graphics board running Ubuntu 24.04
Thanks for the detailed error output, Steve. The
libEGL warning: egl: failed to create dri2 screenerror indicates an NVIDIA Optimus (hybrid graphics) conflict. On your HP laptop with GeForce RTX, the internal display (eDP-1) is likely connected through Intel or AMD integrated graphics, while NVIDIA handles external displays and rendering.Brightness Controller uses X11/xrandr APIs, which can conflict with NVIDIA’s proprietary driver setup on hybrid graphics systems. First, verify your session type and graphics configuration:
If the session type shows
wayland, switch to “Ubuntu on Xorg” at the login screen. Ifprime-select queryshowsnvidia, try switching toon-demandmode:After rebooting, launch Brightness Controller again. The
on-demandmode lets the Intel/AMD iGPU handle display output while NVIDIA activates only when needed, which typically resolves xrandr/EGL conflicts. If the issue persists, you can also try forcing software rendering:This bypasses the OpenGL/EGL initialization that is failing. If that works, you can make it permanent by editing the desktop launcher. I have added a note about NVIDIA hybrid graphics compatibility to the article’s troubleshooting section.