
Are you looking to manage your display settings on Linux Mint? Then, learning how to install Brightness Controller on Linux Mint 21 or its older stable release, Linux Mint 20, can be a game-changer. This application is designed to give you complete control over your screen’s brightness and color temperature, making it easier to achieve the perfect balance for your eyes and environment.
Here’s what you need to know about Brightness Controller:
- Compatibility: Works seamlessly with Linux Mint 21, Linux Mint 20, and other Ubuntu-based distributions.
- Display Support: Compatible with various display technologies, including LCD, LED, and OLED.
- User Interface: Features an intuitive interface that simplifies the adjustment of display settings.
- Multi-Monitor Management: Capable of handling settings for multiple monitors at once.
- Custom Profiles: Allows creation and quick switching between various display profiles.
- Gamma Adjustment: The ability to fine-tune the gamma settings for a more personalized display experience.
The benefits of using Brightness Controller include reduced eye strain, a more enjoyable visual experience, and potential energy savings. Ready to get started? Our upcoming guide will cover the installation process for Brightness Controller using a Launchpad PPA, ensuring you have access to the latest version for your Linux Mint system.
Import Brightness Controller PPA on Linux Mint 21 or 20
Step 1: Update Linux Mint Packages Before Brightness Controller Installation
First, ensure your system is updated by updating all existing packages. This helps avoid any conflicts during the installation process. Open your terminal and run the following command:
sudo apt update && sudo apt upgradeStep 2: Import Brightness Controller PPA
Next, you’ll need to import and install the PPA maintained by Archisman Panigrahi. In your terminal, execute the following command to add the PPA to your system:
sudo add-apt-repository ppa:apandada1/brightness-controller -yInstall Brightness Controller on Linux Mint 21 or 20
Step 1: Refresh APT Index After PPA Import
Before proceeding with the installation, it’s important to update your APT package list to reflect the newly imported PPA. Run the following command in your terminal:
sudo apt updateStep 2: Proceed to Install Brightness Controller with APT Command
Now, you are ready to install the Brightness Controller application. Use the following command to install the software:
sudo apt install brightness-controllerLaunch Brightness Controller on Linux Mint 21 or 20
Now that the Brightness Controller is installed on your system, you can quickly launch it using one of the methods below. This will enable you to start adjusting your display settings for a more comfortable and visually appealing experience.
CLI Command to Launch Brightness Controller
To open Brightness Controller using the terminal, enter the following command:
brightness-controllerGUI Method to Launch Brightness Controller
For most desktop users, you may prefer to launch the software using the application icon. To do this, follow the path below:
Taskbar > Accessories > Brightness Controller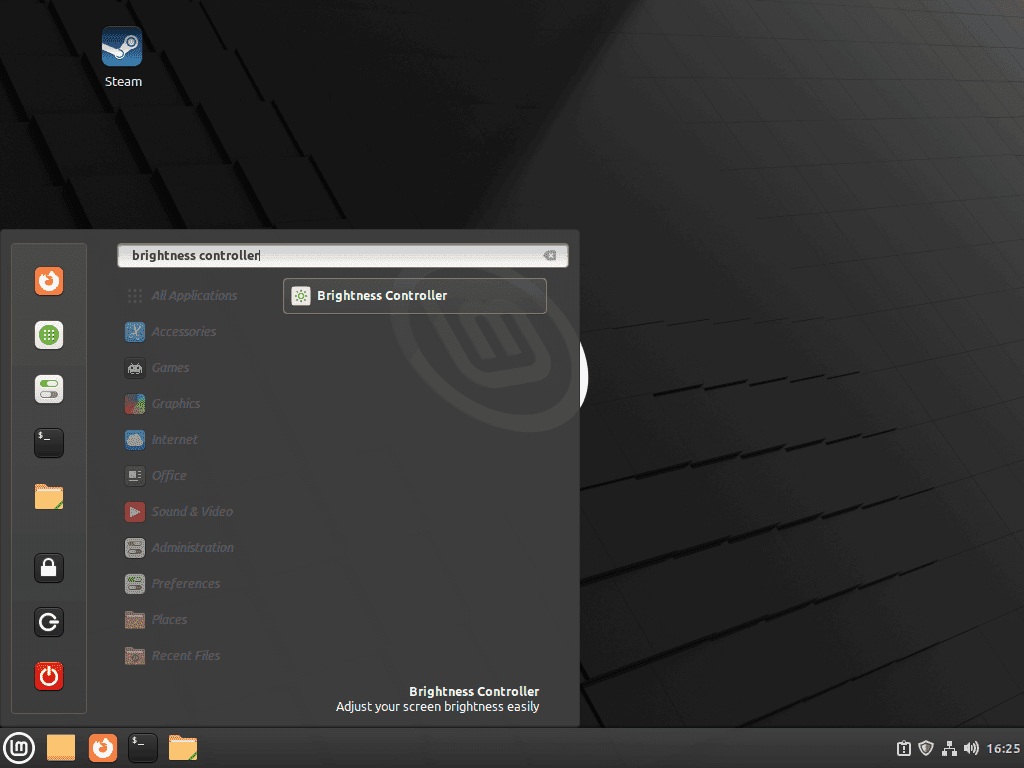
First-Time Tips with Brightness Controller on Linux Mint 21 or 20
Once you have installed and launched Brightness Controller on Linux Mint, it’s time to explore its features and customize the settings to suit your preferences. This section will guide you through general tips, customizations, and other helpful advice to help you maximize this powerful tool.
General Brightness Controller Tips with Linux Mint
- Adjust screen brightness: Use the brightness sliders in the application to easily control the brightness levels of your monitors. This can help reduce eye strain and save energy.
- Modify color temperature: Adjust your display’s color temperature to create a more comfortable viewing experience, particularly during nighttime use or when working in dimly lit environments.
- Manage multiple monitors: Brightness Controller supports multiple monitors, allowing you to adjust the settings for each screen independently or synchronize them as needed.
Brightness Controller Customizations with Linux Mint
- Create display profiles: Save your preferred display settings as profiles, enabling you to quickly switch between different configurations depending on your current task or environment.
- Adjust gamma settings: Fine-tune the gamma levels of your screen to achieve the desired balance between brightness, contrast, and color reproduction.
- Apply settings at startup: Configure Brightness Controller to automatically apply your preferred settings at system startup, ensuring a consistent display experience every time you power on your computer.
Other Brightness Controller Tips with Linux Mint
- Check for updates: Keep your Brightness Controller updated by regularly checking for and installing any available updates. This will ensure optimal performance and compatibility with your Linux Mint system.
- Explore keyboard shortcuts: Familiarize yourself with any available keyboard shortcuts for Brightness Controller to quickly and efficiently adjust your display settings without opening the application interface.
- Seek community support: If you encounter any issues or need assistance with Brightness Controller, don’t hesitate to consult the community forums or the software’s documentation for guidance and troubleshooting tips.
Following these tips and customizing the Brightness Controller to your preferences, you can create a comfortable and visually appealing display environment on your Linux Mint system.

Managing Brightness Controller on Linux Mint 21 or 20
Update Brightness Controller on Linux Mint
To ensure your Brightness Controller installation remains up-to-date, open the command line terminal and execute the following command:
sudo apt upgrade && sudo apt upgradeThis command will also update all other packages managed by the APT package manager, including system packages.
Remove Brightness Controller from Linux Mint
If you no longer require the Brightness Controller application, follow the steps below to uninstall it and remove the PPA:
Step 1: Uninstall Brightness Controller
Use the following command to remove the Brightness Controller based on your original installation method:
sudo apt remove brightness-controllerStep 2: Remove the Brightness Controller PPA
If you do not plan to use the software again, execute the following command to remove the PPA from your system:
sudo add-apt-repository --remove ppa:apandada1/brightness-controller -yFollowing these steps, you can easily uninstall the Brightness Controller application and remove its associated PPA from your Linux Mint system.
Conclusion: Installing Brightness Controller on Linux Mint
In summary, installing and using the Brightness Controller on Linux Mint is a straightforward process that allows users to customize their display settings for a more comfortable and visually appealing experience. This versatile application offers numerous features, such as managing multiple monitors, creating display profiles, and adjusting gamma settings, all designed to enhance your display environment. Following the steps outlined in this guide, you can easily install and configure Brightness Controller on your Linux Mint system and optimize your screen settings to suit your unique needs.
Installed no problem but doesn’t have any effect when I try to use it, screen still stuck at maximum brightness – anybody else find this/know of a solution?
Thank you so much! You’re the first one to help with Mint’s lack of brightness packs!!!