

This guide will demonstrate how to install Modsecurity OWASP CRS with Apache on Ubuntu 24.04, 22.04, or 20.04 Linux LTS releases using the command-line terminal and provide setup tips.
ModSecurity 2 with OWASP CRS provides a robust security layer for Apache servers, enhancing their defense against various web threats. It acts as a web application firewall, precisely identifying and blocking malicious traffic. Leveraging the OWASP Core Rule Set delivers a comprehensive set of rules designed to detect and mitigate prevalent web application vulnerabilities.
Here’s what sets ModSecurity 2 with OWASP CRS apart on Ubuntu servers:
- Real-Time Monitoring: Continuous surveillance of HTTP traffic, detecting potential threats as they occur.
- Customizable Rule Set: Flexibility to tailor the OWASP CRS to meet specific security needs, enhancing targeted defense mechanisms.
- Advanced Logging Capabilities: Detailed logging provides insights into traffic patterns, aiding in the analysis of potential security threats.
- Versatile Compatibility: Seamless integration with Apache, ensuring a broad applicability across various server environments.
- Preventive Security Measures: Proactively blocking suspicious activities reduces the risk of successful attacks.
- Performance Optimization: Designed to minimize impact on server performance, ensuring efficient security operations.
- Community-Supported Updates: Benefit from a community-driven approach, receiving regular updates and new rules to combat emerging threats.
- Transparent Security: Allows for thorough inspection and modification of rules, granting visibility into the security process.
Transitioning to the technical how-to, you’ll gain practical insights into deploying ModSecurity 2 with OWASP CRS, ensuring your Apache server is fortified against a wide array of security challenges.
Install Apache on Ubuntu
Start by updating your system to make sure all existing packages are up to date with the following command:
sudo apt update && sudo apt upgradeAfter updating your system, install Apache if it’s not already installed on your Ubuntu server:
sudo apt install apache2Install ModSecurity Apache Module on Ubuntu
Next, you must now import a third-party repository to install the latest Modescurity Model for Apache. The version contained in Ubuntu’s default repositories will not work, and you will face errors immediately using the default version. This third-party repository is well mentioned on the GitHub and has been providing the binaries for a long time, more information can be found on the official website.
First, install the following packages on your system:
sudo apt install apt-transport-https lsb-release ca-certificates curl -yNext, import the GPG key for the following repository:
curl -fsSL https://modsecurity.digitalwave.hu/archive.key | sudo gpg --dearmor | sudo tee /usr/share/keyrings/digitalwave-modsecurity.gpg > /dev/nullNow import the repository with the following command:
echo "deb [signed-by=/usr/share/keyrings/digitalwave-modsecurity.gpg] http://modsecurity.digitalwave.hu/ubuntu/ $(lsb_release -sc) main" | sudo tee -a /etc/apt/sources.list.d/digitalwave-modsecurity.list
echo "deb [signed-by=/usr/share/keyrings/digitalwave-modsecurity.gpg] http://modsecurity.digitalwave.hu/ubuntu/ $(lsb_release -sc)-backports main" | sudo tee -a /etc/apt/sources.list.d/digitalwave-modsecurity.list
You must now set the APT Policy to use this repository first for the mentioned packages you are going to install. Copy and paste this command, which will do it automatically:
cat << EOF | sudo tee -a /etc/apt/preferences.d/99modsecurity
Package: *nginx*
Pin: origin modsecurity.digitalwave.hu
Pin-Priority: 900

Package: *libapache2-mod-security2*
Pin: origin modsecurity.digitalwave.hu
Pin-Priority: 900

Package: *modsecurity-crs*
Pin: origin modsecurity.digitalwave.hu
Pin-Priority: 900

Package: *libmodsecurity*
Pin: origin modsecurity.digitalwave.hu
Pin-Priority: 900
EOF
Optionally, you can confirm this with the following command:
sudo apt-cache policy nginx-extras libapache2-mod-security2 modsecurity-crs libmodsecurity3Run an APT update to reflect the newly imported source:
sudo apt updateNow install the libapache2-mod-security2 model:
sudo apt install libapache2-mod-security2Once the installation is complete, enable the module with the following command:
sudo a2enmod security2Don’t forget to restart your Apache2 service to apply the new module and changes.
sudo systemctl restart apache2Enable ModSecurity Module For Apache on Ubuntu
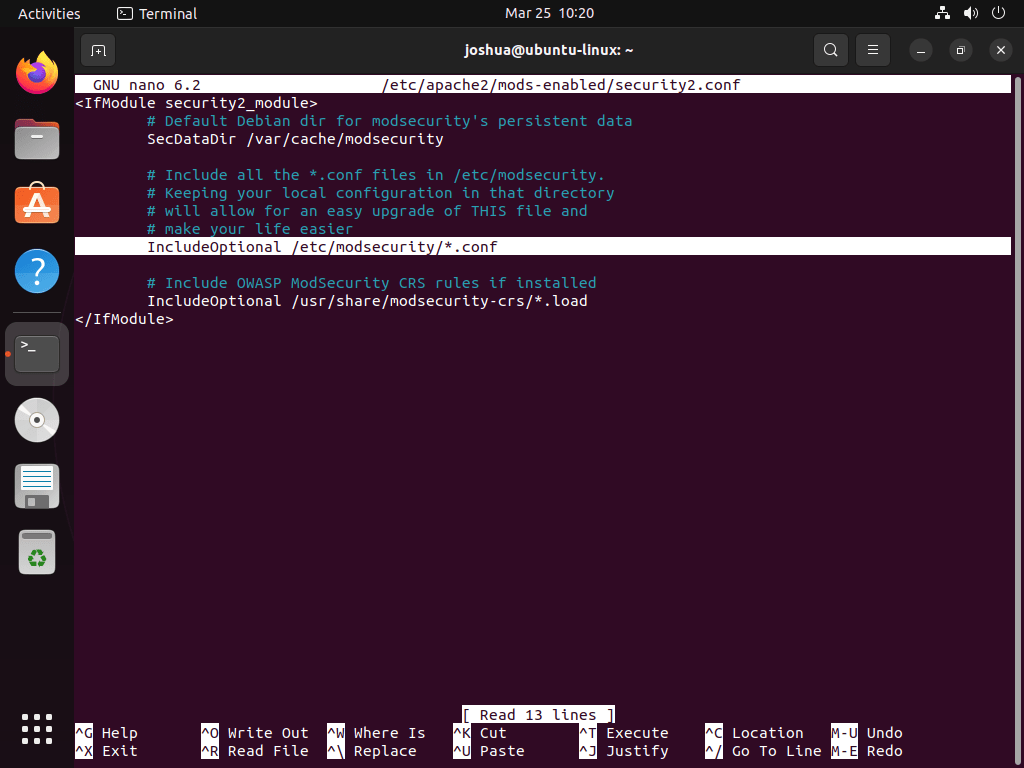
Apache ModSecurity’s configuration file can be found at /etc/apache2/mods-enabled/security2.conf.
sudo nano /etc/apache2/mods-enabled/security2.confFind the following line:
IncludeOptional /etc/modsecurity/*.confEnsure this line is uncommented; this should be the case by default.
To proceed, rename the modsecurity.conf-recommended configuration file:
sudo mv /etc/modsecurity/modsecurity.conf-recommended /etc/modsecurity/modsecurity.confOpen the modsecurity.conf file with your preferred text editor in Ubuntu:
sudo nano /etc/modsecurity/modsecurity.confBy default, the ModSecurity configuration has the rule engine set to “DetectionOnly”, which detects malicious behavior but doesn’t block or ban it. To enable ModSecurity, change the line on line 7 to “On”:
SecRuleEngine DetectionOnlyUpdate it to:
SecRuleEngine On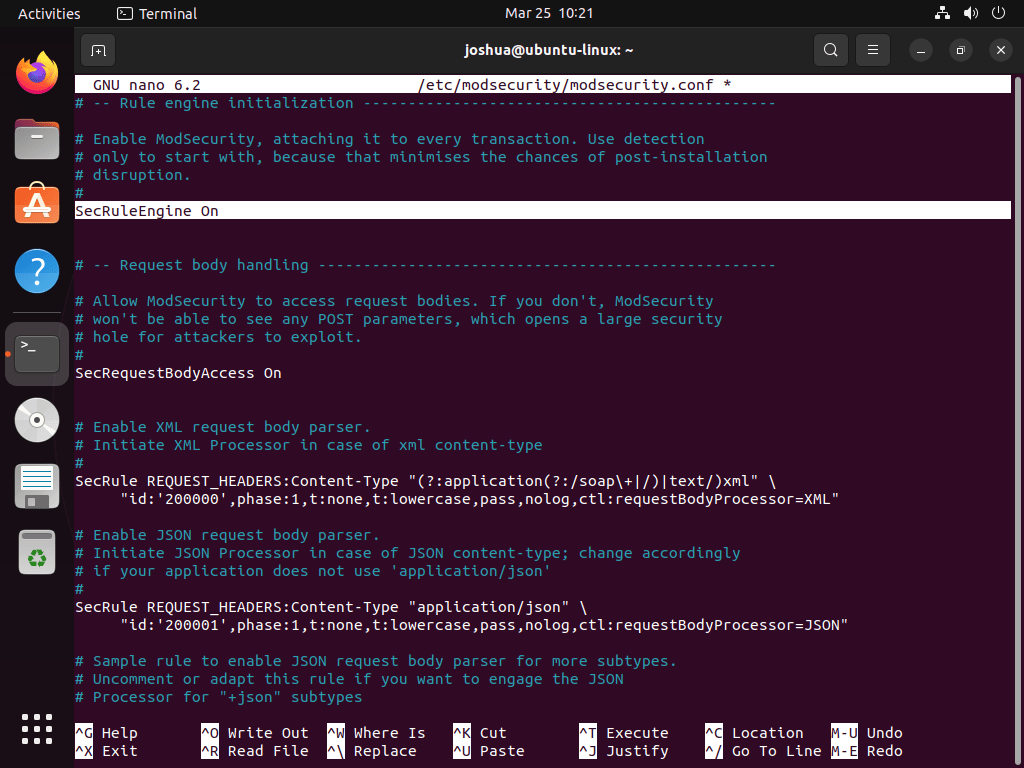
Next, find the SecAuditLogParts line on line 224:
# Log everything we know about a transaction.
SecAuditLogParts ABDEFHIJZ
This setting is incorrect and needs to be changed. Modify it as follows:
SecAuditLogParts ABCEFHJKZ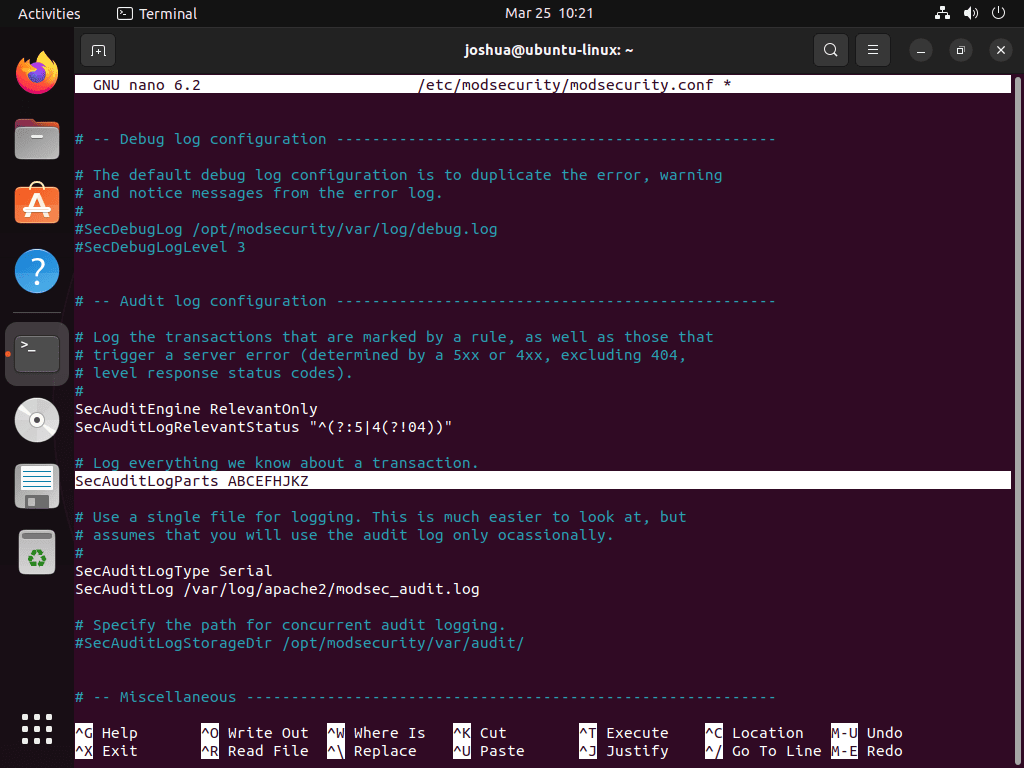
Save the file (CTRL+O) and exit (CTRL+X). Finally, restart the Apache service to apply the changes:
sudo systemctl restart apache2Install OWASP Core Rule Set for ModSecurity with Apache on Ubuntu
ModSecurity itself does not protect your webserver; you need to implement rules. The OWASP Core Rule Set (CRS) stands as one of the most reputable and widely used rule sets. Web servers and other Web Application Firewalls (WAFs) commonly use these rules.
Note: Always check the OWASP Release tag page for the latest version, as the example below may become outdated.
First, create the leading parent directory for OWASP:
sudo mkdir /etc/apache2/modsec/Next, use the wget command to download the OWASP CRS 3.3.4 archive, which is the latest stable version at the time of writing. Be sure to check the link mentioned earlier to see the current releases for the core rule set.
wget https://github.com/coreruleset/coreruleset/archive/refs/tags/v3.3.4.tar.gzIf you prefer using the nightly build, be prepared to recompile and check the CoreRuleSet GitHub frequently for updates. The nightly build may offer more security but can potentially cause issues. For novice users, stick to the stable version and avoid the nightly build.
Now, extract the archive:
sudo tar xvf v3.3.4.tar.gz -C /etc/apache2/modsecNote: Remember to adjust the commands if you downloaded a different OWASP CRS version.
OWASP CRS includes a sample configuration file that you should rename. Use the cp command to create a copy while retaining the original as a backup.
sudo cp /etc/apache2/modsec/coreruleset-3.3.4/crs-setup.conf.example /etc/apache2/modsec/coreruleset-3.3.4/crs-setup.confBe sure to replace /coreruleset-3.3.4/ with the exact version of OWASP CRS you’ve chosen.
To enable the rules, open the /etc/apache2/mods-enabled/security2.conf file:
sudo nano /etc/apache2/mods-enabled/security2.confAdd the following two lines to the file:
Include /etc/apache2/modsec/coreruleset-3.3.4/crs-setup.conf
Include /etc/apache2/modsec/coreruleset-3.3.4/rules/*.conf
Make sure to replace /coreruleset-3.3.4/ with the exact version of OWASP CRS you’ve chosen.
Also, comment out or remove the following line:
IncludeOptional /usr/share/modsecurity-crs/*.load
Save the file (CTRL+O) and exit (CTRL+X).
Restart your Apache service to apply the changes:
sudo systemctl restart apache2Understanding OWASP CRS with Modsecurity on Apache with Ubuntu
OWASP CRS offers numerous options, and its default settings provide immediate protection for most servers without negatively impacting legitimate visitors or SEO bots. This section will cover some key areas, but it is recommended that you explore the configuration files thoroughly to understand all the available options.
Begin by opening your crs-setup.conf file:
sudo nano /etc/apache2/modsec/coreruleset-3.3.4/crs-setup.confThis is where you can modify most of your OWASP CRS settings.
OWASP CRS Scoring with Modsecurity on Apache
ModSecurity operates in two modes:
- Anomaly Scoring Mode (recommended): In this mode, each matching rule increases an ‘anomaly score’. The anomaly score is checked after processing inbound and outbound rules, and the blocking evaluation rules apply a disruptive action (by default, returning an error 403). This mode offers more accurate log information and greater flexibility in setting blocking policies.
- Self-Contained Mode: In this mode, rules apply an action instantly. It can lower resource usage but offers less flexibility in blocking policies and less informative audit logs. The first rule that matches will execute the specified action, often causing evaluation to stop after the first rule matches.
Paranoia Levels
There are four paranoia levels:
- Paranoia Level 1: Default level, recommended for most users.
- Paranoia Level 2: For advanced users only.
- Paranoia Level 3: For expert users only.
- Paranoia Level 4: Not recommended except for exceptional circumstances.
Higher paranoia levels enable additional rules for increased security but also raise the likelihood of blocking legitimate traffic due to false positives. Choose the appropriate level based on your experience and security requirements.
Test OWASP CRS on your Server
To verify that OWASP CRS is working on your server, open your internet browser and enter the following URL, replacing “yourdomain.com” with your actual domain:
https://www.yourdomain.com/index.html?exec=/bin/bashIf you receive a 403 Forbidden error, OWASP CRS is working correctly. If not, you may have missed a step in the setup process.
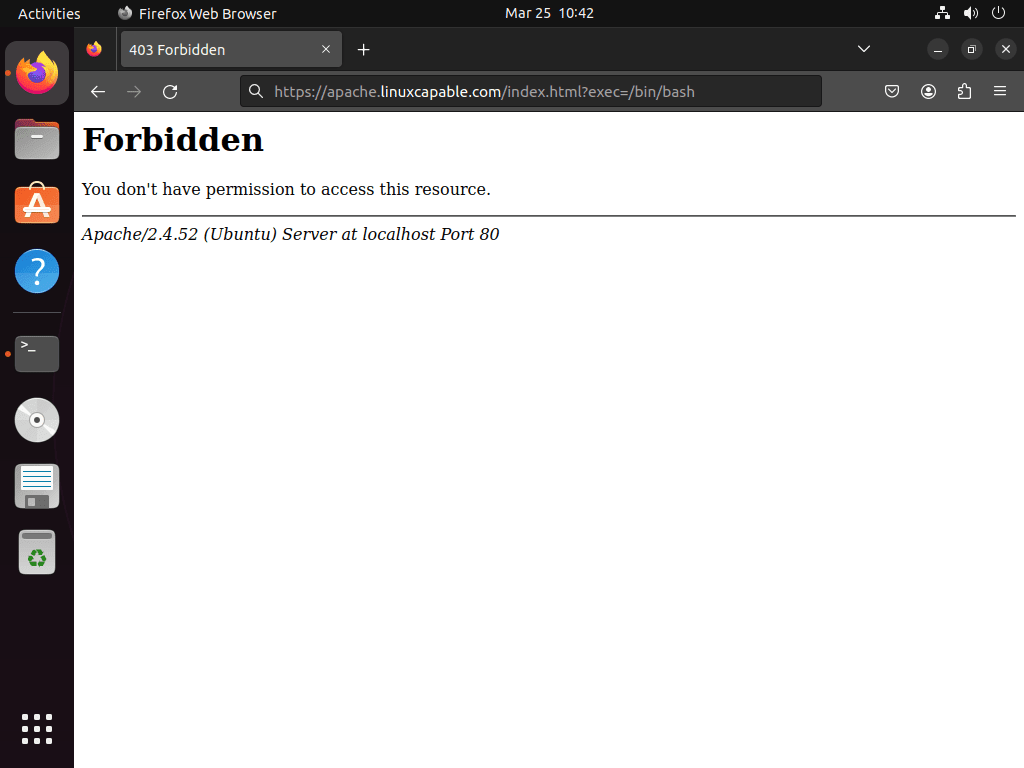
The most common issue is forgetting to change DetectionOnly to On, as discussed earlier in the tutorial.
Fix False Positives & Custom Rules Exclusion
Dealing with false positives can be an ongoing process, but the protection offered by ModSecurity and OWASP CRS is well worth the effort. First, it’s best to keep the paranoia level low to minimize the number of false positives.
A useful approach is running the rule set for a few weeks or months with minimal false positives before increasing the paranoia level. This way, you won’t be overwhelmed by numerous false positives at once.
Excluding False Positives Known Applications
ModSecurity can whitelist common actions that lead to false positives by default. Here’s an example:
#SecAction \
# "id:900130,\
#  phase:1,\
#  nolog,\
#  pass,\
#  t:none,\
#  setvar:tx.crs_exclusions_cpanel=1,\
#  setvar:tx.crs_exclusions_dokuwiki=1,\
#  setvar:tx.crs_exclusions_drupal=1,\
#  setvar:tx.crs_exclusions_nextcloud=1,\
#  setvar:tx.crs_exclusions_phpbb=1,\
#  setvar:tx.crs_exclusions_phpmyadmin=1,\
#  setvar:tx.crs_exclusions_wordpress=1,\
#  setvar:tx.crs_exclusions_xenforo=1"
To enable whitelisting for applications like WordPress, phpBB, and phpMyAdmin, uncomment the lines and keep the (1) value. For other services you don’t use, change the value to (0) so they are not whitelisted.
Here’s an example of the modified configuration:
SecAction \
 "id:900130,\
  phase:1,\
  nolog,\
  pass,\
  t:none,\
  setvar:tx.crs_exclusions_phpbb=1,\
  setvar:tx.crs_exclusions_phpmyadmin=1,\
  setvar:tx.crs_exclusions_wordpress=1"
In this example, unnecessary options have been removed, and the correct syntax has been used.
Excluding Rules Before CRS
To create custom exclusions, first, change the name of the REQUEST-900-EXCLUSION-RULES-BEFORE-CRS-SAMPLE.conf file using the cp command:
sudo cp /etc/apache2/modsec/coreruleset-3.3.4/rules/REQUEST-900-EXCLUSION-RULES-BEFORE-CRS.conf.example /etc/apache2/modsec/coreruleset-3.3.4/rules/REQUEST-900-EXCLUSION-RULES-BEFORE-CRS.confRemember that each exclusion rule must have a unique id:<rule number> or else you’ll encounter errors when testing your Apache2 service.
For instance, some REQUEST_URIs might trigger false positives. The following example demonstrates two such cases with Google PageSpeed beacon and the WPMU DEV plugin for WordPress:
SecRule REQUEST_URI "@beginsWith /wp-load.php?wpmudev" "id:1544,phase:1,log,allow,ctl:ruleEngine=off"

SecRule REQUEST_URI "@beginsWith /ngx_pagespeed_beacon" "id:1554,phase:1,log,allow,ctl:ruleEngine=off"
These rules will automatically allow any URL that starts with the specified path.
You can also whitelist IP addresses in a few different ways:
SecRule REMOTE_ADDR "^195\.151\.128\.96" "id:1004,phase:1,nolog,allow,ctl:ruleEngine=off"or
SecRule REMOTE_ADDR "@ipMatch 127.0.0.1/8, 195.151.0.0/24, 196.159.11.13" "phase:1,id:1313413,allow,ctl:ruleEngine=off"The @ipMatch directive can be used for more extensive subnet matching. To deny a subnet or IP address, change ‘allow’ to ‘deny’. With some expertise, you can create blacklists and whitelists, and even integrate them with Fail2Ban. The possibilities are nearly limitless.
Another approach is to disable specific rules that trigger false positives instead of whitelisting the entire path. This method requires more time and testing. For example, if rules 941000 and 942999 in your /admin/ area consistently trigger false bans and blocks for your team, find the rule ID in your ModSecurity logs and disable only that ID using RemoveByID:
SecRule REQUEST_FILENAME "@beginsWith /admin" "id:1004,phase:1,pass,nolog,ctl:ruleRemoveById=941000-942999"Regarding false positives with Apache, ModSecurity, and OWASP, monitoring logs and identifying patterns that could indicate false positives is essential. Once identified, you can create custom rules to address them. For instance, if you find specific rules that consistently trigger false positives, you can create an exclusion rule for those specific cases.
Set Up Log Rotation for ModSecurity on Ubuntu
ModSecurity logs can grow rapidly, so setting up log rotation is essential to manage them efficiently. Log rotation isn’t configured by default, so you’ll need to create a log rotation file for ModSecurity.
First, create and open a new ModSecurity rotation file named modsec:
sudo nano /etc/logrotate.d/modsecAdd the following code to the file:
/var/log/modsec_audit.log
{
        rotate 31
        daily
        missingok
        compress
        delaycompress
        notifempty
}
This configuration will keep logs for 31 days. If you prefer to store logs for a shorter period, change the 31 to your desired number of days (e.g., 7 for a week’s worth of logs). Rotating ModSecurity logs daily is recommended, as reviewing large log files spanning an entire week can be pretty challenging.
By setting up log rotation, you can effectively manage your ModSecurity logs, ensuring that older logs are compressed and eventually removed, making it easier to analyze and troubleshoot any issues that may arise.
Conclusion
We’ve walked through the process of installing ModSecurity OWASP CRS with Apache on Ubuntu Linux LTS releases, equipping your server with a solid defense against web threats. Remember, staying updated with the latest rule sets is key to maintaining robust security. Tweak the settings to suit your server’s needs, and don’t hesitate to dive deeper into the logs to understand and improve your defenses. It’s all about keeping your digital fort secure while letting the good traffic in. Stay safe and savvy out there!